公告
#376 内核模块 » linux源码解读(三十二):dpdk原理概述(一) » 2022-10-12 11:49:54
- batsom
- 回复: 0
1、操作系统、计算机网络诞生已经几十年了,部分功能不再能满足现在的业务需求。如果对操作系统做更改,成本非常高,所以部分问题是在应用层想办法解决的,比如前面介绍的协程、quic等,都是在应用层重新开发的框架,简单回顾如下:
协程:server多线程通信时,如果每连接一个客户端就要生成一个线程去处理,对server硬件资源消耗极大!为了解决多线程以及互相切换带来的性能损耗,应用层发明了协程框架:单线程人为控制跳转到不同的代码块执行,避免了cpu浪费、线程锁/切换等一系列耗时的问题!
quic协议:tcp协议已经深度嵌入了操作系统,更改起来难度很大,所以同样也是在应用层基于udp协议实现了tls、拥塞控制等,彻底让协议和操作系统松耦合!
除了上述问题,操作还有另一个比较严重的问题:基于os内核的网络数据IO!传统做网络开发时,接收和发送数据用的是操作系统提供的receive和send函数,用户配置一下网络参数、传入应用层的数据即可!操作系统由于集成了协议栈,会在用户传输的应用层数据前面加上协议不同层级的包头,然后通过网卡发送数据;接收到的数据处理方式类似,按照协议类型一层一层拨开,直到获取到应用层的数据!整个流程大致如下:
网卡接受数据----->发出硬件中断通知cpu来取数据----->os把数据复制到内存并启动内核线程
--->软件中断--->内核线程在协议栈中处理包--->处理完毕通知用户层
大家有没有觉得这个链条忒长啊?这么长的处理流程带来的问题:
“中间商”多,整个流程耗时;数据进入下一个环节时容易cache miss
同一份数据在内存不同的地方存储(缓存内存、内核内存、用户空间的内存),浪费内存
网卡通过中断通知cpu,每次硬中断大约消耗100微秒,这还不算因为终止上下文所带来的Cache Miss(L1、L2、TLB等cpu的cache可能都会更新)
用户到内核态的上下文切换耗时
数据在内核态用户态之间切换拷贝带来大量CPU消耗,全局锁竞争
内核工作在多核上,为保障全局一致,即使采用Lock Free,也避免不了锁总线、内存屏障带来的性能损耗
这一系列的问题都是内核处理网卡接收到的数据导致的。大胆一点想象:如果不让内核处理网卡数据了?能不能避免上述各个环节的损耗了?能不能让3环的应用直接控制网卡收发数据了?
2、如果真的通过3环应用层直接读写网卡,面临的问题:
用户空间的内存要映射到网卡,才能直接读写网卡
驱动要运行在用户空间
(1)这两个问题是怎么解决的了?这一切都得益于linux提供的UIO机制! UIO 能够拦截中断,并重设中断回调行为(相当于hook了,这个功能还是要在内核实现的,因为硬件中断只能在内核处理),从而绕过内核协议栈后续的处理流程。这里借用别人的一张图:
UIO 设备的实现机制其实是对用户空间暴露文件接口,比如当注册一个 UIO 设备 uioX,就会出现文件 /dev/uioX(用于读取中断,底层还是要在内核处理,因为硬件中断只能发生在内核),对该文件的读写就是对设备内存的读写(通过mmap实现)。除此之外,对设备的控制还可以通过 /sys/class/uio 下的各个文件的读写来完成。所以UIO的本质:
让用户空间的程序拦截内核的中断,更改中断的handler处理函数,让用户空间的程序第一时间拿到刚从网卡接收到的“一手、热乎”数据,减少内核的数据处理流程!由于应用程序拿到的是网络链路层(也就是第二层)的数据,这就需要应用程序自己按照协议解析数据了!说个额外的:这个功能可以用来抓包!
简化后的示意图如下:原本网卡是由操作系统内核接管的,现在直接由3环的dpdk应用控制了!
这就是dpdk的第一个优点;除了这个,还有以下几个:
(2)Huge Page 大页:传统页面大小是4Kb,如果进程要使用64G内存,则64G/4KB=16000000(一千六百万)页,所有在页表项中占用16000000 * 4B=62MB;但是TLB缓存的空间是有限的,不可能存储这么多页面的地址映射关系,所以可能导致TLB miss;如果改成2MB的huge Page,所需页面减少到64G/2MB=2000个。在TLB容量有限的情况下尽可能地多在TLB存放地址映射,极大减少了TLB miss!下图是采用不同大小页面时TLB能覆盖的内存对比!
(3)mempool 内存池:任何网络协议都要处理报文,这些报文肯定是存放在内存的!申请和释放内存就需要调用malloc和free函数了!这两个是系统调用,涉及到上下文切换;同时还要用buddy或slab算法查找空闲内存块,效率较低!dpdk 在用户空间实现了一套精巧的内存池技术,内核空间和用户空间的内存交互不进行拷贝,只做控制权转移。当收发数据包时,就减少了内存拷贝的开销!
(4)Ring 无锁环:多线程/多进程之间互斥,传统的方式就是上锁!但是dpdk基于 Linux 内核的无锁环形缓冲 kfifo 实现了自己的一套无锁机制,支持多消费者或单消费者出队、多生产者或单生产者入队;
(5)PMD poll-mode网卡驱动:网络IO监听有两种方式,分别是
事件驱动,比如epoll:这种方式进程让出cpu后等数据;一旦有了数据,网卡通过中断通知操作系统,然后唤醒进程继续执行!这种方式适合于接收的数据量不大,但实时性要求高的场景;
轮询,比如poll:本质就是用死循环不停的检查内存有没有数据到来!这种方式适合于接收大块数据,实时性要求不高的场景;
总的来说说:中断是外界强加给的信号,必须被动应对,而轮询则是应用程序主动地处理事情。前者最大的影响就是打断系统当前工作的连续性,而后者则不会,事务的安排自在掌握!
dpdk采用第二种轮询方式:直接用死循环不停的地检查网卡内存,带来了零拷贝、无系统调用的好处,同时避免了网卡硬件中断带来的上下文切换(理论上会消耗300个时钟周期)、cache miss、硬中断执行等损耗!
(6)NUMA:dpdk 内存分配上通过 proc 提供的内存信息,使 CPU 核心尽量使用靠近其所在节点的内存,避免了跨 NUMA 节点远程访问内存的性能问题;其软件架构去中心化,尽量避免全局共享,带来全局竞争,失去横向扩展的能力
(7)CPU 亲和性: dpdk 利用 CPU 的亲和性将一个线程或多个线程绑定到一个或多个 CPU 上,这样在线程执行过程中,就不会被随意调度,一方面减少了线程间的频繁切换带来的开销,另一方面避免了 CPU L1、L2、TLB等缓存的局部失效性,增加了 CPU cache的命中率。
3、一个简单的数据接收demo,主要是对网络中的数据进行一层一层解包:
int main(int argc, char *argv[])
{

    // 初始化环境,检查内存、CPU相关的设置,主要是巨页、端口的设置
    if (rte_eal_init(argc, argv) < 0)
    {

        rte_exit(EXIT_FAILURE, "Error with EAL init\n");
    }

    // 内存池初始化,发送和接收的数据都在内存池里
    struct rte_mempool *mbuf_pool = rte_pktmbuf_pool_create(
        "mbuf pool", NUM_MBUFS, 0, 0, RTE_MBUF_DEFAULT_BUF_SIZE, rte_socket_id());
    if (NULL == mbuf_pool)
    {

        rte_exit(EXIT_FAILURE, "Could not create mbuf pool\n");
    }

    // 启动dpdk
    ng_init_port(mbuf_pool);

    while (1)
    {

        // 接收数据
        struct rte_mbuf *mbufs[BURST_SIZE];
        unsigned num_recvd = rte_eth_rx_burst(gDpdkPortId, 0, mbufs, BURST_SIZE);
        if (num_recvd > BURST_SIZE)
        {

            // 溢出
            rte_exit(EXIT_FAILURE, "Error receiving from eth\n");
        }

        // 对mbuf中的数据进行处理
        unsigned i = 0;
        for (i = 0; i < num_recvd; i++)
        {

            // 得到以太网中的数据
            struct rte_ether_hdr *ehdr = rte_pktmbuf_mtod(mbufs[i], struct rte_ether_hdr *);
            // 如果不是ip协议
            if (ehdr->ether_type != rte_cpu_to_be_16(RTE_ETHER_TYPE_IPV4))
            {

                continue;
            }
            struct rte_ipv4_hdr *iphdr =
                rte_pktmbuf_mtod_offset(mbufs[i], struct rte_ipv4_hdr *, sizeof(struct rte_ether_hdr));

            // 接收udp的数据帧
            if (iphdr->next_proto_id == IPPROTO_UDP)
            {

                struct rte_udp_hdr *udphdr = (struct rte_udp_hdr *)(iphdr + 1);

                uint16_t length = ntohs(udphdr->dgram_len);
                // udp data copy to buff
                uint16_t udp_data_len = length - sizeof(struct rte_udp_hdr) + 1;
                char buff[udp_data_len];
                memset(buff, 0, udp_data_len);
                --udp_data_len;
                memcpy(buff, (udphdr + 1), udp_data_len);

                //源地址
                struct in_addr addr;
                addr.s_addr = iphdr->src_addr;
                printf("src: %s:%d, ", inet_ntoa(addr), ntohs(udphdr->src_port));

                //目的地址+数据长度+数据内容
                addr.s_addr = iphdr->dst_addr;
                printf("dst: %s:%d, %s\n",
                       inet_ntoa(addr), ntohs(udphdr->dst_port), buff);

                // 用完放回内存池
                rte_pktmbuf_free(mbufs[i]);
            }
        }
    }
}
参考:
1、https://cloud.tencent.com/developer/article/1198333 一文看懂dpdk
2、https://www.cnblogs.com/bakari/p/8404650.html dpdk全面分析
3、https://www.bilibili.com/video/BV1VR4y1W7zy?spm_id_from=333.337.search-card.all.click dpdk原理
4、https://lwn.net/Articles/232575/ uio机制
5、https://chowdera.com/2021/12/202112162035343569.html dpdk示例
6、https://cloud.tencent.com/developer/article/1736535 dpdk内存池
#377 内核模块 » linux源码解读(三十一):quic核心源码分析(二) » 2022-10-12 11:46:43
- batsom
- 回复: 0
quic协议最早是google提出来的,所以狗家的源码肯定是最“正宗”的!google把quic协议的源码放在了chromium里面,所以要看quic的源码原则上需要下载chromium源码!但是这份源码体积很大,并且还需要FQ,所以多年前就有好心人把quic源码剥离出来单独放github了,在文章末尾的参考2处;
1、quic相比tcp实现的tls,前面省略了3~4个RTT,根因就是发起连接请求时就发送自己的公钥给对方,让对方利用自己的公钥计算后续对称加密的key,这就是所谓的handshake;在libquic-master\src\net\quic\core\quic_crypto_client_stream.cc中有具体实现握手的代码,先看DoHandshakeLoop函数:
void QuicCryptoClientStream::DoHandshakeLoop(const CryptoHandshakeMessage* in) {
  QuicCryptoClientConfig::CachedState* cached =
      crypto_config_->LookupOrCreate(server_id_);

  QuicAsyncStatus rv = QUIC_SUCCESS;
  do {
    CHECK_NE(STATE_NONE, next_state_);
    const State state = next_state_;
    next_state_ = STATE_IDLE;
    rv = QUIC_SUCCESS;
    switch (state) {
      case STATE_INITIALIZE:
        DoInitialize(cached);
        break;
      case STATE_SEND_CHLO:
        DoSendCHLO(cached);
        return;  // return waiting to hear from server.
      case STATE_RECV_REJ:
        DoReceiveREJ(in, cached);
        break;
      case STATE_VERIFY_PROOF:
        rv = DoVerifyProof(cached);
        break;
      case STATE_VERIFY_PROOF_COMPLETE:
        DoVerifyProofComplete(cached);
        break;
      case STATE_GET_CHANNEL_ID:
        rv = DoGetChannelID(cached);
        break;
      case STATE_GET_CHANNEL_ID_COMPLETE:
        DoGetChannelIDComplete();
        break;
      case STATE_RECV_SHLO:
        DoReceiveSHLO(in, cached);
        break;
      case STATE_IDLE:
        // This means that the peer sent us a message that we weren't expecting.
        CloseConnectionWithDetails(QUIC_INVALID_CRYPTO_MESSAGE_TYPE,
                                   "Handshake in idle state");
        return;
      case STATE_INITIALIZE_SCUP:
        DoInitializeServerConfigUpdate(cached);
        break;
      case STATE_NONE:
        NOTREACHED();
        return;  // We are done.
    }
  } while (rv != QUIC_PENDING && next_state_ != STATE_NONE);
}
只要quic的状态不是pending,并且下一个状态不是NONE,就根据不同的状态调用不同的处理函数!具体发送handshake小的函数是DoSendCHLO,代码如下:
/*发送client hello消息*/
void QuicCryptoClientStream::DoSendCHLO(
    QuicCryptoClientConfig::CachedState* cached) {
  if (stateless_reject_received_) {//如果收到了server拒绝的消息
    // If we've gotten to this point, we've sent at least one hello
    // and received a stateless reject in response.  We cannot
    // continue to send hellos because the server has abandoned state
    // for this connection.  Abandon further handshakes.
    next_state_ = STATE_NONE;
    if (session()->connection()->connected()) {
      session()->connection()->CloseConnection(//关闭连接
          QUIC_CRYPTO_HANDSHAKE_STATELESS_REJECT, "stateless reject received",
          ConnectionCloseBehavior::SILENT_CLOSE);
    }
    return;
  }

  // Send the client hello in plaintext.
  //注意:这是client hello消息,没必要加密
  session()->connection()->SetDefaultEncryptionLevel(ENCRYPTION_NONE);
  encryption_established_ = false;
  if (num_client_hellos_ > kMaxClientHellos) {//握手消息已经发送了很多,不能再发了
    CloseConnectionWithDetails(
        QUIC_CRYPTO_TOO_MANY_REJECTS,
        base::StringPrintf("More than %u rejects", kMaxClientHellos).c_str());
    return;
  }
  num_client_hellos_++;
  //开始构造握手消息了
  CryptoHandshakeMessage out;
  DCHECK(session() != nullptr);
  DCHECK(session()->config() != nullptr);
  // Send all the options, regardless of whether we're sending an
  // inchoate or subsequent hello.
  /*填充握手消息的各个字段*/
  session()->config()->ToHandshakeMessage(&out);

  // Send a local timestamp to the server.
  out.SetValue(kCTIM,
               session()->connection()->clock()->WallNow().ToUNIXSeconds());

  if (!cached->IsComplete(session()->connection()->clock()->WallNow())) {
    crypto_config_->FillInchoateClientHello(
        server_id_, session()->connection()->supported_versions().front(),
        cached, session()->connection()->random_generator(),
        /* demand_x509_proof= */ true, &crypto_negotiated_params_, &out);
    // Pad the inchoate client hello to fill up a packet.
    const QuicByteCount kFramingOverhead = 50;  // A rough estimate.
    const QuicByteCount max_packet_size =
        session()->connection()->max_packet_length();
    if (max_packet_size <= kFramingOverhead) {
      DLOG(DFATAL) << "max_packet_length (" << max_packet_size
                   << ") has no room for framing overhead.";
      CloseConnectionWithDetails(QUIC_INTERNAL_ERROR,
                                 "max_packet_size too smalll");
      return;
    }
    if (kClientHelloMinimumSize > max_packet_size - kFramingOverhead) {
      DLOG(DFATAL) << "Client hello won't fit in a single packet.";
      CloseConnectionWithDetails(QUIC_INTERNAL_ERROR, "CHLO too large");
      return;
    }
    // TODO(rch): Remove this when we remove:
    // FLAGS_quic_use_chlo_packet_size
    out.set_minimum_size(
        static_cast<size_t>(max_packet_size - kFramingOverhead));
    next_state_ = STATE_RECV_REJ;
    /*做hash签名,接收方会根据hash验证消息是否完整*/
    CryptoUtils::HashHandshakeMessage(out, &chlo_hash_);
    //发送消息
    SendHandshakeMessage(out);
    return;
  }

  // If the server nonce is empty, copy over the server nonce from a previous
  // SREJ, if there is one.
  if (FLAGS_enable_quic_stateless_reject_support &&
      crypto_negotiated_params_.server_nonce.empty() &&
      cached->has_server_nonce()) {
    crypto_negotiated_params_.server_nonce = cached->GetNextServerNonce();
    DCHECK(!crypto_negotiated_params_.server_nonce.empty());
  }

  string error_details;
  /*继续填充client hello消息*/
  QuicErrorCode error = crypto_config_->FillClientHello(
      server_id_, session()->connection()->connection_id(),
      session()->connection()->version(),
      session()->connection()->supported_versions().front(), cached,
      session()->connection()->clock()->WallNow(),
      //这个随机数会被server用来计算生成对称加密的key
      session()->connection()->random_generator(),
      channel_id_key_.get(),
      //保存了nonce、key、token相关信息;后续对称加密的方法是CTR,需要NONCE值
      &crypto_negotiated_params_,
      &out, &error_details);
  if (error != QUIC_NO_ERROR) {
    // Flush the cached config so that, if it's bad, the server has a
    // chance to send us another in the future.
    cached->InvalidateServerConfig();
    CloseConnectionWithDetails(error, error_details);
    return;
  }
  /*继续对消息做hash,便于server验证收到的消息是否完整*/
  CryptoUtils::HashHandshakeMessage(out, &chlo_hash_);
  channel_id_sent_ = (channel_id_key_.get() != nullptr);
  if (cached->proof_verify_details()) {
    proof_handler_->OnProofVerifyDetailsAvailable(
        *cached->proof_verify_details());
  }
  next_state_ = STATE_RECV_SHLO;
  SendHandshakeMessage(out);
  // Be prepared to decrypt with the new server write key.
  session()->connection()->SetAlternativeDecrypter(
      ENCRYPTION_INITIAL,
      crypto_negotiated_params_.initial_crypters.decrypter.release(),
      true /* latch once used */);
  // Send subsequent packets under encryption on the assumption that the
  // server will accept the handshake.
  session()->connection()->SetEncrypter(
      ENCRYPTION_INITIAL,
      crypto_negotiated_params_.initial_crypters.encrypter.release());
  session()->connection()->SetDefaultEncryptionLevel(ENCRYPTION_INITIAL);

  // TODO(ianswett): Merge ENCRYPTION_REESTABLISHED and
  // ENCRYPTION_FIRST_ESTABLSIHED
  encryption_established_ = true;
  session()->OnCryptoHandshakeEvent(QuicSession::ENCRYPTION_REESTABLISHED);
}
个人觉得最核心的代码就是FillClientHello函数了,这里会生成随机数,后续server会利用这个随机数生成对称加密的key!部分通信的参数也会通过这个函数的执行保存在crypto_negotiated_params_对象中!client发送了hello包,接下来该server处理这个包了,代码在libquic-master\src\net\quic\core\quic_crypto_server_stream.cc和quic_crypto_server_config.cc中,代码如下:核心功能是生成自己的公钥,还有后续对称加密的key!
QuicErrorCode QuicCryptoServerConfig::ProcessClientHello(
const ValidateClientHelloResultCallback::Result& validate_chlo_result,
bool reject_only,
QuicConnectionId connection_id,
const IPAddress& server_ip,
const IPEndPoint& client_address,
QuicVersion version,
const QuicVersionVector& supported_versions,
bool use_stateless_rejects,
QuicConnectionId server_designated_connection_id,
const QuicClock* clock,
QuicRandom* rand,//发送给client用于计算对称key
QuicCompressedCertsCache* compressed_certs_cache,
QuicCryptoNegotiatedParameters* params,
QuicCryptoProof* crypto_proof,
QuicByteCount total_framing_overhead,
QuicByteCount chlo_packet_size,
CryptoHandshakeMessage* out,
DiversificationNonce* out_diversification_nonce,
string* error_details) const {
DCHECK(error_details);
const CryptoHandshakeMessage& client_hello =
validate_chlo_result.client_hello;
const ClientHelloInfo& info = validate_chlo_result.info;
QuicErrorCode valid = CryptoUtils::ValidateClientHello(
client_hello, version, supported_versions, error_details);
if (valid != QUIC_NO_ERROR)
return valid;
StringPiece requested_scid;
client_hello.GetStringPiece(kSCID, &requested_scid);
const QuicWallTime now(clock->WallNow());
scoped_refptr<Config> requested_config;
scoped_refptr<Config> primary_config;
{
base::AutoLock locked(configs_lock_);
if (!primary_config_.get()) {
*error_details = "No configurations loaded";
return QUIC_CRYPTO_INTERNAL_ERROR;
}
if (!next_config_promotion_time_.IsZero() &&
next_config_promotion_time_.IsAfter(now)) {
SelectNewPrimaryConfig(now);
DCHECK(primary_config_.get());
DCHECK_EQ(configs_.find(primary_config_->id)->second, primary_config_);
}
// Use the config that the client requested in order to do key-agreement.
// Otherwise give it a copy of |primary_config_| to use.
primary_config = crypto_proof->config;
requested_config = GetConfigWithScid(requested_scid);
}
if (validate_chlo_result.error_code != QUIC_NO_ERROR) {
*error_details = validate_chlo_result.error_details;
return validate_chlo_result.error_code;
}
out->Clear();
if (!ClientDemandsX509Proof(client_hello)) {
*error_details = "Missing or invalid PDMD";
return QUIC_UNSUPPORTED_PROOF_DEMAND;
}
DCHECK(proof_source_.get());
string chlo_hash;
CryptoUtils::HashHandshakeMessage(client_hello, &chlo_hash);
// No need to get a new proof if one was already generated.
if (!crypto_proof->chain &&
!proof_source_->GetProof(server_ip, info.sni.as_string(),
primary_config->serialized, version, chlo_hash,
&crypto_proof->chain, &crypto_proof->signature,
&crypto_proof->cert_sct)) {
return QUIC_HANDSHAKE_FAILED;
}
StringPiece cert_sct;
if (client_hello.GetStringPiece(kCertificateSCTTag, &cert_sct) &&
cert_sct.empty()) {
params->sct_supported_by_client = true;
}
if (!info.reject_reasons.empty() || !requested_config.get()) {
BuildRejection(version, clock->WallNow(), *primary_config, client_hello,
info, validate_chlo_result.cached_network_params,
use_stateless_rejects, server_designated_connection_id, rand,
compressed_certs_cache, params, *crypto_proof,
total_framing_overhead, chlo_packet_size, out);
return QUIC_NO_ERROR;
}
if (reject_only) {
return QUIC_NO_ERROR;
}
const QuicTag* their_aeads;
const QuicTag* their_key_exchanges;
size_t num_their_aeads, num_their_key_exchanges;
if (client_hello.GetTaglist(kAEAD, &their_aeads, &num_their_aeads) !=
QUIC_NO_ERROR ||
client_hello.GetTaglist(kKEXS, &their_key_exchanges,
&num_their_key_exchanges) != QUIC_NO_ERROR ||
num_their_aeads != 1 || num_their_key_exchanges != 1) {
*error_details = "Missing or invalid AEAD or KEXS";
return QUIC_INVALID_CRYPTO_MESSAGE_PARAMETER;
}
size_t key_exchange_index;
if (!QuicUtils::FindMutualTag(requested_config->aead, their_aeads,
num_their_aeads, QuicUtils::LOCAL_PRIORITY,
¶ms->aead, nullptr) ||
!QuicUtils::FindMutualTag(requested_config->kexs, their_key_exchanges,
num_their_key_exchanges,
QuicUtils::LOCAL_PRIORITY,
¶ms->key_exchange, &key_exchange_index)) {
*error_details = "Unsupported AEAD or KEXS";
return QUIC_CRYPTO_NO_SUPPORT;
}
if (!requested_config->tb_key_params.empty()) {
const QuicTag* their_tbkps;
size_t num_their_tbkps;
switch (client_hello.GetTaglist(kTBKP, &their_tbkps, &num_their_tbkps)) {
case QUIC_CRYPTO_MESSAGE_PARAMETER_NOT_FOUND:
break;
case QUIC_NO_ERROR:
if (QuicUtils::FindMutualTag(
requested_config->tb_key_params, their_tbkps, num_their_tbkps,
QuicUtils::LOCAL_PRIORITY, ¶ms->token_binding_key_param,
nullptr)) {
break;
}
default:
*error_details = "Invalid Token Binding key parameter";
return QUIC_INVALID_CRYPTO_MESSAGE_PARAMETER;
}
}
StringPiece public_value;
/*提取client hello数据包发送的公钥,server要用来生成对称加密的key*/
if (!client_hello.GetStringPiece(kPUBS, &public_value)) {
*error_details = "Missing public value";
return QUIC_INVALID_CRYPTO_MESSAGE_PARAMETER;
}
const KeyExchange* key_exchange =
requested_config->key_exchanges[key_exchange_index];
if (!key_exchange->CalculateSharedKey(public_value,
¶ms->initial_premaster_secret)) {
*error_details = "Invalid public value";
return QUIC_INVALID_CRYPTO_MESSAGE_PARAMETER;
}
if (!info.sni.empty()) {
std::unique_ptr<char[]> sni_tmp(new char[info.sni.length() + 1]);
memcpy(sni_tmp.get(), info.sni.data(), info.sni.length());
sni_tmp[info.sni.length()] = 0;
params->sni = CryptoUtils::NormalizeHostname(sni_tmp.get());
}
string hkdf_suffix;
//client hello消息序列化,便于提取?
const QuicData& client_hello_serialized = client_hello.GetSerialized();
/*根据一个原始密钥材料,用hkdf算法推导出指定长度的密钥;
这里明显是要根据client hello的数据生成对称加密的密钥了
*/
hkdf_suffix.reserve(sizeof(connection_id) + client_hello_serialized.length() +
requested_config->serialized.size());
hkdf_suffix.append(reinterpret_cast<char*>(&connection_id),
sizeof(connection_id));
hkdf_suffix.append(client_hello_serialized.data(),
client_hello_serialized.length());
hkdf_suffix.append(requested_config->serialized);
DCHECK(proof_source_.get());
if (crypto_proof->chain->certs.empty()) {
*error_details = "Failed to get certs";
return QUIC_CRYPTO_INTERNAL_ERROR;
}
hkdf_suffix.append(crypto_proof->chain->certs.at(0));
StringPiece cetv_ciphertext;
if (requested_config->channel_id_enabled &&
client_hello.GetStringPiece(kCETV, &cetv_ciphertext)) {
CryptoHandshakeMessage client_hello_copy(client_hello);
client_hello_copy.Erase(kCETV);
client_hello_copy.Erase(kPAD);
const QuicData& client_hello_copy_serialized =
client_hello_copy.GetSerialized();
string hkdf_input;
hkdf_input.append(QuicCryptoConfig::kCETVLabel,
strlen(QuicCryptoConfig::kCETVLabel) + 1);
hkdf_input.append(reinterpret_cast<char*>(&connection_id),
sizeof(connection_id));
hkdf_input.append(client_hello_copy_serialized.data(),
client_hello_copy_serialized.length());
hkdf_input.append(requested_config->serialized);
CrypterPair crypters;
if (!CryptoUtils::DeriveKeys(params->initial_premaster_secret, params->aead,
info.client_nonce, info.server_nonce,
hkdf_input, Perspective::IS_SERVER,
CryptoUtils::Diversification::Never(),
&crypters, nullptr /* subkey secret */)) {
*error_details = "Symmetric key setup failed";
return QUIC_CRYPTO_SYMMETRIC_KEY_SETUP_FAILED;
}
char plaintext[kMaxPacketSize];
size_t plaintext_length = 0;
const bool success = crypters.decrypter->DecryptPacket(
kDefaultPathId, 0 /* packet number */,
StringPiece() /* associated data */, cetv_ciphertext, plaintext,
&plaintext_length, kMaxPacketSize);
if (!success) {
*error_details = "CETV decryption failure";
return QUIC_INVALID_CRYPTO_MESSAGE_PARAMETER;
}
std::unique_ptr<CryptoHandshakeMessage> cetv(
CryptoFramer::ParseMessage(StringPiece(plaintext, plaintext_length)));
if (!cetv.get()) {
*error_details = "CETV parse error";
return QUIC_INVALID_CRYPTO_MESSAGE_PARAMETER;
}
StringPiece key, signature;
if (cetv->GetStringPiece(kCIDK, &key) &&
cetv->GetStringPiece(kCIDS, &signature)) {
if (!ChannelIDVerifier::Verify(key, hkdf_input, signature)) {
*error_details = "ChannelID signature failure";
return QUIC_INVALID_CRYPTO_MESSAGE_PARAMETER;
}
params->channel_id = key.as_string();
}
}
string hkdf_input;
size_t label_len = strlen(QuicCryptoConfig::kInitialLabel) + 1;
hkdf_input.reserve(label_len + hkdf_suffix.size());
hkdf_input.append(QuicCryptoConfig::kInitialLabel, label_len);
hkdf_input.append(hkdf_suffix);
string* subkey_secret = ¶ms->initial_subkey_secret;
CryptoUtils::Diversification diversification =
CryptoUtils::Diversification::Never();
if (version > QUIC_VERSION_32) {
rand->RandBytes(out_diversification_nonce->data(),
out_diversification_nonce->size());
diversification =
CryptoUtils::Diversification::Now(out_diversification_nonce);
}
if (!CryptoUtils::DeriveKeys(params->initial_premaster_secret, params->aead,
info.client_nonce, info.server_nonce, hkdf_input,
Perspective::IS_SERVER, diversification,
¶ms->initial_crypters, subkey_secret)) {
*error_details = "Symmetric key setup failed";
return QUIC_CRYPTO_SYMMETRIC_KEY_SETUP_FAILED;
}
string forward_secure_public_value;
if (ephemeral_key_source_.get()) {
params->forward_secure_premaster_secret =
ephemeral_key_source_->CalculateForwardSecureKey(
key_exchange, rand, clock->ApproximateNow(), public_value,
&forward_secure_public_value);
} else {
std::unique_ptr<KeyExchange> forward_secure_key_exchange(
key_exchange->NewKeyPair(rand));
forward_secure_public_value =
forward_secure_key_exchange->public_value().as_string();
/*生成共享密钥*/
if (!forward_secure_key_exchange->CalculateSharedKey(
public_value, ¶ms->forward_secure_premaster_secret)) {
*error_details = "Invalid public value";
return QUIC_INVALID_CRYPTO_MESSAGE_PARAMETER;
}
}
string forward_secure_hkdf_input;
label_len = strlen(QuicCryptoConfig::kForwardSecureLabel) + 1;
forward_secure_hkdf_input.reserve(label_len + hkdf_suffix.size());
forward_secure_hkdf_input.append(QuicCryptoConfig::kForwardSecureLabel,
label_len);
forward_secure_hkdf_input.append(hkdf_suffix);
string shlo_nonce;
shlo_nonce = NewServerNonce(rand, info.now);
out->SetStringPiece(kServerNonceTag, shlo_nonce);
/*生成密钥*/
if (!CryptoUtils::DeriveKeys(
params->forward_secure_premaster_secret, params->aead,
info.client_nonce,
shlo_nonce.empty() ? info.server_nonce : shlo_nonce,
forward_secure_hkdf_input, Perspective::IS_SERVER,
CryptoUtils::Diversification::Never(),
¶ms->forward_secure_crypters, ¶ms->subkey_secret)) {
*error_details = "Symmetric key setup failed";
return QUIC_CRYPTO_SYMMETRIC_KEY_SETUP_FAILED;
}
out->set_tag(kSHLO);
QuicTagVector supported_version_tags;
for (size_t i = 0; i < supported_versions.size(); ++i) {
supported_version_tags.push_back(
QuicVersionToQuicTag(supported_versions[i]));
}
out->SetVector(kVER, supported_version_tags);
out->SetStringPiece(
kSourceAddressTokenTag,
NewSourceAddressToken(*requested_config.get(), info.source_address_tokens,
client_address.address(), rand, info.now, nullptr));
QuicSocketAddressCoder address_coder(client_address);
out->SetStringPiece(kCADR, address_coder.Encode());
/*server hello包中设置server的公钥,后续client会利用这个生成对称加密的key*/
out->SetStringPiece(kPUBS, forward_secure_public_value);
return QUIC_NO_ERROR;
}这里用了不同的方法来生成对称加密的key。这里以椭圆曲线为例,计算对称加密key的代码如下:这是直接调用了openssl/curve25519.h的接口计算出来的。一旦双方都生成了对称密钥,后续就可以通过对称加密通信了!
bool Curve25519KeyExchange::CalculateSharedKey(StringPiece peer_public_value,
                                               string* out_result) const {
  if (peer_public_value.size() != crypto::curve25519::kBytes) {
    return false;
  }

  uint8_t result[crypto::curve25519::kBytes];
  if (!crypto::curve25519::ScalarMult(
          private_key_,
          reinterpret_cast<const uint8_t*>(peer_public_value.data()), result)) {
    return false;
  }
  out_result->assign(reinterpret_cast<char*>(result), sizeof(result));

  return true;
}
bool ScalarMult(const uint8_t* private_key,
                const uint8_t* peer_public_key,
                uint8_t* shared_key) {
  return !!X25519(shared_key, private_key, peer_public_key);
}
通信时给packet加密的方法:
bool AeadBaseEncrypter::EncryptPacket(QuicPathId path_id,
                                      QuicPacketNumber packet_number,
                                      StringPiece associated_data,
                                      StringPiece plaintext,
                                      char* output,
                                      size_t* output_length,
                                      size_t max_output_length) {
  size_t ciphertext_size = GetCiphertextSize(plaintext.length());
  if (max_output_length < ciphertext_size) {
    return false;
  }
  // TODO(ianswett): Introduce a check to ensure that we don't encrypt with the
  // same packet number twice.
  const size_t nonce_size = nonce_prefix_size_ + sizeof(packet_number);
  ALIGNAS(4) char nonce_buffer[kMaxNonceSize];
  memcpy(nonce_buffer, nonce_prefix_, nonce_prefix_size_);
  uint64_t path_id_packet_number =
      QuicUtils::PackPathIdAndPacketNumber(path_id, packet_number);
  memcpy(nonce_buffer + nonce_prefix_size_, &path_id_packet_number,
         sizeof(path_id_packet_number));
  /*这里用nonce给明文加密*/
  if (!Encrypt(StringPiece(nonce_buffer, nonce_size), associated_data,
               plaintext, reinterpret_cast<unsigned char*>(output))) {
    return false;
  }
  *output_length = ciphertext_size;
  return true;
}
最后,server hello消息是从这里发出去的,并且在某些情况下server hello已经用server新生成的key加密了,如下:
void QuicCryptoServerStream::FinishProcessingHandshakeMessage(
    const ValidateClientHelloResultCallback::Result& result,
    std::unique_ptr<ProofSource::Details> details) {
  const CryptoHandshakeMessage& message = result.client_hello;

  // Clear the callback that got us here.
  DCHECK(validate_client_hello_cb_ != nullptr);
  validate_client_hello_cb_ = nullptr;

  if (use_stateless_rejects_if_peer_supported_) {
    peer_supports_stateless_rejects_ = DoesPeerSupportStatelessRejects(message);
  }

  CryptoHandshakeMessage reply;
  DiversificationNonce diversification_nonce;
  string error_details;
  QuicErrorCode error =
  /*server处理client的hello消息:重点是生成对称加密key、自己的公钥和nonce
   同时生成给client回复的消息*/
      ProcessClientHello(result, std::move(details), &reply,
                         &diversification_nonce, &error_details);

  if (error != QUIC_NO_ERROR) {
    CloseConnectionWithDetails(error, error_details);
    return;
  }

  if (reply.tag() != kSHLO) {
    if (reply.tag() == kSREJ) {
      DCHECK(use_stateless_rejects_if_peer_supported_);
      DCHECK(peer_supports_stateless_rejects_);
      // Before sending the SREJ, cause the connection to save crypto packets
      // so that they can be added to the time wait list manager and
      // retransmitted.
      session()->connection()->EnableSavingCryptoPackets();
    }
    SendHandshakeMessage(reply);//给client发server hello

    if (reply.tag() == kSREJ) {
      DCHECK(use_stateless_rejects_if_peer_supported_);
      DCHECK(peer_supports_stateless_rejects_);
      DCHECK(!handshake_confirmed());
      DVLOG(1) << "Closing connection "
               << session()->connection()->connection_id()
               << " because of a stateless reject.";
      session()->connection()->CloseConnection(
          QUIC_CRYPTO_HANDSHAKE_STATELESS_REJECT, "stateless reject",
          ConnectionCloseBehavior::SILENT_CLOSE);
    }
    return;
  }

  // If we are returning a SHLO then we accepted the handshake.  Now
  // process the negotiated configuration options as part of the
  // session config.
  //代码到这里已经给client发送了client hello,表示server已经准备好接受数据了
  //这里保存一些双方协商好的通信配置
  QuicConfig* config = session()->config();
  OverrideQuicConfigDefaults(config);
  error = config->ProcessPeerHello(message, CLIENT, &error_details);
  if (error != QUIC_NO_ERROR) {
    CloseConnectionWithDetails(error, error_details);
    return;
  }

  session()->OnConfigNegotiated();

  config->ToHandshakeMessage(&reply);

  // Receiving a full CHLO implies the client is prepared to decrypt with
  // the new server write key.  We can start to encrypt with the new server
  // write key. 可以开始用服务端新生成的key解密数据了
  //
  // NOTE: the SHLO will be encrypted with the new server write key.
  /*既然在server已经生成了对称加密的key,这里可以用这个key加密server hello消息*/
  session()->connection()->SetEncrypter(
      ENCRYPTION_INITIAL,
      crypto_negotiated_params_.initial_crypters.encrypter.release());
  session()->connection()->SetDefaultEncryptionLevel(ENCRYPTION_INITIAL);
  // Set the decrypter immediately so that we no longer accept unencrypted
  // packets.
  session()->connection()->SetDecrypter(
      ENCRYPTION_INITIAL,
      crypto_negotiated_params_.initial_crypters.decrypter.release());
  if (version() > QUIC_VERSION_32) {
    session()->connection()->SetDiversificationNonce(diversification_nonce);
  }

  SendHandshakeMessage(reply);//发送server hello

  session()->connection()->SetEncrypter(
      ENCRYPTION_FORWARD_SECURE,
      crypto_negotiated_params_.forward_secure_crypters.encrypter.release());
  session()->connection()->SetDefaultEncryptionLevel(ENCRYPTION_FORWARD_SECURE);

  session()->connection()->SetAlternativeDecrypter(
      ENCRYPTION_FORWARD_SECURE,
      crypto_negotiated_params_.forward_secure_crypters.decrypter.release(),
      false /* don't latch */);

  encryption_established_ = true;
  handshake_confirmed_ = true;
  session()->OnCryptoHandshakeEvent(QuicSession::HANDSHAKE_CONFIRMED);
}
(2)为了防止tcp的队头阻塞,quic在前面丢包的情况下任然继续发包,丢的包用新的packet number重新发,怎么区别这个新包是以往丢包的重发了?核心是每个包都有stream id和stream offset字段,根据这两个字段定位包的位置,而不是packet number。整个包结构定义的类在这里:
struct NET_EXPORT_PRIVATE QuicStreamFrame {
  QuicStreamFrame();
  QuicStreamFrame(QuicStreamId stream_id,
                  bool fin,
                  QuicStreamOffset offset,
                  base::StringPiece data);
  QuicStreamFrame(QuicStreamId stream_id,
                  bool fin,
                  QuicStreamOffset offset,
                  QuicPacketLength data_length,
                  UniqueStreamBuffer buffer);
  ~QuicStreamFrame();

  NET_EXPORT_PRIVATE friend std::ostream& operator<<(std::ostream& os,
                                                     const QuicStreamFrame& s);

  QuicStreamId stream_id;
  bool fin;
  QuicPacketLength data_length;
  const char* data_buffer;
  QuicStreamOffset offset;  // Location of this data in the stream.
  // nullptr when the QuicStreamFrame is received, and non-null when sent.
  UniqueStreamBuffer buffer;

 private:
  QuicStreamFrame(QuicStreamId stream_id,
                  bool fin,
                  QuicStreamOffset offset,
                  const char* data_buffer,
                  QuicPacketLength data_length,
                  UniqueStreamBuffer buffer);

  DISALLOW_COPY_AND_ASSIGN(QuicStreamFrame);
};
收到后自然要把payload取出来拼接成完整的数据,stream id和stream offset必不可少,拼接和处理的逻辑在这里:里面涉及到很多duplicate冗余去重的动作,都是依据offset来判断的!
QuicErrorCode QuicStreamSequencerBuffer::OnStreamData(
    QuicStreamOffset starting_offset,
    base::StringPiece data,
    QuicTime timestamp,
    size_t* const bytes_buffered,
    std::string* error_details) {
  *bytes_buffered = 0;
  QuicStreamOffset offset = starting_offset;
  size_t size = data.size();
  if (size == 0) {
    *error_details = "Received empty stream frame without FIN.";
    return QUIC_EMPTY_STREAM_FRAME_NO_FIN;
  }

  // Find the first gap not ending before |offset|. This gap maybe the gap to
  // fill if the arriving frame doesn't overlaps with previous ones.
  std::list<Gap>::iterator current_gap = gaps_.begin();
  while (current_gap != gaps_.end() && current_gap->end_offset <= offset) {
    ++current_gap;
  }

  DCHECK(current_gap != gaps_.end());

  // "duplication": might duplicate with data alread filled,but also might
  // overlap across different base::StringPiece objects already written.
  // In both cases, don't write the data,
  // and allow the caller of this method to handle the result.
  if (offset < current_gap->begin_offset &&
      offset + size <= current_gap->begin_offset) {
    DVLOG(1) << "Duplicated data at offset: " << offset << " length: " << size;
    return QUIC_NO_ERROR;
  }
  if (offset < current_gap->begin_offset &&
      offset + size > current_gap->begin_offset) {
    // Beginning of new data overlaps data before current gap.
    *error_details =
        string("Beginning of received data overlaps with buffered data.\n") +
        "New frame range " + RangeDebugString(offset, offset + size) +
        " with first 128 bytes: " +
        string(data.data(), data.length() < 128 ? data.length() : 128) +
        "\nCurrently received frames: " + ReceivedFramesDebugString() +
        "\nCurrent gaps: " + GapsDebugString();
    return QUIC_OVERLAPPING_STREAM_DATA;
  }
  if (offset + size > current_gap->end_offset) {
    // End of new data overlaps with data after current gap.
    *error_details =
        string("End of received data overlaps with buffered data.\n") +
        "New frame range " + RangeDebugString(offset, offset + size) +
        " with first 128 bytes: " +
        string(data.data(), data.length() < 128 ? data.length() : 128) +
        "\nCurrently received frames: " + ReceivedFramesDebugString() +
        "\nCurrent gaps: " + GapsDebugString();
    return QUIC_OVERLAPPING_STREAM_DATA;
  }

  // Write beyond the current range this buffer is covering.
  if (offset + size > total_bytes_read_ + max_buffer_capacity_bytes_) {
    *error_details = "Received data beyond available range.";
    return QUIC_INTERNAL_ERROR;
  }

  if (current_gap->begin_offset != starting_offset &&
      current_gap->end_offset != starting_offset + data.length() &&
      gaps_.size() >= kMaxNumGapsAllowed) {
    // This frame is going to create one more gap which exceeds max number of
    // gaps allowed. Stop processing.
    *error_details = "Too many gaps created for this stream.";
    return QUIC_TOO_MANY_FRAME_GAPS;
  }

  size_t total_written = 0;
  size_t source_remaining = size;
  const char* source = data.data();
  // Write data block by block. If corresponding block has not created yet,
  // create it first.
  // Stop when all data are written or reaches the logical end of the buffer.
  while (source_remaining > 0) {
    const size_t write_block_num = GetBlockIndex(offset);
    const size_t write_block_offset = GetInBlockOffset(offset);
    DCHECK_GT(blocks_count_, write_block_num);

    size_t block_capacity = GetBlockCapacity(write_block_num);
    size_t bytes_avail = block_capacity - write_block_offset;

    // If this write meets the upper boundary of the buffer,
    // reduce the available free bytes.
    if (offset + bytes_avail > total_bytes_read_ + max_buffer_capacity_bytes_) {
      bytes_avail = total_bytes_read_ + max_buffer_capacity_bytes_ - offset;
    }

    if (reduce_sequencer_buffer_memory_life_time_ && blocks_ == nullptr) {
      blocks_.reset(new BufferBlock*[blocks_count_]());
      for (size_t i = 0; i < blocks_count_; ++i) {
        blocks_[i] = nullptr;
      }
    }

    if (blocks_[write_block_num] == nullptr) {
      // TODO(danzh): Investigate if using a freelist would improve performance.
      // Same as RetireBlock().
      blocks_[write_block_num] = new BufferBlock();
    }

    const size_t bytes_to_copy = min<size_t>(bytes_avail, source_remaining);
    char* dest = blocks_[write_block_num]->buffer + write_block_offset;
    DVLOG(1) << "Write at offset: " << offset << " length: " << bytes_to_copy;
    memcpy(dest, source, bytes_to_copy);
    source += bytes_to_copy;
    source_remaining -= bytes_to_copy;
    offset += bytes_to_copy;
    total_written += bytes_to_copy;
  }

  DCHECK_GT(total_written, 0u);
  *bytes_buffered = total_written;
  UpdateGapList(current_gap, starting_offset, total_written);

  frame_arrival_time_map_.insert(
      std::make_pair(starting_offset, FrameInfo(size, timestamp)));
  num_bytes_buffered_ += total_written;
  return QUIC_NO_ERROR;
}
(3)为了精准测量RTT,quic协议的数据包编号都是单调递增的,哪怕是重发的包的编号都是增加的,这部分的控制代码在WritePacket函数里面:函数开头就判断数据包编号。一旦发现编号比最后一次发送包的编号还小,说明出错了,这时就关闭连接退出函数!
bool QuicConnection::WritePacket(SerializedPacket* packet) {
  /*如果数据包号比最后一个发送包的号还小,说明顺序错了,直接关闭连接*/
  if (packet->packet_number <
      sent_packet_manager_->GetLargestSentPacket(packet->path_id)) {
    QUIC_BUG << "Attempt to write packet:" << packet->packet_number << " after:"
             << sent_packet_manager_->GetLargestSentPacket(packet->path_id);
    CloseConnection(QUIC_INTERNAL_ERROR, "Packet written out of order.",
                    ConnectionCloseBehavior::SEND_CONNECTION_CLOSE_PACKET);
    return true;
  }
  /*没有连接、没有加密的包是不能发的*/
  if (ShouldDiscardPacket(*packet)) {
    ++stats_.packets_discarded;
    return true;
  }
  .........................
}
(4)为啥quic协议要基于udp了?应用层现成的协议很复杂,改造的难度大!传输层只有tcp和udp两种协议;tcp的缺点不再赘述,udp的优点就是简单,只提供最原始的发包功能,完全不管对方有没有收到,quic就是利用了udp这种最基础的send package发包能力,在此之上完成了tls(保证数据安全)、拥塞控制(保证链路被塞满)、多路复用(保证数据不丢失)等应用层的功能!
参考:
1、https://www.cnblogs.com/dream397/p/14605040.html quic实现代码分析
2、https://github.com/devsisters/libquic libquic源码
#378 内核模块 » linux源码解读(三十):quic协议分析(一) » 2022-10-12 11:42:19
- batsom
- 回复: 0
1、网络通信时,为了确保数据不丢包,早在几十年前就发明了tcp协议!然而此一时非彼一时,随着技术进步和业务需求增多,tcp也暴露了部分比较明显的缺陷,比如:
建立连接的3次握手延迟大; TLS需要至少需要2个RTT,延迟也大
协议缺陷可能导致syn反射类的DDOS攻击
tcp协议紧耦合到了操作系统,升级需要操作系统层面改动,无法快速、大面积推广升级补丁包
对头阻塞:数据被分成sequence,一旦中间的sequence丢包,后面的sequence也不会处理
中转设备僵化:路由器、交换机等设备“认死理”,比如只认80、443等端口,其他端口一律丢弃
为了解决这些问题,牛逼plus的google早在10年前,也就是2012年发布了基于UDP的quic协议!为啥不基于tcp了,因为tcp有上述5条缺陷的嘛,所以干脆“另起炉灶”重新开搞!
2、正式介绍前,先看一张图:quci在右边,底层用了udp的协议;自生实现了Multistreaming、tls、拥塞控制,然后支撑了上层的http/2,所以我个人理解quic是一个夹在应用层和传输层之间的协议!

上面“数落”了tcp协议的5点不是,quic又是怎么基于udp解决这些问题的了?quic 是基于 UDP 实现的协议,而 UDP 是不可靠的面向报文的协议,这和 TCP 基于 IP 层的实现并没有什么本质上的不同,都是:
底层只负责尽力而为的,以 packet 为单位的传输;
上层协议实现更关键的特性,如可靠,有序,安全等。
(1)由于quic并未改造udp,而是直接使用udp,所以不需要改动现有的操作系统,也兼容了现有的网络中转设备,这些都不需要做任何改动,所以quic部署的改造成本相对较低!但是quic毕竟是新的协议,在哪部署和使用了?只有应用层了!这个和操作系统是解耦的,全靠3环的app自己想办法实现(和之前介绍的协程是不是类似了?)!google已经开源了算法,下载连接见文章末尾的参考5;PS:微软也实现了QUIC协议,名称叫MsQuic,源码在这:https://github.com/microsoft/msquic;
这里多说几句:应用层app能操作的最底层协议就是传输层了。大家在用libc库编写通信代码时可以对指定的ip地址和端口收发数据,没法改自己的mac地址吧?也没法改自己的ip地址吧?这些都是操作系统内核封装的,app的开发人员是不需要、也是没法改变的,所以站在安全防护的角度,部分大厂基于传输层自研了类似quic的通信协议,逆向时需要人工挨个分析协议字段的含义了,现成的fiddler/charles/burpsuit等https/http的抓包工具是无效的,用wireshark这类工具抓包也无法自动解析这些厂家自研的协议!
(2)TCP连接需要3次握手,tls最少需要2次RTT,两个加起来一共要耗费5个RTT,究其原因一方面是 TCP 和 TLS 分层设计导致的:分层的设计需要每个逻辑层次分别建立自己的连接状态。另一方面是 TLS 的握手阶段复杂的密钥协商机制导致的,quic又是怎么改进的了?quic建立握手的步骤如下:
客户端判断本地是否已有服务器的全部配置参数(证书配置信息),如果有则直接跳转到(5),否则继续 。
客户端向服务器发送 inchoate client hello(CHLO) 消息,请求服务器传输配置参数。
服务器收到 CHLO,回复 rejection(REJ) 消息,其中包含服务器的部分配置参数
客户端收到 REJ,提取并存储服务器配置参数,跳回到 (1) 。
客户端向服务器发送 full client hello 消息,开始正式握手,消息中包括客户端选择的公开数。此时客户端根据获取的服务器配置参数和自己选择的公开数,可以计算出初始密钥 K1。
服务器收到 full client hello,如果不同意连接就回复 REJ,同(3);如果同意连接,根据客户端的公开数计算出初始密钥 K1,回复 server hello(SHLO) 消息, SHLO 用初始密钥 K1 加密,并且其中包含服务器选择的一个临时公开数。
客户端收到服务器的回复,如果是 REJ 则情况同(4);如果是 SHLO,则尝试用初始密钥 K1 解密,提取出临时公开数。
客户端和服务器根据临时公开数和初始密钥 K1,各自基于 SHA-256 算法推导出会话密钥 K2。
双方更换为使用会话密钥 K2 通信,初始密钥 K1 此时已无用,QUIC 握手过程完毕。之后会话密钥 K2 更新的流程与以上过程类似,只是数据包中的某些字段略有不同。这里为啥不继续使用key1,而是要重新生成key2来加密了?核心是为了前向安全!万一key1泄漏,之前用key1加密的数据全都被解密。所以为了前向安全,每次通信时会重新生成key2加密!
总的来说:
udp本身就不是面向连接的协议,所以省略了tcp 3次握手连接的耗时;直接通过事先内置的服务器参数发起通信请求;
既然不是面向连接的,怎么确保所有的数据都能到达了?通过stream id和stream offset确保数据包不会丢失,接收方能收到完整的全量数据
第一次用DH算法计算对称加密的密钥需要1个RTT;后续每次都用这个缓存的密钥加密,又省了一个RTT;本质上是把tcp的打招呼、握手,还有tls交换密钥的工作在1个RTT中全做了,这就是相比于tcp实现的tls效率高的根本原因!
注意:通信双方用于密钥交换的DH算法无法防止中间人攻击,所以仅通过密钥交换是无法防止被抓包的,所以还要通过证书等其他方式验证身份!x音就是通过libboringssl.so(google开源的一个openssl分支)SSL_CTX_set_custom_verify函数验证客户端是否是原来的client,而不是抓包软件!
(3)拥塞控制:QUIC 使用可插拔的拥塞控制,相较于 TCP,它能提供更丰富的拥塞控制信息。比如对于每一个包,不管是原始包还是重传包,都带有一个新的序列号(seq),这使得 QUIC 能够区分 ACK 是重传包还是原始包,从而避免了 TCP 重传模糊的问题。QUIC 同时还带有收到数据包与发出 ACK 之间的时延信息。这些信息能够帮助更精确的计算 RTT!同时,因为quic不依赖操作系统,而是在应用层实现,所以开发人员对于quic有非常强的操控能力:完全可以根据不同的业务场景,实现和配置不同的拥塞控制算法以及参数;比如Google 提出的 BBR 拥塞控制算法与 CUBIC 是思路完全不一样的算法,在弱网和一定丢包场景,BBR 比 CUBIC 更不敏感,性能也更好;
(4)队头阻塞:TCP 为了保证可靠性,使用了基于字节序号的 Sequence Number 及 Ack 来确认消息的有序到达;一旦中间某个sequence的包丢失,哪怕是这个sequence后面的数据已经到达接收端,操作系统也不会立即把数据发给上层的应用来接受处理,而是一直等待发送端重新发送丢失的sequence包,举例如下:
应用层可以顺利读取 stream1 中的内容,但由于 stream2 中的第三个 segment 发生了丢包,TCP 为了保证数据的可靠性,需要发送端重传第 3 个 segment 才能通知应用层读取接下去的数据。所以即使 stream3、stream4 的内容已顺利抵达,应用层仍然无法读取,只能等待 stream2 中丢失的包进行重传。在弱网环境下,HTTP2 的队头阻塞问题在用户体验上极为糟糕!quic是怎么既确保数据传输可靠不丢失,又解决队头阻塞的这个问题的了?
对于数据包的传输,肯定是要编号的,否则接受方在拼接这些数据包的时候怎么知道顺序了?quic协议用Packet Number 代替了 TCP 的 Sequence Number,不同之处在于:
每个 Packet Number 都严格递增,也就是说就算 Packet N 丢失了,重传的 Packet N 的 Packet Number 已经不是 N,而是一个比 N 大的值,比如Packet N+M;
数据包支持乱序确认,不再要求 TCP 那样必须有序确认
当数据包 Packet N 丢失后,只要有新的已接收数据包确认,当前窗口就会继续向右滑动。待发送端获知数据包 Packet N 丢失后,会将需要重传的数据包放到待发送队列,重新编号比如数据包 Packet N+M 后重新发送给接收端,对重传数据包的处理跟发送新的数据包类似,这样就不会因为丢包重传将当前窗口阻塞在原地,从而解决了队头阻塞问题;但是问题又来了:怎么确认Package N+M就是重传PackageN的数据包了?这就涉及到quic另一个重要的特性了:多路复用!比如用户访问某个网页,这个页面有两个文件,分别是index.htm和index.js,可以同时、分别传输这两个文件!每个传输的stream都有各自的id,所以可以通过id确认是哪个stream超时丢包了!但包的Packet 编号是N+M,怎么进一步确认就是重传的Packet N包了?这就需要另一个重要的变量了:offset!怎么样,单从英语是不是就能猜到这个变量的作用了?每个数据包都有个offset字段,用于标识在stream id中的偏移!接收方完全可以根据offset来拼接收到的数据包!
总结:quic协议可以在乱序发送的情况下任然可靠不丢失,靠的就是每个数据包的offset字段;再搭配上stream id字段,接收方完全可以在乱序的情况下无误拼接收到的数据包了!
(4)除了以上通过stream id和stream offset确保数据不丢失外,quic还采用了另一个叫向前纠错 (Forward Error Correction,FEC)的校验方式:即每个数据包除了它本身的内容之外,还包括了部分其他数据包的数据,因此少量的丢包可以通过其他包的冗余数据直接组装而无需重传。向前纠错牺牲了每个数据包可以发送数据的上限,但是减少了因为丢包导致的数据重传,因为数据重传将会消耗更多的时间(包括确认数据包丢失、请求重传、等待新数据包等步骤的时间消耗);这个原理和纠删码没有本质区别!
(5)通信双方不论使用何种协议,发送的数据必须事前约定好格式,否则接受方怎么从数据包(本质就是一段字符串)中解析和提取关键的信息了?quic协议的格式如下:
数据包中除了个别报文比如 PUBLIC_RESET 和 CHLO,所有报文头部(上图红色部分)都是经过认证的(哈希散列值),报文 Body (上图绿色部分)都是经过加密的,这样只要对 QUIC 报文任何修改,接收端都能够及时发现;每个字段的含义如下:
Flags:用于表示 Connection ID 长度、Packet Number 长度等信息;
Connection ID:客户端随机选择的最大长度为64位的无符号整数,用于标识连接;如果app更换了ip地址(比如wifi和4G之间切换了),仍然可以通过这个id和服务端在0 RTT下通信!
QUIC Version:QUIC 协议的版本号,32 位的可选字段。如果 Public Flag & FLAG_VERSION != 0,这个字段必填。客户端设置 Public Flag 中的 Bit0 为1,并且填写期望的版本号。如果客户端期望的版本号服务端不支持,服务端设置 Public Flag 中的 Bit0 为1,并且在该字段中列出服务端支持的协议版本(0或者多个),并且该字段后不能有任何报文;
Packet Number:长度取决于 Public Flag 中 Bit4 及 Bit5 两位的值,最大长度 6 字节。发送端在每个普通报文中设置 Packet Number。发送端发送的第一个包的序列号是 1,随后的数据包中的序列号的都大于前一个包中的序列号;
Stream ID:用于标识当前数据流属于哪个资源请求,用于消除队头阻塞;
Offset:标识当前数据包在当前 Stream ID 中的字节偏移量,用于消除队头阻塞。
(6)为了便于理解和记忆,这里把quic的要点做了总结,如下:
3、正式因为quic有这么多优点,国内很多互联网一、二线厂商都开始采用,其中比较著名的app就是x音了!lib库中有个libsscronet.so就支持quic协议!
参考:
1、 https://zhuanlan.zhihu.com/p/32553477
2、https://www.bilibili.com/video/BV1fr4y1F7BD/
3、https://www.sofastack.tech/blog/deeper-into-http/3-evolution-of-the-protocol-from-the-creation-and-closing-of-quic-links/
4、https://cloud.tencent.com/developer/article/1802343 quic协议浅析
5、https://www.chromium.org/developers/how-tos/get-the-code/ chromium内核源码
6、https://www.shangmayuan.com/a/cfe4bc1f10b147aab9ccac26.html cronet用例与原理实践
#379 内核模块 » linux源码解读(二十九):android线程通信机制handler&java对象实例布局 » 2022-10-12 11:38:35
- batsom
- 回复: 0
1、为了在进程间通信,linux推出了信号量、共享内存、消息队列、管道、信号等IPC的方式;为了提高IPC效率,android又进一步优化共享内存,推处了binder机制(本质就是把不同进程的虚拟内存映射到同一块物理内存)。进程间通信的问题解决了,线程间也需要通信,android是怎么解决的了?回顾一下进程间通信的方式:本质就是找一块物理内存,生产者进程写入数据,消费者进程读取数据。不同的IPC方式区别就在于对这块公用物理内存怎么用!比如管道pipe传输的是无格式的字节流,通信双方要事先约定好每个字节的业务含义(本质上就是通信协议)!相比之下,消息独队列显得“规范”多了:数据按照一定的格式组成消息,允许同时存在不同格式或类型的消息;消费者进程可以按需读取消息。这两者对比,前者好比散装,后者好比精装,用起来高大上多了!android在java层面为了便于线程间通信,借鉴了消息队列的形式,推出了handler线程间的通信机制——MessageQueue!整体框架如下: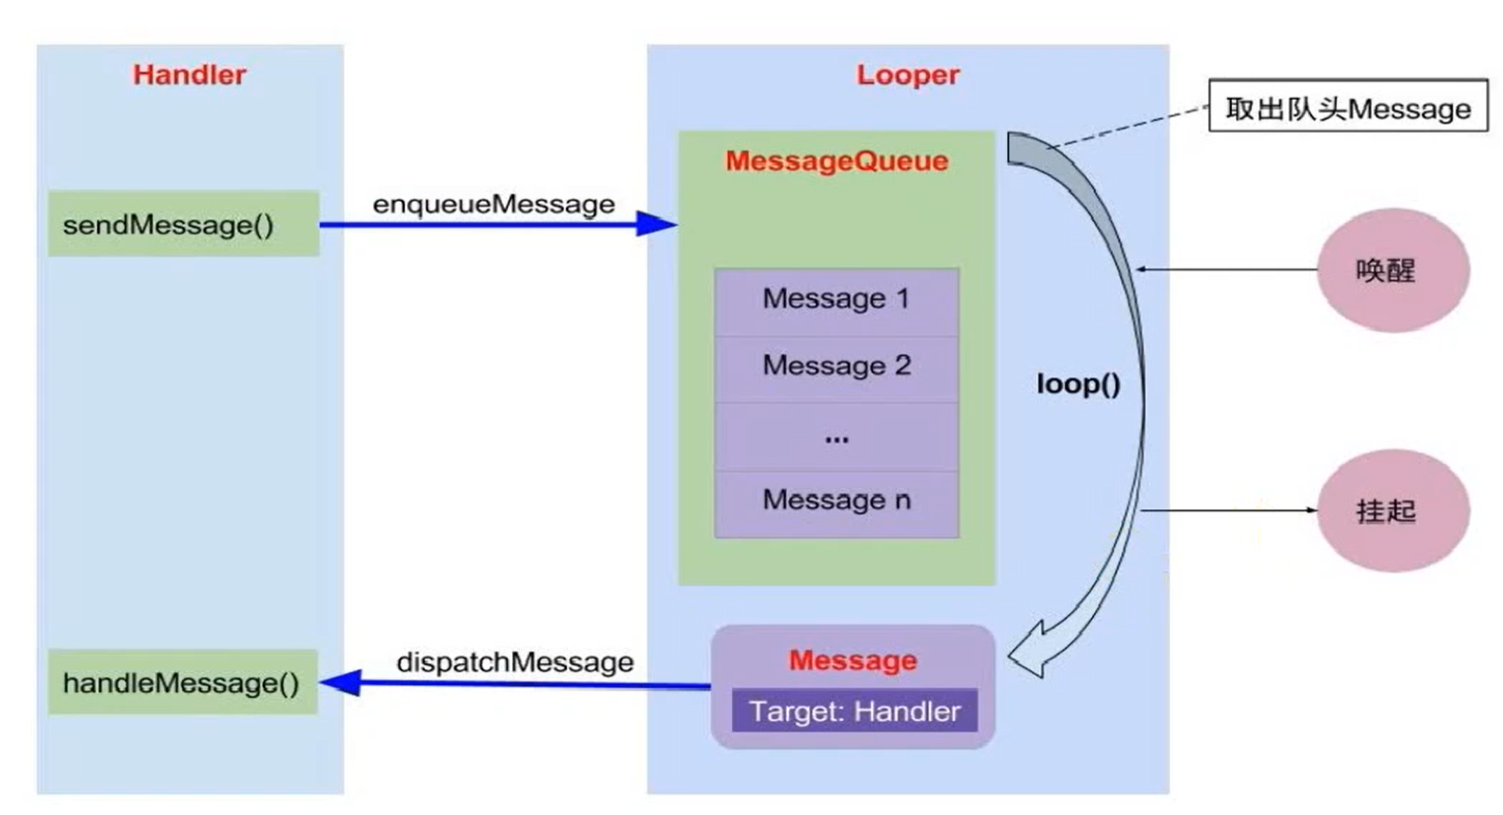
用户的代码只需要新建handler对象,然后不同的线程调用sendMessage和handlerMessage就能实现线程间通信了。具体代码是怎么实现的了?
2、(1)发送消息
由于是多线程之间通信,所以同时可以有多个线程发消息,也可以有多个线程读消息!用什么来存message了?这个消息队列又该怎么实现了?
由于是个队列,肯定不可能用单个变量实现啦!实现的队列的方式可以是数组,也可以是链表。由于线程之间的消息数量无法准确预估,数组的大小在声明时就要确定,所以肯定不肯能用数组啦,最终只能用链表实现!
队列只需要根据业务需求取出某个消息,所以单向足够了,没必要做成双向的,浪费内存空间
有些消息很重要,需要优先处理,所以这里是个有优先级的队列!那么优先级高低的评判标准是什么了? android这里采用了时间!距离代码执行时间越近的优先级越高,在队列的位置越靠前,会越先被消费者线程取出来处理!
综上所述,android实现入队列的函数如下:
boolean enqueueMessage(Message msg, long when) {
        if (msg.target == null) {
            throw new IllegalArgumentException("Message must have a target.");
        }
        if (msg.isInUse()) {
            throw new IllegalStateException(msg + " This message is already in use.");
        }

        synchronized (this) {
            if (mQuitting) {
                IllegalStateException e = new IllegalStateException(
                        msg.target + " sending message to a Handler on a dead thread");
                Log.w(TAG, e.getMessage(), e);
                msg.recycle();
                return false;
            }
            msg.markInUse();
            msg.when = when;
            Message p = mMessages;
            boolean needWake;
            if (p == null || when == 0 || when < p.when) {
                // New head, wake up the event queue if blocked.
                msg.next = p;
                mMessages = msg;
                needWake = mBlocked;
            } else {
                // Inserted within the middle of the queue.  Usually we don't have to wake
                // up the event queue unless there is a barrier at the head of the queue
                // and the message is the earliest asynchronous message in the queue.
                needWake = mBlocked && p.target == null && msg.isAsynchronous();
                Message prev;
                for (;;) {
                    prev = p;
                    p = p.next;
                    /*这不是普通的队列,这是优先级队列,根据message的时间排序*/
                    if (p == null || when < p.when) {
                        break;
                    }
                    if (needWake && p.isAsynchronous()) {
                        needWake = false;
                    }
                }
                msg.next = p; // invariant: p == prev.next
                prev.next = msg;
            }

            // We can assume mPtr != 0 because mQuitting is false.
            if (needWake) {
                nativeWake(mPtr);
            }
        }
        return true;
    }
消息被封装成了Message类,里面有很多字段和方法;when是消息需要被处理的事件,根据这个找到新消息在队列中的位置然后插入!
(2)既然队列是以时间作为优先级排序,那么超时的消息必须排在队列最前面才能优先被消费者线程取出来处理,所以需要有封装好的方法把这些超时的消息都捻出来!大家还记得红黑树么?linux内核定时器用的就是红黑树,最左边的节点就是距离超时最近的节点。不过android这里并没有用红黑树,用的还是链表遍历,估计是觉得消息数量不会多到几十万、甚至上百万级别吧,没必要非得建树。这个方法叫next,不需要参数,源码如下:
/*
    1、首先判断当前时间与链表头部的Message.when字段的大小,
        如果该Message可以处理,那么直接返回链表头部的Message,否则继续等待
    2、当设置了同步屏障之后,next函数将会忽略所有的同步消息,返回异步消息。
        换句话说就是,设置了同步屏障之后,Handler只会处理异步消息。再换句话说,
        同步屏障为Handler消息机制增加了一种简单的优先级机制,
        异步消息的优先级要高于同步消息2、
    */
    Message next() {
        // Return here if the message loop has already quit and been disposed.
        // This can happen if the application tries to restart a looper after quit
        // which is not supported.
        final long ptr = mPtr;
        if (ptr == 0) {
            return null;
        }

        int pendingIdleHandlerCount = -1; // -1 only during first iteration
        int nextPollTimeoutMillis = 0;
        for (;;) {
            if (nextPollTimeoutMillis != 0) {
                Binder.flushPendingCommands();
            }

            nativePollOnce(ptr, nextPollTimeoutMillis);

            synchronized (this) {
                // Try to retrieve the next message.  Return if found.
                final long now = SystemClock.uptimeMillis();
                Message prevMsg = null;
                Message msg = mMessages;
                if (msg != null && msg.target == null) {//碰到同步屏障
                    // Stalled by a barrier.  Find the next asynchronous message in the queue.
                    do {
                        //跳出循环时,msg指向离表头最近的一个异步消息
                        prevMsg = msg;
                        msg = msg.next;
                    } while (msg != null && !msg.isAsynchronous());
                }
                if (msg != null) {
                    if (now < msg.when) {
                        // Next message is not ready.  Set a timeout to wake up when it is ready.
                        // 如果下一个消息的处理时间还没到,那么设置一个等待超时时间
                        nextPollTimeoutMillis = (int) Math.min(msg.when - now, Integer.MAX_VALUE);
                    } else {
                        //拿到可用的msg,返回
                        // Got a message.
                        mBlocked = false;
                        if (prevMsg != null) {
                            prevMsg.next = msg.next;
                        } else {
                        //链表头部移动到链表第二个元素上
                            mMessages = msg.next;
                        }
                        msg.next = null;
                        if (DEBUG) Log.v(TAG, "Returning message: " + msg);
                        msg.markInUse();
                        //返回链表中的第一个元素
                        return msg;
                    }
                } else {
                    // No more messages.
                    nextPollTimeoutMillis = -1;
                }

                // Process the quit message now that all pending messages have been handled.
                if (mQuitting) {
                    dispose();
                    return null;
                }

                // If first time idle, then get the number of idlers to run.
                // Idle handles only run if the queue is empty or if the first message
                // in the queue (possibly a barrier) is due to be handled in the future.
                if (pendingIdleHandlerCount < 0
                        && (mMessages == null || now < mMessages.when)) {
                    pendingIdleHandlerCount = mIdleHandlers.size();
                }
                if (pendingIdleHandlerCount <= 0) {
                    // No idle handlers to run.  Loop and wait some more.
                    mBlocked = true;
                    continue;
                }

                if (mPendingIdleHandlers == null) {
                    mPendingIdleHandlers = new IdleHandler[Math.max(pendingIdleHandlerCount, 4)];
                }
                mPendingIdleHandlers = mIdleHandlers.toArray(mPendingIdleHandlers);
            }

            // Run the idle handlers.
            // We only ever reach this code block during the first iteration.
            for (int i = 0; i < pendingIdleHandlerCount; i++) {
                final IdleHandler idler = mPendingIdleHandlers[i];
                mPendingIdleHandlers[i] = null; // release the reference to the handler

                boolean keep = false;
                try {
                    keep = idler.queueIdle();
                } catch (Throwable t) {
                    Log.wtf(TAG, "IdleHandler threw exception", t);
                }

                if (!keep) {
                    synchronized (this) {
                        mIdleHandlers.remove(idler);
                    }
                }
            }

            // Reset the idle handler count to 0 so we do not run them again.
            pendingIdleHandlerCount = 0;

            // While calling an idle handler, a new message could have been delivered
            // so go back and look again for a pending message without waiting.
            nextPollTimeoutMillis = 0;
        }
    }
(3)通过next找到超时的消息处理,需要把消息发送给消费者线程,这个工作是looper.loop方法做的!原理很简单:在死循环里面调用next方法,不停的筛选出超时的消息,然后调用dispathMessage发送给消费者线程处理,代码如下:
/**
     * Run the message queue in this thread. Be sure to call
     * {@link #quit()} to end the loop.
     让MessageQueue循环动起来:通过next筛选出超时的消息,然后通过dispatchMessage让消费者线程处理
     */
    public static void loop() {
        final Looper me = myLooper();
        if (me == null) {
            throw new RuntimeException("No Looper; Looper.prepare() wasn't called on this thread.");
        }
        final MessageQueue queue = me.mQueue;

        // Make sure the identity of this thread is that of the local process,
        // and keep track of what that identity token actually is.
        Binder.clearCallingIdentity();
        final long ident = Binder.clearCallingIdentity();

        // Allow overriding a threshold with a system prop. e.g.
        // adb shell 'setprop log.looper.1000.main.slow 1 && stop && start'
        final int thresholdOverride =
                SystemProperties.getInt("log.looper."
                        + Process.myUid() + "."
                        + Thread.currentThread().getName()
                        + ".slow", 0);

        boolean slowDeliveryDetected = false;

        for (;;) {
            //获取消息队列超时的消息
            Message msg = queue.next(); // might block
            if (msg == null) {//没有超时的消息先返回了
                // No message indicates that the message queue is quitting.
                return;
            }

            // This must be in a local variable, in case a UI event sets the logger
            final Printer logging = me.mLogging;
            if (logging != null) {
                logging.println(">>>>> Dispatching to " + msg.target + " " +
                        msg.callback + ": " + msg.what);
            }
            // Make sure the observer won't change while processing a transaction.
            final Observer observer = sObserver;

            final long traceTag = me.mTraceTag;
            long slowDispatchThresholdMs = me.mSlowDispatchThresholdMs;
            long slowDeliveryThresholdMs = me.mSlowDeliveryThresholdMs;
            if (thresholdOverride > 0) {
                slowDispatchThresholdMs = thresholdOverride;
                slowDeliveryThresholdMs = thresholdOverride;
            }
            final boolean logSlowDelivery = (slowDeliveryThresholdMs > 0) && (msg.when > 0);
            final boolean logSlowDispatch = (slowDispatchThresholdMs > 0);

            final boolean needStartTime = logSlowDelivery || logSlowDispatch;
            final boolean needEndTime = logSlowDispatch;

            if (traceTag != 0 && Trace.isTagEnabled(traceTag)) {
                Trace.traceBegin(traceTag, msg.target.getTraceName(msg));
            }

            final long dispatchStart = needStartTime ? SystemClock.uptimeMillis() : 0;
            final long dispatchEnd;
            Object token = null;
            if (observer != null) {
                token = observer.messageDispatchStarting();
            }
            long origWorkSource = ThreadLocalWorkSource.setUid(msg.workSourceUid);
            try {
                /*
                msg.target是一个Handler,让该Message关联的Handler通过dispatchMessage()处理Message。
                */
                msg.target.dispatchMessage(msg);
                if (observer != null) {
                    observer.messageDispatched(token, msg);
                }
                dispatchEnd = needEndTime ? SystemClock.uptimeMillis() : 0;
            } catch (Exception exception) {
                if (observer != null) {
                    observer.dispatchingThrewException(token, msg, exception);
                }
                throw exception;
            } finally {
                ThreadLocalWorkSource.restore(origWorkSource);
                if (traceTag != 0) {
                    Trace.traceEnd(traceTag);
                }
            }
            if (logSlowDelivery) {
                if (slowDeliveryDetected) {
                    if ((dispatchStart - msg.when) <= 10) {
                        Slog.w(TAG, "Drained");
                        slowDeliveryDetected = false;
                    }
                } else {
                    if (showSlowLog(slowDeliveryThresholdMs, msg.when, dispatchStart, "delivery",
                            msg)) {
                        // Once we write a slow delivery log, suppress until the queue drains.
                        slowDeliveryDetected = true;
                    }
                }
            }
            if (logSlowDispatch) {
                showSlowLog(slowDispatchThresholdMs, dispatchStart, dispatchEnd, "dispatch", msg);
            }

            if (logging != null) {
                logging.println("<<<<< Finished to " + msg.target + " " + msg.callback);
            }

            // Make sure that during the course of dispatching the
            // identity of the thread wasn't corrupted.
            final long newIdent = Binder.clearCallingIdentity();
            if (ident != newIdent) {
                Log.wtf(TAG, "Thread identity changed from 0x"
                        + Long.toHexString(ident) + " to 0x"
                        + Long.toHexString(newIdent) + " while dispatching to "
                        + msg.target.getClass().getName() + " "
                        + msg.callback + " what=" + msg.what);
            }

            msg.recycleUnchecked();
        }
    }
(4)最后就是消费者线程处理消息了;由于不同的业务需求不同,处理消息的逻辑肯定也不相同,所以肯定要给开发人员预留处理消息的数据接口,这个接口就是handleMessage,函数具体的实现由开发人员根据业务需求完成,接口的调用就是在dispatchMessage方法了,如下:
/**
     * Handle system messages here.
     */
    public void dispatchMessage(@NonNull Message msg) {
        //消息的回调函数不会空就执行回调函数
        if (msg.callback != null) {
            handleCallback(msg);
        } else {
            if (mCallback != null) {
                if (mCallback.handleMessage(msg)) {
                    return;
                }
            }
            //用户实现的接口方法
            handleMessage(msg);
        }
    }
整个handler过程最核心的代码和思路就这样了,一点也不复杂!
3、其他重要点:
(1)发送消息前需要得到一个message;如果直接new,jvm底层肯定会调用操作系统系统的malloc分配堆内存,效率不高;所以这里并没有直接new,而是复用现成的message实例,避免了频繁jvm频繁调用malloc带来的低效;这里本质上就是app一次性申请较多内存,然后反复使用这些内存,避免频繁“折腾”操作系统不停的分配和回收内存!
/**
     * Return a new Message instance from the global pool. Allows us to
     * avoid allocating new objects in many cases.
     */
    public static Message obtain() {
        synchronized (sPoolSync) {
            if (sPool != null) {
                Message m = sPool;
                sPool = m.next;
                m.next = null;
                m.flags = 0; // clear in-use flag
                sPoolSize--;
                return m;
            }
        }
        return new Message();
    }
(2)由于是多线程读写同样的内存区域,避免不了互斥/同步;java层面采用的是synchronize关键字,需要传入某个对象实例;还记得之前的总结的同步/互斥方法么?以x86为例,汇编层面还是lock一块内存,在这块内存上加减。如果这块内存的值是0,所以有线程进入临界区了,当前线程就不能继续执行。synchronize(对象)这块内存区域在哪了?既然传入了对象的实例,那么100%肯定这块内存就在这个对象实例内部或附近! java对象实例布局如下: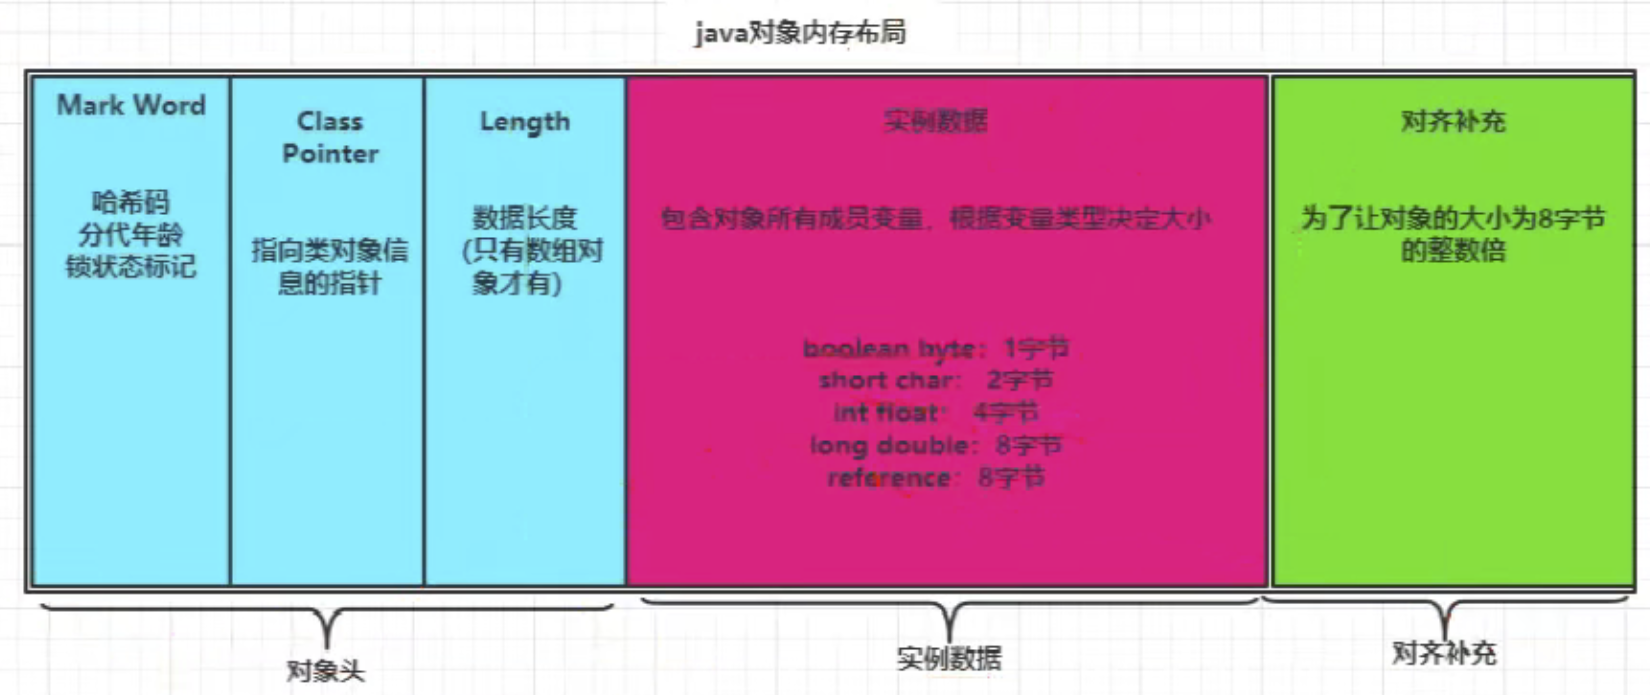
对象头的Mark Word区域存储对象的hashCode、锁信息或分代年龄或GC标志等信息,Class Metadata Address是类型指针指向对象的类元数据,JVM通过该指针确定该对象是哪个类的实例。锁的类型和状态在对象头Mark Word中都有记录,在申请锁、锁升级等过程中JVM都需要读取对象的Mark Word数据!
注意:class字节码文件是会被classloader加载到内存的(通过class.forName能找到)。执行完new方法后,内存生成类的instance,会单独开辟内存存放实例数据,也就是实例的成员变量。由于类方法是所有instance都公用的,所以就没必要在每个instance都单独复制一份了,浪费内存!
(3) 无论是网络中不同节点之间的IO,还是单节点内部不同进程/线程之间的IO,接受数据只有两种方式:
轮询poll:就是写个死循环dead loop,不停的去共享内存处检查是不是有新的数据到来。有就复制过来然后处理,没有就继续再循环轮询探查!(这个和多线程之间同步的CAS本质上是一样的:写个死循环一直待命,收到命令/数据就处理,否则原地自旋循环待命;所谓的同步通信,也是这样的!)
中断interupt:比如网络通信时节点的网卡收到数据后直接通过中断通知cpu过来取数据!(单节点内部进程/线程之间不适用于这种“通知”类的IO方案,想想为啥??)
参考:
1、https://www.cnblogs.com/jimuzz/p/14187408.html handler内存泄漏原理
2、https://www.bilibili.com/video/BV1Wv411b7YM?from=search&seid=18202251044637176644&spm_id_from=333.337.0.0 handler原理
3、https://blog.csdn.net/a78270528/article/details/48246735 handler使用实例
#380 内核模块 » linux源码解读(二十八):通过epoll实现协程(二) » 2022-10-12 11:33:58
- batsom
- 回复: 0
1、协程只是一种思路,并且没有操作系统层面的参与,所以全靠3环的应用开发人员自己实现。市面上有各种协程框架,这里以微信的libco库为例,看看协程到底是怎么落地实现的!libco 是微信后台开发和使用的协程库,号称可以调度千万级协程;从使用上来说,libco 不仅提供了一套类 pthread 的协程通信机制,同时可以零改造地将三方库的阻塞 IO 调用进行协程化;正式介绍libco的源码前,先直观感受一下libco的效果,demo代码如下:
void A() {
   cout << 1 << " ";
   cout << 2 << " ";
   cout << 3 << " ";
}

void B() {
   cout << "x" << " ";
   cout << "y" << " ";
   cout << "z" << " ";
}

int main(void) {
  A();
  B();
}
这个代码很简单,刚开始学编程的人都能看懂,结果如下:
1 2 3 x y z
如果用libco的协程api在A和B函数之间切换(注意这是简化后的伪代码,目的是抓住主干,避免被细枝末节的代码干扰),如下:
void A() {
   cout << 1 << " ";
   cout << 2 << " ";
   co_yield_ct();  // 切出到主协程
   cout << 3 << " ";
}

void B() {
   cout << "x" << " ";
   co_yield_ct();  // 切出到主协程
   cout << "y" << " ";
   cout << "z" << " ";
}

int main(void) {
  ...  // 主协程
  co_resume(A);  // 启动协程 A
  co_resume(B);  // 启动协程 B
  co_resume(A);  // 从协程 A 切出处继续执行
  co_resume(B);  // 从协程 B 切出处继续执行
}
这时的结果就变了:
1 2 x 3 y z
可以看到代码在A和B函数之间来回切换执行,整个切换的顺序完全依靠co_yield_ct和co_resume两个函数人为控制!这样就实现了A函数阻塞时人为切换到B函数执行;B函数阻塞时再切换到A函数继续执行,不浪费一点CPU时间片!
2、之前解读linux源码时,遇到某些功能时都是先看结构体,再阅读函数功能,原因很简单:重要的字段和数据都会放在结构体中统一管理(本质是能快速寻址,利于读写),函数的所有代码都是围绕结构体中这些数据读写展开的!libco重要的结构体之一就是stCoRoutine_t(从名称包含routine就能大概才出来结构体和执行的函数相关),定义如下:
/*协程跳转(也即是yield、resume)执行的函数结构体,
  包含了协程运行最重要的3要素:
  协程运行环境、执行函数的入口、函数参数
*/
struct stCoRoutine_t
{
    stCoRoutineEnv_t *env;//协程运行环境
    pfn_co_routine_t pfn;// 协程跳转执行的函数
    void *arg;//函数的参数
    coctx_t ctx;//保存协程的下文环境

    char cStart;//协程是否开始
    char cEnd;//协程是否结束
    char cIsMain;//当前是main函数吗
    char cEnableSysHook; //是否运行系统 hook,即非侵入式逻辑
    char cIsShareStack;//多个协程之间是否共享栈
    void *pvEnv;

    //char sRunStack[ 1024 * 128 ];
    stStackMem_t* stack_mem;// 协程运行时的栈空间

    //save stack buffer while confilct on same stack_buffer;
    char* stack_sp;
    unsigned int save_size;
    char* save_buffer;
    stCoSpec_t aSpec[1024];
};
看吧,这个结构体几乎包含了协程子重要的几个元素:协程的调度环境、协程要运行的函数及参数,协程切换时要保存的上下文等!这些结构体之间的关系如下:
结构体有了,接下来就是初始化这个结构体了,再co_create_env函数中做的,核心是把传入的函数入口、参数、env等变量纳入stCoRoutine_t统一管理,同时初始化栈和其他变量!
/*创建协程
env:协程跳转执行函数的结构体,也可以理解为函数的环境
pfn:协程跳转执行的函数入口
初始化stCoRoutine_t *lp结构体
*/
struct stCoRoutine_t *co_create_env( stCoRoutineEnv_t * env, const stCoRoutineAttr_t* attr,
        pfn_co_routine_t pfn,void *arg )
{

    stCoRoutineAttr_t at;
    if( attr )
    {
        memcpy( &at,attr,sizeof(at) );
    }
    if( at.stack_size <= 0 )
    {
        at.stack_size = 128 * 1024;//协程栈128k
    }
    else if( at.stack_size > 1024 * 1024 * 8 )//不能超过8M
    {
        at.stack_size = 1024 * 1024 * 8;
    }

    if( at.stack_size & 0xFFF )
    {
        at.stack_size &= ~0xFFF;//栈大小的低12bit清零,也就是页对齐
        at.stack_size += 0x1000;
    }

    stCoRoutine_t *lp = (stCoRoutine_t*)malloc( sizeof(stCoRoutine_t) );

    memset( lp,0,(long)(sizeof(stCoRoutine_t)));

    /*stCoRoutine_t包含了协程运行最重要的3要素:环境、函数入口和参数*/
    lp->env = env;
    lp->pfn = pfn;
    lp->arg = arg;

    stStackMem_t* stack_mem = NULL;
    if( at.share_stack )//如果用共享内存
    {
        stack_mem = co_get_stackmem( at.share_stack);
        at.stack_size = at.share_stack->stack_size;
    }
    else//否则重新分配协程栈
    {
        stack_mem = co_alloc_stackmem(at.stack_size);
    }
    lp->stack_mem = stack_mem;

    lp->ctx.ss_sp = stack_mem->stack_buffer;
    lp->ctx.ss_size = at.stack_size;

    lp->cStart = 0;
    lp->cEnd = 0;
    lp->cIsMain = 0;
    lp->cEnableSysHook = 0;
    lp->cIsShareStack = at.share_stack != NULL;

    lp->save_size = 0;
    lp->save_buffer = NULL;

    return lp;
}
协程结构体初始化完成后就该使用了吧,还记得文章开头的那个demo案例么?main里面直接调用的co_resume函数,如下:
void co_resume( stCoRoutine_t *co )
{
    stCoRoutineEnv_t *env = co->env;
    // 获取当前正在运行的协程的结构
    // 每次有新协程产生就放入数组管理
    stCoRoutine_t *lpCurrRoutine = env->pCallStack[ env->iCallStackSize - 1 ];
    if( !co->cStart )
    {
        // 为将要运行的 co 布置上下文环境:初始化协程的栈,并把函数参数、返回地址入栈
        coctx_make( &co->ctx,(coctx_pfn_t)CoRoutineFunc,co,0 );
        co->cStart = 1;
    }
    //需要恢复的协程加入数组,表示正在运行
    env->pCallStack[ env->iCallStackSize++ ] = co;
    co_swap( lpCurrRoutine, co );
}
唯一的参数就是协程结构体;前面做的都是各种准备工作,最关键的就是最后一个co_swap函数了,从名字和参数看就知道是协程结构体(本质上就是函数)互相切换!
void co_swap(stCoRoutine_t* curr, stCoRoutine_t* pending_co)
{
     stCoRoutineEnv_t* env = co_get_curr_thread_env();

    //get curr stack sp
    char c;
    /*记录curr协程栈位置,后续切换回curr时可用于恢复栈内容*/
    curr->stack_sp= &c;

    if (!pending_co->cIsShareStack)
    {
        env->pending_co = NULL;
        env->occupy_co = NULL;
    }
    else //共享栈模式
    {
        env->pending_co = pending_co;
        //get last occupy co on the same stack mem
        //取出共享栈中已有的协程
        stCoRoutine_t* occupy_co = pending_co->stack_mem->occupy_co;
        //set pending co to occupy thest stack mem;
        //在共享栈中记录挂起的协程
        pending_co->stack_mem->occupy_co = pending_co;
        /*env记录pending和occupy两个协程,便于切换后仍然能找到*/
        env->occupy_co = occupy_co;
        if (occupy_co && occupy_co != pending_co)
        {
            /*换个地方保存协程*/
            save_stack_buffer(occupy_co);
        }
    }

    //swap context
    /*协程切换最核心的函数:切换通用寄存器、esp+ebp、eip;*/
    coctx_swap(&(curr->ctx),&(pending_co->ctx) );

    //stack buffer may be overwrite, so get again;
    stCoRoutineEnv_t* curr_env = co_get_curr_thread_env();
    stCoRoutine_t* update_occupy_co =  curr_env->occupy_co;
    stCoRoutine_t* update_pending_co = curr_env->pending_co;

    if (update_occupy_co && update_pending_co && update_occupy_co != update_pending_co)
    {
        //resume stack buffer
        if (update_pending_co->save_buffer && update_pending_co->save_size > 0)
        {
            memcpy(update_pending_co->stack_sp, update_pending_co->save_buffer, update_pending_co->save_size);
        }
    }
}
co_swap最核心的莫过于coctx_swap了,由于涉及到寄存器操作,C语言已经无能为力,这里直接用汇编简单粗暴来做:先把curr的上下文push到curr的栈里,然后通过movq %rsi, %rsp把rsp切换到pending的栈,最后通过一系列的pop把pending的context赋值给寄存器,最后一句ret把此时栈顶的地址赋值给eip,由此完成切换!
.globl coctx_swap
.type  coctx_swap, @function
coctx_swap:
    leaq 8(%rsp),%rax  # rax=(*rsp) + 8;
                       # 此时栈顶元素是当前的%rip(即当前协程挂起后被再次唤醒时,需要执行的下一条指令
                       # 的地址),后面会把栈顶的这个地址保存到curr->ctx->regs[9]中,所以保存rsp的
                       # 时候就跳过这8个字节了
    leaq 112(%rdi),%rsp#rsp=(*rdi) + (8*14);
                       # %rdi存放的是函数第一个参数的地址,即curr->ctx的地址
                       # 然后加上需要保存的14个寄存器的长度,使rsp指向curr->ctx->regs[13]
    pushq %rax         # curr->ctx->regs[13] = rax;
                       # 保存rsp,看第一行代码的注释
    pushq %rbx         # curr->ctx->regs[12] = rbx;
    pushq %rcx         # curr->ctx->regs[11] = rcx;
    pushq %rdx         # curr->ctx->regs[10] = rcx;
    pushq -8(%rax)     # curr->ctx->regs[9] = (*rax) - 8;
                       # 把协程挂起后被再次唤醒时,需要执行的下一条指令的地址保存起来
    pushq %rsi         # curr->ctx->regs[8] = rsi;
    pushq %rdi         # curr->ctx->regs[7] = rdi;
    pushq %rbp         # curr->ctx->regs[6] = rbp;
    pushq %r8          # curr->ctx->regs[5] = r8;
    pushq %r9          # curr->ctx->regs[4] = r9;
    pushq %r12         # curr->ctx->regs[3] = r12;
    pushq %r13         # curr->ctx->regs[2] = r13;
    pushq %r14         # curr->ctx->regs[1] = r14;
    pushq %r15         # curr->ctx->regs[0] = r15;

    movq %rsi, %rsp    # rsp = rsi;
                       # rsi中存放的是函数的第二个参数的地址,即使rsp指向pending_co->ctx->regs[0]
    popq %r15          # r15 = pending_co->ctx->regs[0];
    popq %r14          # r14 = pending_co->ctx->regs[1];
    popq %r13          # r13 = pending_co->ctx->regs[2];
    popq %r12          # r12 = pending_co->ctx->regs[3];
    popq %r9           # r9 = pending_co->ctx->regs[4];
    popq %r8           # r8 = pending_co->ctx->regs[5];
    popq %rbp          # rbp = pending_co->ctx->regs[6];
    popq %rdi          # rdi = pending_co->ctx->regs[7];
    popq %rsi          # rsi = pending_co->ctx->regs[8];
    popq %rax          # rax = pending_co->ctx->regs[9];
                       # 对照前面,ctx->regs[9]中存放的是协程被唤醒后需要执行的下一条指令的地址
    popq %rdx          # rdx = pending_co->ctx->regs[10];
    popq %rcx          # rcx = pending_co->ctx->regs[11];
    popq %rbx          # rbx = pending_co->ctx->regs[12];
    popq %rsp          # rsp = pending_co->ctx->regs[13]; rsp += 8;
                       # 这句代码是理解整个过程的关键。和coctx_make函数中保存rsp时减8再保存相对应。
    pushq %rax         # rsp -= 8;*rsp = rax;
                       # 此时栈顶元素就是协程被唤醒后需要执行的下一条指令的地址了

    xorl %eax, %eax    # eax = 0;
                       # 使eax清零,eax中的内容作为函数的返回值
    ret                # 相当于popq %rip 这样就可以唤醒上次挂起的协程,接着运行
自此,调用resume完成了函数执行的切换!resume的代码分析完了,轮到另一个yield了!其实这两个函数核心功能都是切换函数,所以底层调用的都是co_swap,如下:
void co_yield_env( stCoRoutineEnv_t *env )
{
    //从数组从分别取出两个协程用于交换
    stCoRoutine_t *last = env->pCallStack[ env->iCallStackSize - 2 ];
    stCoRoutine_t *curr = env->pCallStack[ env->iCallStackSize - 1 ];

    env->iCallStackSize--;

    co_swap( curr, last);
}
看吧,代码是不是超级简单了?
3、上述代码完美地在一个线程内部完成了不同代码之间的切换,不过都是人工手动掌控切换时机的,如果是网络IO了?开发人员是无法精准预测收发数据时机的,所以也没法人为精准“埋点”resume、yield做协程切换,这种业务场景该怎么处理了?之前用的是epoll来监听socket是否有事件到达,这里该怎么复用epoll了?在example_echosrv.c文件中,微信官方提供了服务端协程的用例,代码不多,但是涉及到main、readwrite、accept等多个方法之间的来回切换,并且方法内部还有for死循环,整个流程比较复杂, 我画了个简单的草图,如下:
可以看出:整个过程只有一个线程;里面有专门负责接受客户端连接的accept_co协程,也有监听事件的mian主协程,也有添加事件和负责读写的readwrite_so!epoll还是用于网络IO的事件监听和触发,接着就是通过yield、resume切换导到合适的协程处理这些io事件!整个过程逻辑上不算难,就是很繁杂,需要静下心来慢慢捋!为了实现整个流程,有几个关键的函数需要着重说明。
(1)libco为了对统一网络IO,条件变量需要超时管理的事件,实现了基于时间轮(timing wheel)的超时管理器; 时间轮为图中深红色的轮状数组,数组的每一个单元我们称为一个槽(slot)。单个slot里存储一定时间内注册的事件列表(图中黄色链表)。在libco中,单个slot的精度为1毫秒(刚好是jiffies),整个时间轮由60000个slot组成,对应的整个时间轮覆盖60秒的时间;
为了实现时间轮,两个核心的方法如下:
/* 在时间轮中插入新项
 * @param
 * apTimeout :时间轮结构
 * apItem    :新的超时项
 * allNow    :当前事件(timestamp in ms)
 * @return   :0成功, else失败行数
 */
int AddTimeout( stTimeout_t *apTimeout,stTimeoutItem_t *apItem ,unsigned long long allNow )
{
    if( apTimeout->ullStart == 0 )
    {
        apTimeout->ullStart = allNow;// 设置时间轮的最早时间是当前时间
        apTimeout->llStartIdx = 0;
    }
    /* 当前时间小于初始时间出错返回 */
    if( allNow < apTimeout->ullStart )
    {
        co_log_err("CO_ERR: AddTimeout line %d allNow %llu apTimeout->ullStart %llu",
                    __LINE__,allNow,apTimeout->ullStart);

        return __LINE__;
    }
    /* 当前时间大于超时时间出错返回 */
    if( apItem->ullExpireTime < allNow )
    {
        co_log_err("CO_ERR: AddTimeout line %d apItem->ullExpireTime %llu allNow %llu apTimeout->ullStart %llu",
                    __LINE__,apItem->ullExpireTime,allNow,apTimeout->ullStart);

        return __LINE__;
    }
    // 计算超时时间
    unsigned long long diff = apItem->ullExpireTime - apTimeout->ullStart;
    /* 超时时间大于时间轮的最长时间出错返回 */
    if( diff >= (unsigned long long)apTimeout->iItemSize )
    {
        diff = apTimeout->iItemSize - 1;
        co_log_err("CO_ERR: AddTimeout line %d diff %d",
                    __LINE__,diff);

        //return __LINE__;
    }
    /* 将时间加入到时间轮中 */
    AddTail( apTimeout->pItems + ( apTimeout->llStartIdx + diff ) % apTimeout->iItemSize , apItem );

    return 0;
}
/* 在时间轮中取出所有超时项
 * @param
 * apTimeout:时间轮结构
 * allNow   :当前时间(timestamp in ms)
 * apResult :超时事件结果链表
 */
inline void TakeAllTimeout( stTimeout_t *apTimeout,unsigned long long allNow,stTimeoutItemLink_t *apResult )
{
    if( apTimeout->ullStart == 0 )
    {
        apTimeout->ullStart = allNow;
        apTimeout->llStartIdx = 0;
    }

    if( allNow < apTimeout->ullStart )
    {
        return ;
    }
    int cnt = allNow - apTimeout->ullStart + 1;
    if( cnt > apTimeout->iItemSize )
    {
        cnt = apTimeout->iItemSize;
    }
    if( cnt < 0 )
    {
        return;
    }
    for( int i = 0;i<cnt;i++)
    {
        int idx = ( apTimeout->llStartIdx + i) % apTimeout->iItemSize;
        Join<stTimeoutItem_t,stTimeoutItemLink_t>( apResult,apTimeout->pItems + idx  );
    }
    apTimeout->ullStart = allNow;
    apTimeout->llStartIdx += cnt - 1;


}
(2)每个main函数都需要调用的方法,用于不停的监听是否有事件发生,如下:
/* 事件循环:不停的监听是否有事件发生
 * @param
 * ctx:epoll句柄
 * pfn:退出事件循环检查函数
 * arg:pfn参数
 */
void co_eventloop( stCoEpoll_t *ctx,pfn_co_eventloop_t pfn,void *arg )
{
    if( !ctx->result )
    {
        ctx->result =  co_epoll_res_alloc( stCoEpoll_t::_EPOLL_SIZE );
    }
    co_epoll_res *result = ctx->result;
    for(;;)
    {
        int ret = co_epoll_wait( ctx->iEpollFd,result,stCoEpoll_t::_EPOLL_SIZE, 1 );
        stTimeoutItemLink_t *active = (ctx->pstActiveList);
        stTimeoutItemLink_t *timeout = (ctx->pstTimeoutList);
        memset( timeout,0,sizeof(stTimeoutItemLink_t) ); //清空超时队列
        for(int i=0;i<ret;i++)//遍历有事件的fd
        {
            //获取event里数据指向的stTimeoutItem_t
            stTimeoutItem_t *item = (stTimeoutItem_t*)result->events[i].data.ptr;
            if( item->pfnPrepare )//如果有预处理函数,执行,由其加入就绪列表
            {
                item->pfnPrepare( item,result->events[i],active );
            }
            else//手动加入就绪列表
            {
                AddTail( active,item );
            }
        }
        unsigned long long now = GetTickMS();
        /*时间轮中取出所有的超时项,并插入超时列表*/
        TakeAllTimeout( ctx->pTimeout,now,timeout );

        stTimeoutItem_t *lp = timeout->head;
        while( lp )
        {
            //printf("raise timeout %p\n",lp);
            lp->bTimeout = true;//设置为超时
            lp = lp->pNext;
        }
        //将超时列表合并入就绪列表
        Join<stTimeoutItem_t,stTimeoutItemLink_t>( active,timeout );

        lp = active->head;
        while( lp )
        {
            PopHead<stTimeoutItem_t,stTimeoutItemLink_t>( active );
            if (lp->bTimeout && now < lp->ullExpireTime)
            {    //还未达到超时时间但已经标记为超时的,加回时间轮
                int ret = AddTimeout(ctx->pTimeout, lp, now);
                if (!ret)
                {
                    lp->bTimeout = false;
                    lp = active->head;
                    continue;
                }
            }
            /*调用stTimeoutItem_t项的执行函数,也就是OnPollProcessEvent
            里面有co_resume*/
            if( lp->pfnProcess )
            {
                lp->pfnProcess( lp );
            }

            lp = active->head;
        }
        if( pfn )//用于用户控制跳出事件循环
        {
            if( -1 == pfn( arg ) )
            {
                break;
            }
        }
    }
}
(3)将 fd 交由 Epoll 管理,待 Epoll 的相应的事件触发时,再切换回来执行 read 或者 write 操作,从而实现由 Epoll 管理协程,如下:
/* poll内核:将 fd 交由 Epoll 管理,待 Epoll 的相应的事件触发时,
             再切换回来执行 read 或者 write 操作,
             从而实现由 Epoll 管理协程的功能
 * @param
 * ctx:epoll句柄
 * fds:fd数组
 * nfds:fd数组长度
 * timeout:超时时间ms
 * pollfunc:默认poll
 */
typedef int (*poll_pfn_t)(struct pollfd fds[], nfds_t nfds, int timeout);
int co_poll_inner( stCoEpoll_t *ctx,struct pollfd fds[], nfds_t nfds, int timeout, poll_pfn_t pollfunc)
{
    if (timeout == 0)
    {
        //调用系统原生poll(其实上层poll已经做过检查了,此处无需再做)
        return pollfunc(fds, nfds, timeout);
    }
    if (timeout < 0)
    {
        timeout = INT_MAX;
    }
    int epfd = ctx->iEpollFd;
    stCoRoutine_t* self = co_self();

    //1.struct change
    /* 1. 初始化poll相关的数据结构 */
    stPoll_t& arg = *((stPoll_t*)malloc(sizeof(stPoll_t)));
    memset( &arg,0,sizeof(arg) );

    arg.iEpollFd = epfd;
    arg.fds = (pollfd*)calloc(nfds, sizeof(pollfd));//分配nfds个pollfd
    arg.nfds = nfds;

    stPollItem_t arr[2];
    //nfds少于2且未使用共享栈的情况下
    if( nfds < sizeof(arr) / sizeof(arr[0]) && !self->cIsShareStack)
    {    // 栈中分配
        arg.pPollItems = arr;
    }
    else
    {
        arg.pPollItems = (stPollItem_t*)malloc( nfds * sizeof( stPollItem_t ) );
    }
    memset( arg.pPollItems,0,nfds * sizeof(stPollItem_t) );
    //调用co_resume(arg.pArg), 唤醒参数arg.pArg所指协程
    arg.pfnProcess = OnPollProcessEvent;
    arg.pArg = GetCurrCo( co_get_curr_thread_env() );//得到当前运行的协程


    //2. add epoll把事件加入到epoll中监控
    for(nfds_t i=0;i<nfds;i++)
    {
        arg.pPollItems[i].pSelf = arg.fds + i;
        arg.pPollItems[i].pPoll = &arg;

        arg.pPollItems[i].pfnPrepare = OnPollPreparePfn;// 预处理回调函数
        struct epoll_event &ev = arg.pPollItems[i].stEvent;

        if( fds[i].fd > -1 )
        {
            ev.data.ptr = arg.pPollItems + i;
            ev.events = PollEvent2Epoll( fds[i].events );

            int ret = co_epoll_ctl( epfd,EPOLL_CTL_ADD, fds[i].fd, &ev ); //事件加入epoll的监听
            if (ret < 0 && errno == EPERM && nfds == 1 && pollfunc != NULL)
            {
                if( arg.pPollItems != arr )
                {
                    free( arg.pPollItems );
                    arg.pPollItems = NULL;
                }
                free(arg.fds);
                free(&arg);
                return pollfunc(fds, nfds, timeout);
            }
        }
        //if fail,the timeout would work
    }

    //3.add timeout 给时间轮添加超时时间
    unsigned long long now = GetTickMS();
    arg.ullExpireTime = now + timeout;
    int ret = AddTimeout( ctx->pTimeout,&arg,now );
    int iRaiseCnt = 0;
    if( ret != 0 )
    {
        co_log_err("CO_ERR: AddTimeout ret %d now %lld timeout %d arg.ullExpireTime %lld",
                ret,now,timeout,arg.ullExpireTime);
        errno = EINVAL;
        iRaiseCnt = -1;

    }
    else
    {    // 把执行权交给调用此协程的协程,也就是main线程
        co_yield_env( co_get_curr_thread_env() );
        iRaiseCnt = arg.iRaiseCnt;
    }
    /*当 main 协程的事件循环 co_eventloop 中触发了对应的监听事件时,会恢复执行
    此时,将开始执行下半段,即将上半段添加的句柄 fds 从 epoll 中移除,
    清理残留的数据结构*/
    {
        //clear epoll status and memory
        // 将该项从时间轮中删除
        RemoveFromLink<stTimeoutItem_t,stTimeoutItemLink_t>( &arg );
        for(nfds_t i = 0;i < nfds;i++)
        {
            int fd = fds[i].fd;
            if( fd > -1 )
            {
                co_epoll_ctl( epfd,EPOLL_CTL_DEL,fd,&arg.pPollItems[i].stEvent );
            }
            fds[i].revents = arg.fds[i].revents;
        }


        if( arg.pPollItems != arr )
        {
            free( arg.pPollItems );
            arg.pPollItems = NULL;
        }

        free(arg.fds);
        free(&arg);
    }

    return iRaiseCnt;
}
总结:
1、协程:在各个不同的方法之间切换,从汇编层面看,就是jmp到不同的代码执行
参考:
1、https://www.cyhone.com/articles/analysis-of-libco/ 微信 libco 协程库源码分析
2、https://github.com/tencent/libco libco源码
3、https://www.infoq.cn/article/CplusStyleCorourtine-At-Wechat C/C++ 协程库 libco:微信怎样漂亮地完成异步化改造
4、https://zhuanlan.zhihu.com/p/27409164 libco协程上下文切换原理
5、https://cloud.tencent.com/developer/article/1459729 libco的设计与实现
6、https://nifengz.com/libco_context_swap/
7、http://kaiyuan.me/2017/07/10/libco/ libco分析
8、https://www.changliu.me/post/libco-auto/ 自动切换
9、https://blog.csdn.net/MOU_IT/article/details/115033799 事件注册poll
10、http://kaiyuan.me/2017/10/20/libco2/ 协程的管理
#381 内核模块 » linux源码解读(二十七):协程原理和背景(一)& java的协程实现 » 2022-10-11 16:08:07
- batsom
- 回复: 0
1、协程原理阐述
(1)为了提升数据处理的效率,用户的应用程序通常采用多线程的形式,典型的就是生产者-消费者模型:生产者往共享内存块写数据,消费者从共享内存块读数据后处理!这种经典的模型具体落地实现时有两点需要特别注意:
多线程之间的互斥/同步:一般情况下共享内存块同时只能有1个线程写,写线程之间必须互斥;写线程结束后多个读线程可以同时读;但是如果读线程不能处理相同的数据,为了避免不同读线程重复读取同样的数据,读线程之间也要互斥;这么一来会导致写线程之间、读线程之间都要互斥,在一定程度上影响了效率
线程切换:不同线程切换需要操作系统内核来实现,这就需要通过syscall进入系统内核,线程切换完后又要切出系统内核回到3环的应用程序继续执行,从3环到0环内核的一进一出也会有上下文切换带来的性能损耗
仔细想想不难发现,带来损耗的无非这两点:线程锁、线程之间切换;如果想办法去掉这两个,是不是效率就大幅提升了? 协程就在这种背景下诞生了!
(2)当初为了提升数据的处理效率发明了多线程,但多线程也伴随产生了上述问题。此时如果摒弃多线程,重新回到单线程的方式,该怎么做了?只剩华山一条路了:单个线程即生产、又消费(又当爹、又当妈的,真是幸苦了!)!这么一来完全避免了多线程的切换、锁带来的问题,岂不美哉? 剩下的问题就变成这几个了:
线程什么执行生产者代码了?什么时候执行消费者代码了?
谁来控制执行代码的切换了?什么时候执行切换代码了?
怎么切换需要执行的代码了?
(3)由于是单线程,不涉及到线程切换和锁,所以协程是不需要操作系统内核参与的,整个协程功能的实现都是在3环应用层,所以操作系统并未提供现成的协程方案和代码库。先来看看python实现的最简单协程代码demo,如下:
import time

def consumer():
    r = ''
    while True:
        n = yield r
        if not n:
            return
        print('[CONSUMER] Consuming %s...' % n)
        time.sleep(1)
        r = '200 OK'

def produce(c):
    c.next()
    n = 0
    while n < 5:
        n = n + 1
        print('[PRODUCER] Producing %s...' % n)
        r = c.send(n)
        print('[PRODUCER] Consumer return: %s' % r)
    c.close()

if __name__=='__main__':
    c = consumer()
    produce(c)
先看看代码的执行效果:生产1个、消费1个,整个流程井然有序,丝毫不混乱!
整个代码只有1个线程,就是main函数开始的地方。consumer 函数是一个 generator,把 consumer 传入 produce 后:首先调用 c.next()启动生成器;而后一旦生产了东西,通过 c.send(n)切换到 consumer 执行;consumer 通过 yield 拿到消息;处理完毕后又通过 yield 把结果传回;produce 拿到 consumer 处理的结果,继续生产下一条消息;produce 决定不生产了,通过 c.close()关闭 consumer,整个过程结束。整个流程无锁,由一个线程执行,produce 和 consumer 协作完成任务,所以称为“协程”,而非线程的抢占式多任务。总结一下这个demo案例的特点:
生产者和消费者之间的切换是用户自己控制的,和操作系统无关
切换时显示地调用了send(为统一表示,后续用resume替换)、yield函数,通过这两个函数控制切换的时机!
通过上述简单的demo用例,协程的原理应该理解了吧?最大的特点:单线程+用户程序自行通过yield+resume在生产者和消费者代码之间切换,与操作系统内核无关,也不需要内核参与!就目前这个demo案例仔细推敲,还是有新问题:上述这种demo的应用场景在哪了?在实际生产环境中,难道真的有人这样写代码?哪个场景适合用协程了?
2、上面只介绍了协程表面的特点,实际上还未触及协程的本质:代码执行不下去时不能傻等空转、浪费cpu时间片!举个例子:代码是从main开始执行的,而main里面最开始实行的是comsumer消费者函数,这就奇怪了:生产者都还没执行,数据都没生产出来,此时执行消费者有用么?所以consumer此刻执行yield跳转到生产者代码,本质就是在当前条件不成熟、代码执行不下去的时候让出cpu,跳转到条件成熟、可以继续执行的代码处!这个跳转的时机和跳转的地点是应用程序的开发者人为控制的(因为操作系统不参与,所以没有提供统一的“标准”接口,市面上有各种协程的实现代码)!看到这个本质,是不是很容易联想到另一个应用场景了:网络IO多路复用!
(1)再来回顾一下server最早网络通信代码的写法,如下:
while(1) {
    socklen_t len = sizeof(struct sockaddr_in);
    int clientfd = accept(sockfd, (struct sockaddr*)&remote, &len);

    pthread_t thread_id;
    pthread_create(&thread_id, NULL, client_cb, &clientfd);
}
在死循环里阻塞在了accept这里;如果此时有客户端连接,立马单独生成一个线程来处理这个新的连接请求,以及后续的数据收发;这种代码的逻辑思路清晰,后续维护也很容易,不过对性能的损耗是很大的:每次从客户端来个请求都要生成一个线程,假如每个线程的栈是1MB,再不考虑线程结构体本身内存消耗的前提下,1000个请求就要耗费1GB内存;10万个请求就要耗费100G内存,再加上线程结构体本身的存储空间,内存消耗就更大了;然而这还只是内存的消耗,还有线程切换的时间成本了?要进入内核切换,这些都非常耗时!为了解决这些问题,异步和IO多路复用被发明了出来,本质核心思路是:当前客观条件不满足、无法继续执行代码时,让出cpu,当前线程开始等待;当前客观条件成熟、可以继续执行代码时唤醒线程继续执行!代码框架如下:
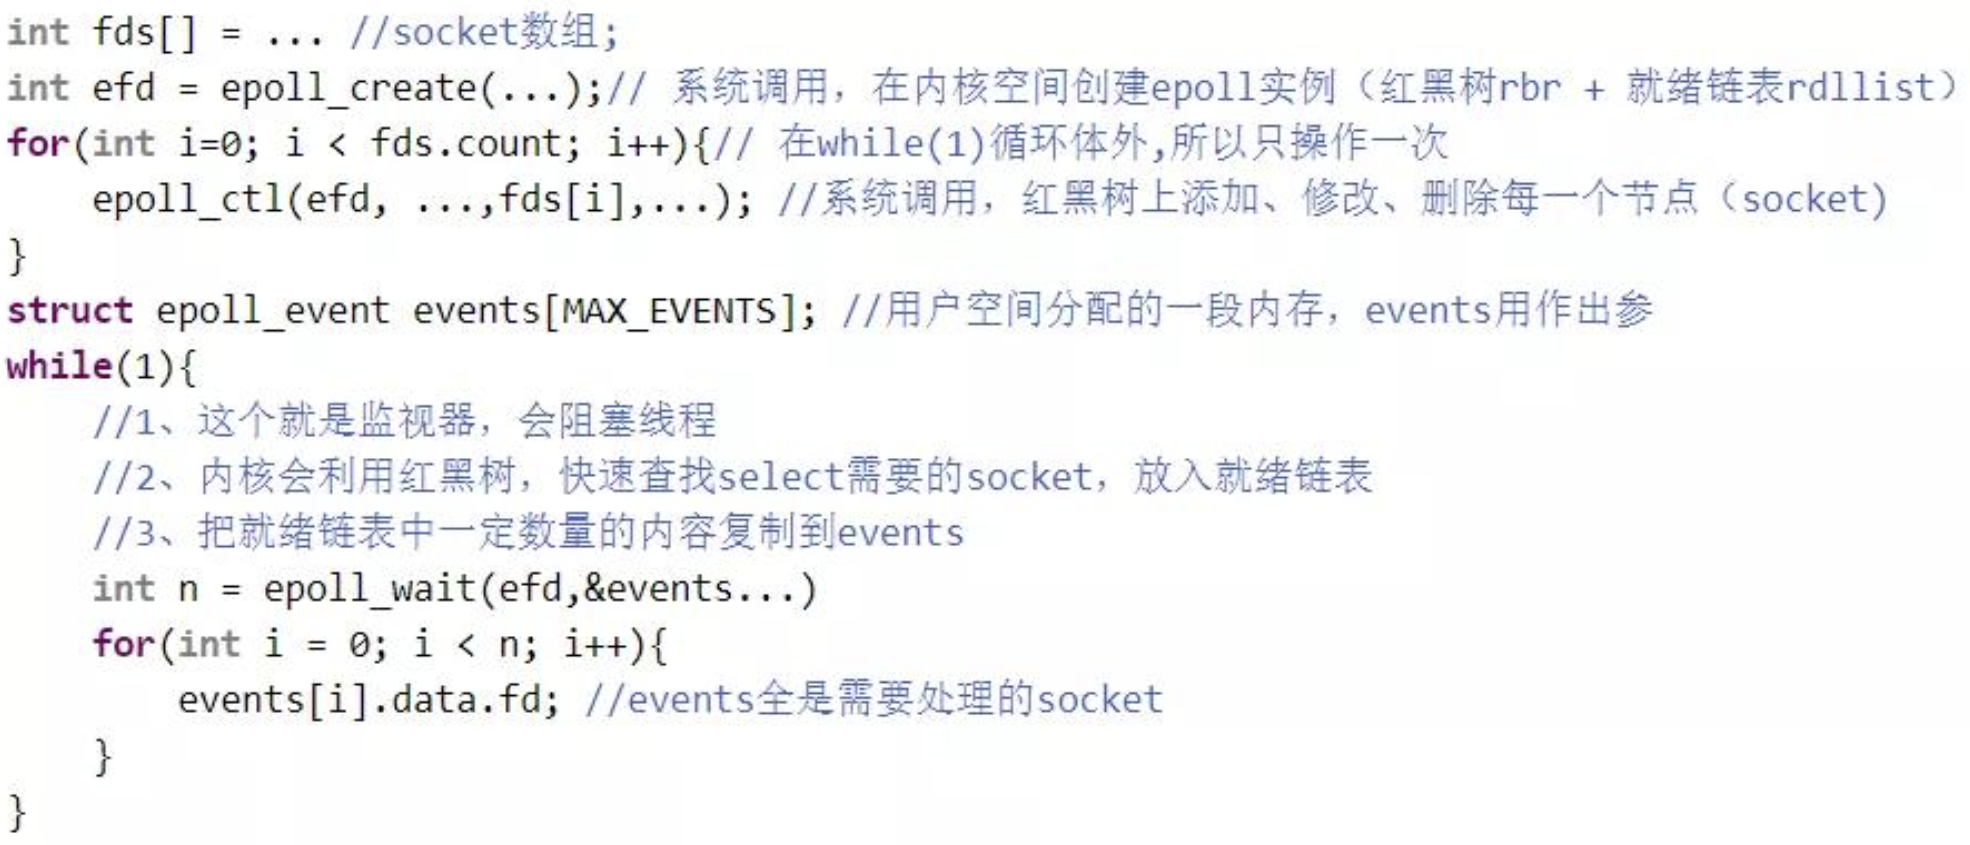
把socket/fd通过epoll_ctl加入红黑树管理;一旦注册的事件发生(比如收到数据、有新客户端连接、有数据需要发送等),可以快速通过fd从红黑树找到该epollitem返回给epoll_wait,然后进入for循环挨个处理这些事件,这样做的好处:
把以前的同步、阻塞改成了异步、非阻塞
把以前的多线程改成了单线程,也不涉及到线程切换和锁了!
貌似epoll的核心功能和协程是一样的呀,既然都用epoll解决多线程切换、锁、同步阻塞的问题了,还要协程干啥了?
(2) 仔细看,其实上述epoll+单线程的方式并不完美,还是有缺陷,比如:在接收到数据时要赶紧处理吧。万一收到的数据量很大,处理的逻辑又很复杂,非常耗时,整个线程是不是又被“卡住”了(类似的场景还有中断:为了避免中断嵌套,处理中断请求时要关闭中断的,所以中断的handler不能耗时太长,否则可能造成新来的中断被忽视丢弃)?好不容易通过epoll解决了accept、recv等方法的阻塞,现在却又卡在了数据处理上,咋办? 通过在处理数据这里重新生成新线程的方式来避免阻塞原来的主线程(专业名称叫回调函数)?比如下面这种写法:
while (1) {
    int nready = epoll_wait(epfd, events, EVENT_SIZE, -1);

    for (i = 0;i < nready;i ++) {

        int sockfd = events[i].data.fd;
        if (sockfd == listenfd) {
            int connfd = accept(listenfd, xxx, xxxx);

            setnonblock(connfd);

            ev.events = EPOLLIN | EPOLLET;
            ev.data.fd = connfd;
            epoll_ctl(epfd, EPOLL_CTL_ADD, connfd, &ev);

        } else {
            handle(sockfd);
        }
    }
}
int thread_cb(int sockfd) {
    // 此函数是在线程池创建的线程中运行。
    // 与handle不在一个线程上下文中运行
    recv(sockfd, rbuffer, length, 0);
    parser_proto(rbuffer, length);
    send(sockfd, sbuffer, length, 0);
}

int handle(int sockfd) {
    //此函数在主线程 main_thread 中运行
    //在此处之前,确保线程池已经启动。
    push_thread(sockfd, thread_cb); //将sockfd放到其他线程中运行(这里单独生成了线程池)。
}
复制代码
这种写法的好处:Handle函数将sockfd处理方式放到另一个已经其他的线程中运行。如此做法,将io操作(recv,send)与epoll_wait 不在一个处理流程里面,使得io操作(recv,send)与epoll_wait实现解耦,能避免server程序依赖epoll_wait的循环响应速度变慢;但还是有缺点:
由于每次处理数据都要调用线程,对cpu和内存的消耗又变大了,而且又涉及到多线程之间互斥/同步,绕来绕去怎么又回到原点了?
每一个子线程都需要管理好sockfd,避免在IO操作的时候,sockfd出现关闭或其他异常。根本原因是:执行回调函数时的代码环境和当初触发回调时的环境可能不一样了,这种异步回调时的容错是需要开发人员自行考虑的!
IO同步和异步之间的对比如下:
两种方式各有千秋,就不能优势互补、融合贯通一下:既有异步的性能优势,又有同步的代码逻辑清晰优势?
(3)再次回顾上个demo的缺陷:为了解决handler处理数据耗时太长而引入了线程池(本质是把同步处理变成了异步处理),而线程池又需要开发人员考虑sockfd关闭或异常等情况的容错,有没有其他办法替代线程池解决handler处理耗时的问题了?这就需要协程了!看看文章开头第一个协程的例子:同一个线程,通过yield和resume在生产者和消费者之间不停地切换(本质是在选择合适的代码执行),两边都不拉下,时机把握的刚刚好!把这个思路用到这里:handler处理数据耗时太长,导致线程“卡住”,耽误其他代码的执行(比如epoll_wait监听是否有事件发生),此时如果人为在handler加上yield,先跳转去执行epoll_wait;等到时机合适后再人为通过resume回到handler继续执行,图示如下:
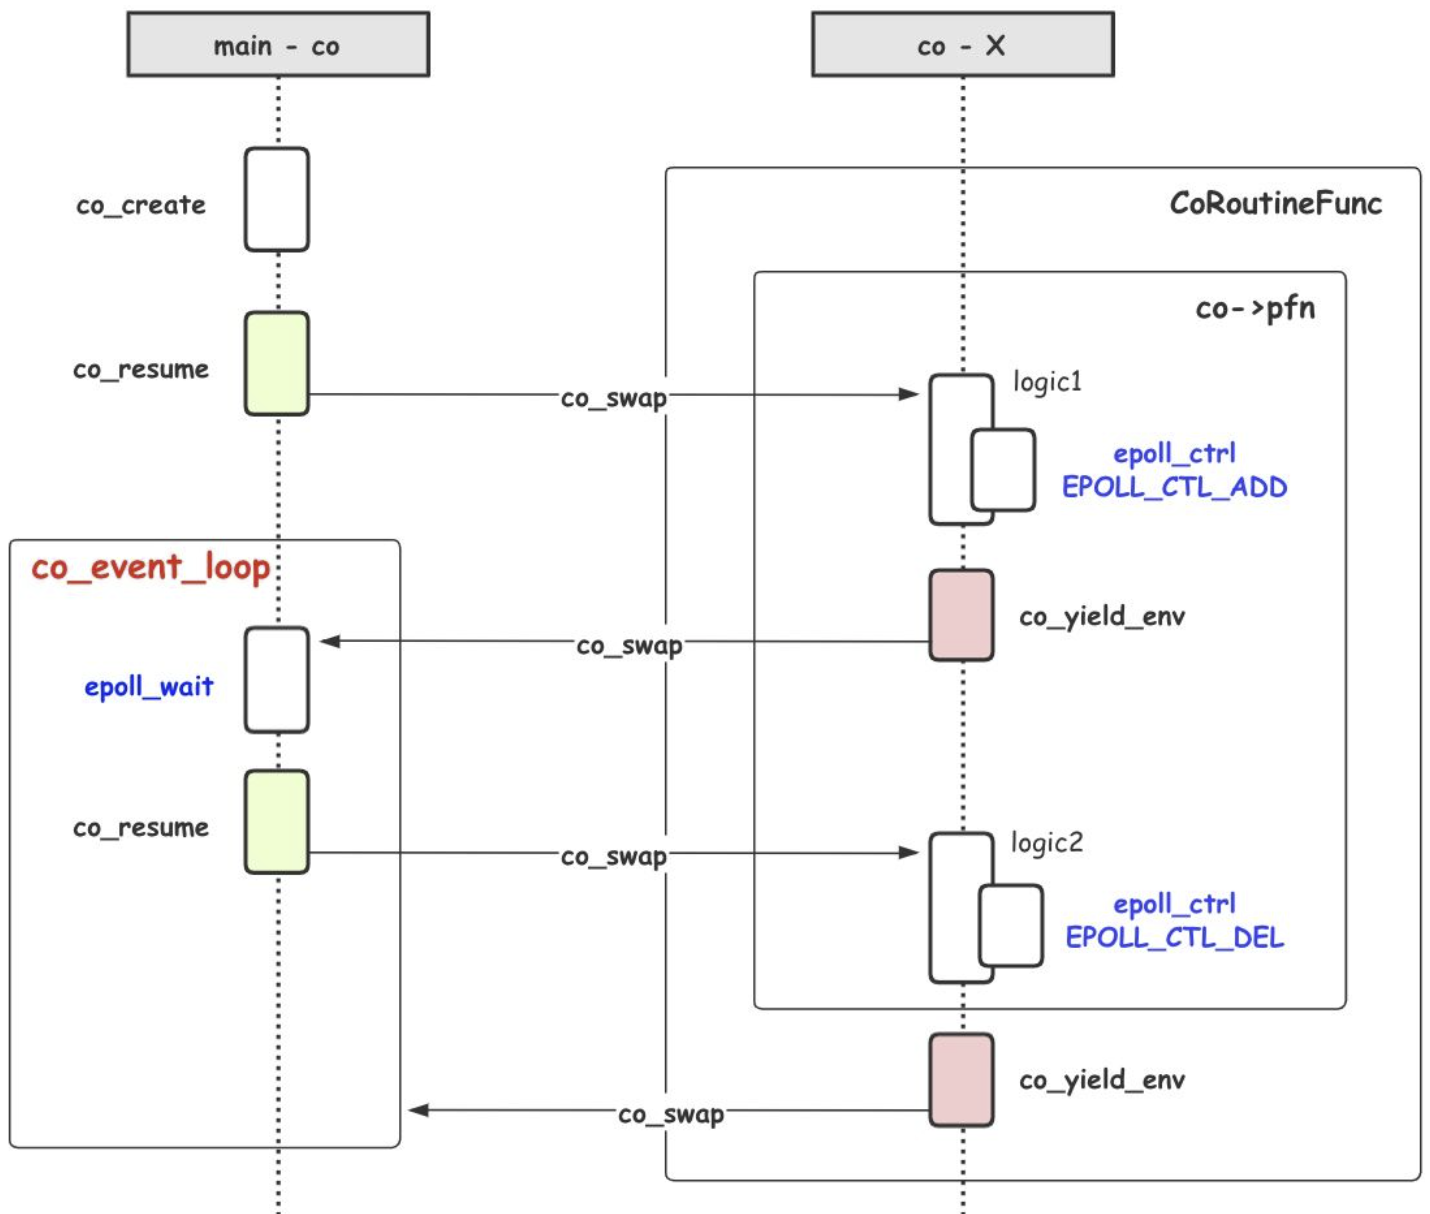
整个过程的特点:
始终保持单线程,不涉及线程切换、互斥/同步等
也不涉及异步回调,保持了同步的代码逻辑。handler代码执行的sockfd等重要的参数或环境没变!
人为通过yield、resume来回切换避免阻塞,在单线程中达到了多线程才有的异步性能!
上述的理论分析头头是道,但是在网络IO场景下,协程该怎么落地了?
3、java的协程实现
截至目前,java官方并未正式上线协程的实现框架,所以现阶段只能使用第三方的协程框架,诸如kilim、quasar、loom等;尽管实现方式不同,但远离都一样:自己有schedule在不同的代码来回切换!切换的时候context也要在内存保存,切回来的时候才能恢复执行。但是:代码切换(汇编层面就是jmp语句)都是在3环应用层自己控制的,不需要通过syscall进入0环内核再切换,所以不需要操作系统参与,效率高了不少!
总结:
1、由于协程是3环用户程序层面的切换,不需要操作系统参与,所以操作系统并没有提供统一的协程实现接口,所以截至目前协程也只是一种标准思路,而不是“标准库”!
2、epoll和协程是松耦合的,没有必然联系;只是在处网络IO请求的时候需要epoll来检测是否有事件到达。如果有,在通过协程调度器去执行。在处理非网络IO阻塞、读取文件等和网络无关的IO时,就用不上epoll了!
3、协程只适合IO密集型的任务进程,因为IO通常会伴随着大量的阻塞等待过程,而使用协程就可以在IO阻塞的同时让出CPU,而当IO就绪后再主动抢占CPU即可;
4、在单线程中:人为通过yield、resume等操作不停地寻找并执行可执行的代码,避免了代码不可执行时的阻塞、浪费cpu时间片的空转!
参考:
1、https://www.bilibili.com/video/BV1a5411b7aZ/?spm_id_from=333.788.recommend_more_video 协程和epoll
2、https://www.zhihu.com/question/455735271/answer/2264510160
3、https://www.zhihu.com/question/503292770/answer/2332328285
4、https://www.zhihu.com/question/503292770/answer/2261532968
5、https://www.zhihu.com/question/455735271
6、https://www.bilibili.com/video/BV1a5411b7aZ/?spm_id_from=333.788.recommend_more_video epoll和协程
7、https://github.com/wangbojing/NtyCo/wiki/NtyCo%E7%9A%84%E5%AE%9E%E7%8E%B0
8、https://jordanzheng.github.io/simple-analysis-kilim/ java协程开源库
#382 内核模块 » linux源码解读(二十六):android binder原理和实现方式 » 2022-10-11 16:03:23
- batsom
- 回复: 0
1、linux提供了好几种IPC的机制:共享内存、管道、消息队列、信号量等,所有IPC机制的核心或本质就是在内核开辟一块空间,通信双方都从这块空间读写数据,整个流程图示如下:
这种通信方式天生的缺陷看出来了么? A进程把数据拷贝到内核,B进程从内核再拷贝走,同一份数据可能在内存存放了3份,同时还复制了2次,感觉和app通过read、write等方法从磁盘读数据的效率一样低啊!既然app读写文件数据能通过mmap提升效率,IPC是不是也能通过mmap提升效率了?答案也是肯定的,这就是android中binder诞生的背景!相比传统的IPC,binder只需要拷贝1次,整个原理和流程如下图所示:

A进程还是把数据从用户空间写到内核缓存区,也就是生产者的流程或方式没变!改动最大的就是消费端了:先是内核建立数据接受缓存区,但这个缓存区和内核缓存区建立了映射,换句话说用的是同一块物理地址!接着是接收端进程空间和内核的数据接受缓存区页也建立映射,换句话说用的也是同一块物理地址,这样一来内核实际只用了1块物理地址,但是这块物理地址映射了2个虚拟地址(感觉好鸡贼.....)!
2、原理和本质其实也很简单:通信双方不就是共用一块物理内存么?既然双方都要依靠这块内存,那么对这块内存的管理就尤为重要了!围绕这块内存的各种操作,也就是binder的各种操作,都定义在了binder_fops 结构体中,如下:
static const struct file_operations binder_fops = {
    .owner = THIS_MODULE,
    .poll = binder_poll,
    .unlocked_ioctl = binder_ioctl,
    .compat_ioctl = binder_ioctl,
    .mmap = binder_mmap,
    .open = binder_open,
    .flush = binder_flush,
    .release = binder_release,
};
从名字就能看出来,分别是poll、io控制、mmap、打开、刷新和释放,通过这些接口完全能够操作共用的物理内存了!老规矩,在分析具体的实现方法前,先看看有哪些重要的结构体,从这些结构体的属性字段就能管中窥豹,看出具体怎么落地实现,结构体主要字段和关联关系如下:
(2)要想实现IPC,第一个就要在内核开辟内存空间,否则交换个毛的数据啊!看上面的结构体,交换数据的空间在binder_buffer中,和binder_proc中的buffers的字段是关联的,所以binder驱动先生成binder_proc实例(本质是用来管理交换数据的公共内存),初始化后加入链表队列,整个过程在binder_open方法内部实现的,如下:
/*1、新生成、初始化binder_proc实例,并加入binder_procs全局队列
  2、初始化todo队列和等待队列
*/
static int binder_open(struct inode *nodp, struct file *filp)
{
    struct binder_proc *proc;

    binder_debug(BINDER_DEBUG_OPEN_CLOSE, "binder_open: %d:%d\n",
             current->group_leader->pid, current->pid);
    // 分配 binder_proc 数据结构内存
    proc = kzalloc(sizeof(*proc), GFP_KERNEL);
    if (proc == NULL)
        return -ENOMEM;
    //增加task结构体的引用计数
    get_task_struct(current);
    proc->tsk = current;
    proc->vma_vm_mm = current->mm;
    INIT_LIST_HEAD(&proc->todo);//初始化待处理事件队列头
    init_waitqueue_head(&proc->wait);//初始化等待队列头
    proc->default_priority = task_nice(current);
    //锁定临界区
    binder_lock(__func__);
    // 增加BINDER_STAT_PROC的对象计数
    binder_stats_created(BINDER_STAT_PROC);
    /*添加新生成的proc_node到 binder_procs全局队列中,
    这样任何进程就可以访问到其他进程的 binder_proc 对象了*/
    hlist_add_head(&proc->proc_node, &binder_procs);
    proc->pid = current->group_leader->pid;
    INIT_LIST_HEAD(&proc->delivered_death);
    filp->private_data = proc;
    //释放临界区的锁
    binder_unlock(__func__);

    if (binder_debugfs_dir_entry_proc) {
        char strbuf[11];

        snprintf(strbuf, sizeof(strbuf), "%u", proc->pid);
        proc->debugfs_entry = debugfs_create_file(strbuf, S_IRUGO,
            binder_debugfs_dir_entry_proc, proc, &binder_proc_fops);
    }

    return 0;
}
既然binder_open是生成binder_proc实例,用完后也需要释放和回收,避免内存泄漏,binder驱动提供了binder_release方法,如下:
static int binder_release(struct inode *nodp, struct file *filp)
{
    struct binder_proc *proc = filp->private_data;

    debugfs_remove(proc->debugfs_entry);
    binder_defer_work(proc, BINDER_DEFERRED_RELEASE);

    return 0;
}
static void
binder_defer_work(struct binder_proc *proc, enum binder_deferred_state defer)
{
    mutex_lock(&binder_deferred_lock);
    proc->deferred_work |= defer;
    if (hlist_unhashed(&proc->deferred_work_node)) {
        //binder_proc实例添加到释放队列
        hlist_add_head(&proc->deferred_work_node,
                &binder_deferred_list);
        schedule_work(&binder_deferred_work);
    }
    mutex_unlock(&binder_deferred_lock);
}
(3) binder_proc本质上是用来管理共用内存的结构体,这个实例化后就需要开始最重要的一步了:在进程虚拟地址申请内存,然后映射到内核的物理地址,这个过程是在binder_map中实现的,代码如下:
/*把内核的物理内存映射到用户进程地址空间中,这样就可以像操作用户内存那样操作内核内存*/
static int binder_mmap(struct file *filp, struct vm_area_struct *vma)
{
    int ret;
    struct vm_struct *area;
    //获取proc实例,这里有通信双方的共用内存
    struct binder_proc *proc = filp->private_data;
    const char *failure_string;
    //通信双方的共用内存
    struct binder_buffer *buffer;

    if (proc->tsk != current)
        return -EINVAL;
    //共用内存最多4m,不能再多了
    if ((vma->vm_end - vma->vm_start) > SZ_4M)
        vma->vm_end = vma->vm_start + SZ_4M;

    binder_debug(BINDER_DEBUG_OPEN_CLOSE,
             "binder_mmap: %d %lx-%lx (%ld K) vma %lx pagep %lx\n",
             proc->pid, vma->vm_start, vma->vm_end,
             (vma->vm_end - vma->vm_start) / SZ_1K, vma->vm_flags,
             (unsigned long)pgprot_val(vma->vm_page_prot));
    //看看flags是否合法
    if (vma->vm_flags & FORBIDDEN_MMAP_FLAGS) {
        ret = -EPERM;
        failure_string = "bad vm_flags";
        goto err_bad_arg;
    }
    vma->vm_flags = (vma->vm_flags | VM_DONTCOPY) & ~VM_MAYWRITE;
    //锁定临界区,便于在进程之间互斥,避免不同的进程同时申请虚拟内存
    mutex_lock(&binder_mmap_lock);
    if (proc->buffer) {//这块内存已经映射了
        ret = -EBUSY;
        failure_string = "already mapped";
        goto err_already_mapped;
    }
    /*从/proc/self/maps查找未使用的虚拟内存,并申请内核虚拟内存空间
    注意:这里是进程的虚拟地址空间
    */
    area = get_vm_area(vma->vm_end - vma->vm_start, VM_IOREMAP);
    if (area == NULL) {
        ret = -ENOMEM;
        failure_string = "get_vm_area";
        goto err_get_vm_area_failed;
    }
    // 将申请到的内存地址保存到 binder_proc 对象中
    proc->buffer = area->addr;
    proc->user_buffer_offset = vma->vm_start - (uintptr_t)proc->buffer;
    mutex_unlock(&binder_mmap_lock);

#ifdef CONFIG_CPU_CACHE_VIPT
    if (cache_is_vipt_aliasing()) {
        while (CACHE_COLOUR((vma->vm_start ^ (uint32_t)proc->buffer))) {
            pr_info("binder_mmap: %d %lx-%lx maps %p bad alignment\n", proc->pid, vma->vm_start, vma->vm_end, proc->buffer);
            vma->vm_start += PAGE_SIZE;
        }
    }
#endif
    //根据请求到的内存空间大小,分配给binder_proc对象的pages, 用于保存指向物理页的指针
    proc->pages = kzalloc(sizeof(proc->pages[0]) * ((vma->vm_end - vma->vm_start) / PAGE_SIZE), GFP_KERNEL);
    if (proc->pages == NULL) {
        ret = -ENOMEM;
        failure_string = "alloc page array";
        goto err_alloc_pages_failed;
    }
    //共用内存大小,不超过4M
    proc->buffer_size = vma->vm_end - vma->vm_start;

    vma->vm_ops = &binder_vm_ops;
    vma->vm_private_data = proc;
    //分配一个物理页
    if (binder_update_page_range(proc, 1, proc->buffer, proc->buffer + PAGE_SIZE, vma)) {
        ret = -ENOMEM;
        failure_string = "alloc small buf";
        goto err_alloc_small_buf_failed;
    }
    buffer = proc->buffer;
    INIT_LIST_HEAD(&proc->buffers);
    //将binder_buffer对象放入到proc->buffers链表中,便于统一管理
    list_add(&buffer->entry, &proc->buffers);
    buffer->free = 1;
    /*新生成的buffer加入红黑树管理*/
    binder_insert_free_buffer(proc, buffer);
    proc->free_async_space = proc->buffer_size / 2;
    //内存屏障,防止乱序
    barrier();
    proc->files = get_files_struct(current);
    proc->vma = vma;
    proc->vma_vm_mm = vma->vm_mm;

    /*pr_info("binder_mmap: %d %lx-%lx maps %p\n",
         proc->pid, vma->vm_start, vma->vm_end, proc->buffer);*/
    return 0;

err_alloc_small_buf_failed:
    kfree(proc->pages);
    proc->pages = NULL;
err_alloc_pages_failed:
    mutex_lock(&binder_mmap_lock);
    vfree(proc->buffer);
    proc->buffer = NULL;
err_get_vm_area_failed:
err_already_mapped:
    mutex_unlock(&binder_mmap_lock);
err_bad_arg:
    pr_err("binder_mmap: %d %lx-%lx %s failed %d\n",
           proc->pid, vma->vm_start, vma->vm_end, failure_string, ret);
    return ret;
}
这里面最核心的函数就是binder_update_page_range了,这个函数要么释放物理页,要么分配物理页;如果分配物理页,还会建立和进程虚拟地址空间的映射关系!其中真正建立虚拟内存和物理页映射关系的当属map_kernel_range_noflush和vm_insert_page函数了:前者是内核虚拟内存和物理页建立映射,后者是进程虚拟内存和物理页建立映射。整个代码如下:
/*分配和释放物理页;如果是分配,同时建立和进程虚拟地址空间的映射*/
static int binder_update_page_range(struct binder_proc *proc, int allocate,
                    void *start, void *end,
                    struct vm_area_struct *vma)
{
    void *page_addr;
    unsigned long user_page_addr;
    struct page **page;
    struct mm_struct *mm;

    binder_debug(BINDER_DEBUG_BUFFER_ALLOC,
             "%d: %s pages %p-%p\n", proc->pid,
             allocate ? "allocate" : "free", start, end);

    if (end <= start)
        return 0;

    trace_binder_update_page_range(proc, allocate, start, end);

    if (vma)
        mm = NULL;
    else
        /* 读取进程的内存描述符(mm_struct),
         * 并增加内存描述符(mm_struct)中的mm_users用户计数,防止mm_struct被释放*/
        mm = get_task_mm(proc->tsk);

    if (mm) {
        /*获取写锁*/
        down_write(&mm->mmap_sem);
        vma = proc->vma;
        if (vma && mm != proc->vma_vm_mm) {
            pr_err("%d: vma mm and task mm mismatch\n",
                proc->pid);
            vma = NULL;
        }
    }
    //如果传入的allocate是0,就是释放物理页
    if (allocate == 0)
        goto free_range;

    if (vma == NULL) {
        pr_err("%d: binder_alloc_buf failed to map pages in userspace, no vma\n",
            proc->pid);
        goto err_no_vma;
    }
    /* 开始循环分配物理页,并建立映射,每次循环分配1个页*/
    for (page_addr = start; page_addr < end; page_addr += PAGE_SIZE) {
        int ret;
        /* 确定页所存放的数组的位置,按内核虚拟地址由小到大排列*/
        page = &proc->pages[(page_addr - proc->buffer) / PAGE_SIZE];

        BUG_ON(*page);
        //最核心的地方;分配物理页
        *page = alloc_page(GFP_KERNEL | __GFP_HIGHMEM | __GFP_ZERO);
        if (*page == NULL) {
            pr_err("%d: binder_alloc_buf failed for page at %p\n",
                proc->pid, page_addr);
            goto err_alloc_page_failed;
        }
        /*将内核虚拟地址与该物理页建立映射关系,最终调用的是
        mm\vmalloc.c的vmap_page_range_noflush,然后依次递进调用
        vmap_pud_range、vmap_pmd_range、vmap_pte_range、set_pte_at设置页表的4级映射关系;
        注意:这里映射的是内核虚拟地址空间,用户进程的虚拟地址空间映射在后面,
        调用的是vm_insert_page方法*/
        ret = map_kernel_range_noflush((unsigned long)page_addr,
                    PAGE_SIZE, PAGE_KERNEL, page);
        //页表更新后刷新cpu的TLB缓存
        flush_cache_vmap((unsigned long)page_addr,
                (unsigned long)page_addr + PAGE_SIZE);
        if (ret != 1) {
            pr_err("%d: binder_alloc_buf failed to map page at %p in kernel\n",
                   proc->pid, page_addr);
            goto err_map_kernel_failed;
        }
        /*计算用户态虚地址*/
        user_page_addr =
            (uintptr_t)page_addr + proc->user_buffer_offset;
        /*将用户虚拟地址与该物理页建立映射关系*/
        ret = vm_insert_page(vma, user_page_addr, page[0]);
        if (ret) {
            pr_err("%d: binder_alloc_buf failed to map page at %lx in userspace\n",
                   proc->pid, user_page_addr);
            goto err_vm_insert_page_failed;
        }
        /* vm_insert_page does not seem to increment the refcount */
    }
    if (mm) {
        //释放写锁
        up_write(&mm->mmap_sem);
        /*减少内存描述符(mm_struct)中的mm_users用户计数*/
        mmput(mm);
    }
    return 0;

free_range:
    for (page_addr = end - PAGE_SIZE; page_addr >= start;
         page_addr -= PAGE_SIZE) {
        page = &proc->pages[(page_addr - proc->buffer) / PAGE_SIZE];
        if (vma)
            zap_page_range(vma, (uintptr_t)page_addr +
                proc->user_buffer_offset, PAGE_SIZE, NULL);
err_vm_insert_page_failed:
        unmap_kernel_range((unsigned long)page_addr, PAGE_SIZE);
err_map_kernel_failed:
        __free_page(*page);
        *page = NULL;
err_alloc_page_failed:
        ;
    }
err_no_vma:
    if (mm) {
        up_write(&mm->mmap_sem);
        mmput(mm);
    }
    return -ENOMEM;
}
(4)内存映射完毕后,万事俱备,只欠数据了!通信双方都可以从内核缓存区读写数据,调用链条比较长,是这样的:binder_ioctl() -> binder_get_thread() -> binder_ioctl_write_read() -> binder_thread_write()/binder_thread_read()!最终执行的就是binder_thread_write和binder_thread_read方法了,这两个方法的核心思路也很简单:循环读取cmd,根据不同的cmd才取不同的动作;具体读写数据时,因为涉及到内核和用户进程之间的拷贝,最终调用的还是copy_from_user和copy_to_user。因为代码太长,我这里只截取少量核心代码展示:
/*循环读取cmd,根据不同的cmd才取不同的动作;具体读写数据时,因为涉及到内核和用户进程之间
的拷贝,最终调用的还是copy_from_user和copy_to_user*/
static int binder_thread_write(struct binder_proc *proc,
            struct binder_thread *thread,
            binder_uintptr_t binder_buffer, size_t size,
            binder_size_t *consumed)
{
    uint32_t cmd;
    void __user *buffer = (void __user *)(uintptr_t)binder_buffer;
    //数据起始地址
    void __user *ptr = buffer + *consumed;
    //数据结束地址
    void __user *end = buffer + size;
    //可能有多个命令或数据要处理,需要循环
    while (ptr < end && thread->return_error == BR_OK) {
        //读取一个cmd命令
        if (get_user(cmd, (uint32_t __user *)ptr))
            return -EFAULT;
        //起始地址条过cmd命令占用的空间
        ptr += sizeof(uint32_t);
                 .................
                switch (cmd) {
        case BC_INCREFS:
        case BC_ACQUIRE:
        case BC_RELEASE:
                case BC_REPLY: {
            struct binder_transaction_data tr;
            //从3环用户态写数据到内核态,离不开copy_from_user和copy_to_user,任何情况都不例外
            if (copy_from_user(&tr, ptr, sizeof(tr)))
                return -EFAULT;
            ptr += sizeof(tr);
            binder_transaction(proc, thread, &tr, cmd == BC_REPLY);
            break;
        }
}
binder_thread_read核心思路: 检查当前线程是否被唤醒。如果是,核心功能就是执行copy_to_user让3环的进程把数据拷贝走!如果不是就继续retry循环,核心代码如下:有个while死循环,在循环中探查是否有数据;如果没数据就回到retry继续等待唤醒!
retry:
    // 获取将要处理的任务
    wait_for_proc_work = thread->transaction_stack == NULL &&
                list_empty(&thread->todo);
    if (wait_for_proc_work) {
        if (!(thread->looper & (BINDER_LOOPER_STATE_REGISTERED |
                    BINDER_LOOPER_STATE_ENTERED))) {
            binder_user_error("binder: %d:%d ERROR: Thread waiting "
                "for process work before calling BC_REGISTER_"
                "LOOPER or BC_ENTER_LOOPER (state %x)\n",
                proc->pid, thread->pid, thread->looper);
            wait_event_interruptible(binder_user_error_wait,
                         binder_stop_on_user_error < 2);
        }
        binder_set_nice(proc->default_priority);
        if (non_block) {
            // 非阻塞且没有数据则返回 EAGAIN
            if (!binder_has_proc_work(proc, thread))
                ret = -EAGAIN;
        } else
            // 阻塞则进入睡眠状态,等待可操作的任务
            ret = wait_event_freezable_exclusive(proc->wait, binder_has_proc_work(proc, thread));
    } else {
        if (non_block) {
            if (!binder_has_thread_work(thread))
                ret = -EAGAIN;
        } else
            ret = wait_event_freezable(thread->wait, binder_has_thread_work(thread));
    }

    binder_lock(__func__);

    if (wait_for_proc_work)
        proc->ready_threads--;
    thread->looper &= ~BINDER_LOOPER_STATE_WAITING;

    if (ret)
        return ret;

    while (1) {
        uint32_t cmd;
        struct binder_transaction_data tr;
        struct binder_work *w;
        struct binder_transaction *t = NULL;

        // 获取 binder_work 对象
        if (!list_empty(&thread->todo))
            w = list_first_entry(&thread->todo, struct binder_work, entry);
        else if (!list_empty(&proc->todo) && wait_for_proc_work)
            w = list_first_entry(&proc->todo, struct binder_work, entry);
        else {
            if (ptr - buffer == 4 && !(thread->looper & BINDER_LOOPER_STATE_NEED_RETURN)) /* no data added没有数据就回到retry继续等 */
                goto retry;
            break;
        }     ..................    }
(5)上述通过读写公共内存通信的方式原理很简单,实现的时候还有点需要注意:记得介绍linux IPC时的poll么? binder面临同样的问题:读取数据的进程是怎么知道公共内存有数据的了?这个问题是在binder_transaction解决的:binder_thread_write函数执行完后会调用binder_transaction,最后两行代码就是唤醒目标线程了,刚好和binder_thread_read中的循环探查数据完美闭环!
if (target_wait)
// 唤醒目标线程
wake_up_interruptible(target_wait);
总结:
1、整个过程本质就是更改页表,让不同的虚拟地址映射到同一个物理地址,和windows下用shadow walker过PG保护的原理一模一样!
2、3环进程和内核之间拷贝数据用的还是copy_from_user和copy_to_user,一万年都不变的!
参考:
1、https://www.bilibili.com/video/BV1Kf4y1z7kT?p=3&spm_id_from=pageDriver android为什么选binder
2、https://zhuanlan.zhihu.com/p/35519585 binder原理剖析
3、https://github.com/xdtianyu/SourceAnalysis/blob/master/Binder%E6%BA%90%E7%A0%81%E5%88%86%E6%9E%90.md binder源码分析
4、https://www.bilibili.com/video/BV1Ef4y127nU 手写binder进程通信框架
https://www.bilibili.com/video/BV1Zp4y1 … re_video.1
5、https://wangkuiwu.github.io/2014/09/02/Binder-Datastruct/ binder中的数据结构
6、https://blog.csdn.net/zhanshenwu/article/details/106458188 binder地址映射全解
7、https://blog.csdn.net/ljt326053002/article/details/105328384 binder源码分析
#383 文件系统模块 » linux源码解读(二十五):mmap原理和实现方式 » 2022-10-11 15:52:52
- batsom
- 回复: 0
众所周知,linux的理念是万物皆文件,自然少不了对文件的各种操作,常见的诸如open、read、write等,都是大家耳熟能详的操作。除了这些常规操作外,还有一个不常规的操作:mmap,其在file_operations结构体中的定义如下: 这个函数的作用是什么了?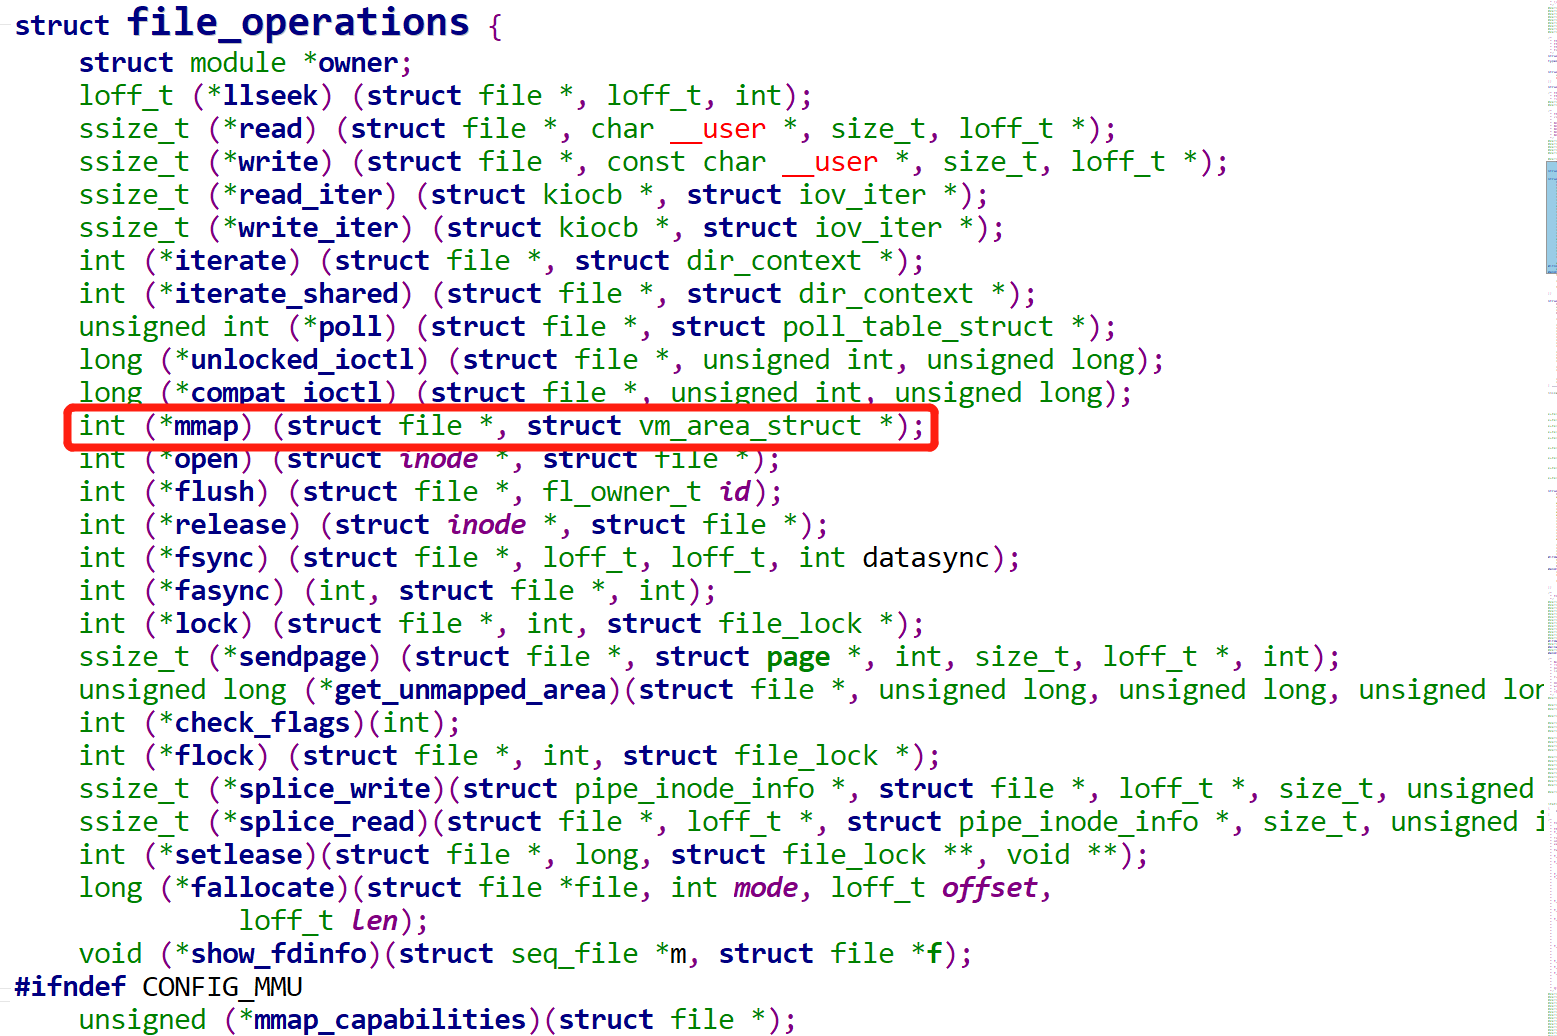
1、对于读写文件,传统经典的api都是这样的:先open文件,拿到文件的fd;再调用read或write读写文件。由于文件存放在磁盘,3环的app是没有权限直接操作磁盘的,所以需要通过系统调用进入操作系统的内核,再通过事先安装好的驱动读写磁盘数据。这样一来,磁盘的数据会分别存放在内核空间和用户空间,也就是同一份数据会在内存内部放在两个不同的地方,而且也需要拷贝2次,整个过程是“又费柴油又费马达”;流程示例如下: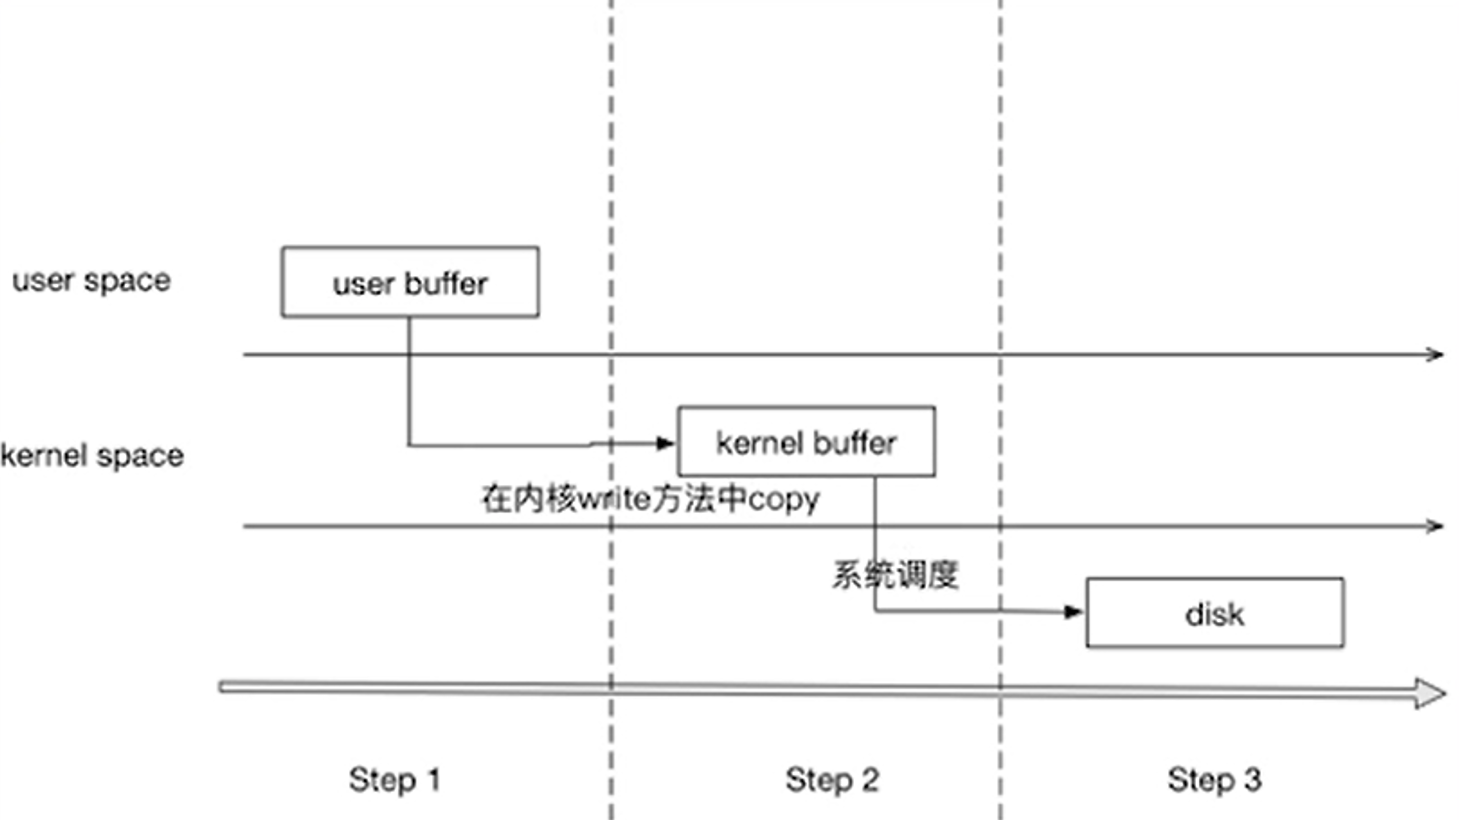
这样做既然浪费内存空间,也浪费拷贝的时间,该怎么优化了?
2、上述做法的结症在于同一份数据拷贝2次,那么能不能只拷贝1次了?答案是可以的,mmap就是这么干的!
(1)先看看mmap的用例,直观了解一下是怎么使用的,如下:
#include<stdlib.h>
#include<sys/mman.h>
#include<fcntl.h>

int main(void)
{
    int *p;
    int fd = open("hello", O_RDWR);
    if(fd < 0)
    {
        perror("open hello");
        exit(1);
    }
    p = mmap(NULL,6, PROT_WRITE, MAP_SHARED, fd, 0);
    if(p == MAP_FAILED)
    {
       perror("mmap"); //程序进里面了,证明mmap失败
       exit(1);
    }
    close(fd);
    p[0] = 0x30313233;
    munmap(p, 6);
    return 0;

}
用例是不是很简单了?还是先调用open函数得到文件的fd,再调用mmap建立文件在内存的映射,这时得到了文件在内存映射的地址p,最后通过p指针读写文件数据!整个逻辑非常简单,是个码农都能看懂!这么简单方便、效率还高(只复制一次)的mmap又是怎么实现的了?
(2)先说一下mmap的原理:mmap只复制1次的原理也简单,就是在进程的虚拟内存开辟一块空间,映射到内核的物理内存,并建立和文件的关联,再把文件内容读到这块内存;后续3环的app读写文件都不走磁盘了,而是直接读写这块建立好映射的内存!等到进程退出或出意外奔溃,操作系统把映射内存的数据重新写回磁盘的文件!
mmap的原理也不复杂,具体是到代码层面是怎么做的了?
(3)从上面的demo可以看出,3环应用层直接调用的是mmap函数,但很明显这个功能因为涉及到磁盘读写,肯定是需要操作系统支持得,所以mmap肯定需要通过系统调用进入内核执行代码。操作系统提供的系统调用函数是do_mmap,在mm\mmap.c文件中,代码如下:
/*
* The caller must hold down_write(¤t->mm->mmap_sem).
根据用户传入的参数做了一系列的检查,然后根据参数初始化vm_area_struct的标志vm_flags、
vma->vm_file = get_file(file)建立文件与vma的映射
*/
unsigned long do_mmap(struct file *file, unsigned long addr,
unsigned long len, unsigned long prot,
unsigned long flags, vm_flags_t vm_flags,
unsigned long pgoff, unsigned long *populate)
{
struct mm_struct *mm = current->mm;//当前进程的虚拟内存描述符
int pkey = 0;
*populate = 0;
if (!len)
return -EINVAL;
/*
* Does the application expect PROT_READ to imply PROT_EXEC?
*
* (the exception is when the underlying filesystem is noexec
* mounted, in which case we dont add PROT_EXEC.)
*/
if ((prot & PROT_READ) && (current->personality & READ_IMPLIES_EXEC))
if (!(file && path_noexec(&file->f_path)))
prot |= PROT_EXEC;
/* 假如没有设置MAP_FIXED标志,且addr小于mmap_min_addr, 因为可以修改addr,
所以就需要将addr设为mmap_min_addr的页对齐后的地址 */
if (!(flags & MAP_FIXED))
addr = round_hint_to_min(addr);
/* Careful about overflows.. 检查长度,防止溢出??*/
/* 进行Page大小的对齐,因为内存映射大小必须页对齐 */
len = PAGE_ALIGN(len);
if (!len)
return -ENOMEM;
/* offset overflow? */
if ((pgoff + (len >> PAGE_SHIFT)) < pgoff)
return -EOVERFLOW;
/* Too many mappings? */
/* 判断该进程的地址空间的虚拟区间数量是否超过了限制 */
if (mm->map_count > sysctl_max_map_count)
return -ENOMEM;
/* Obtain the address to map to. we verify (or select) it and ensure
* that it represents a valid section of the address space.
从当前进程的用户空间获取一个未被映射区间的起始地址:这里就涉及到红黑树了
*/
addr = get_unmapped_area(file, addr, len, pgoff, flags);
if (offset_in_page(addr))/* 检查addr是否有效 */
return addr;
if (prot == PROT_EXEC) {
pkey = execute_only_pkey(mm);
if (pkey < 0)
pkey = 0;
}
/* Do simple checking here so the lower-level routines won't have
* to. we assume access permissions have been handled by the open
* of the memory object, so we don't do any here.
*/
vm_flags |= calc_vm_prot_bits(prot, pkey) | calc_vm_flag_bits(flags) |
mm->def_flags | VM_MAYREAD | VM_MAYWRITE | VM_MAYEXEC;
/* 假如flags设置MAP_LOCKED,即类似于mlock()将申请的地址空间锁定在内存中,
检查是否可以进行lock*/
if (flags & MAP_LOCKED)
if (!can_do_mlock())
return -EPERM;
if (mlock_future_check(mm, vm_flags, len))
return -EAGAIN;
if (file) {
struct inode *inode = file_inode(file);
/*根据标志指定的map种类,把为文件设置的访问权考虑进去。
如果所请求的内存映射是共享可写的,就要检查要映射的文件是为写入而打开的,而不
是以追加模式打开的,还要检查文件上没有上强制锁。
对于任何种类的内存映射,都要检查文件是否为读操作而打开的。
*/
switch (flags & MAP_TYPE) {
case MAP_SHARED:
if ((prot&PROT_WRITE) && !(file->f_mode&FMODE_WRITE))
return -EACCES;
/*
* Make sure we don't allow writing to an append-only
* file..
*/
if (IS_APPEND(inode) && (file->f_mode & FMODE_WRITE))
return -EACCES;
/*
* Make sure there are no mandatory locks on the file.
*/
if (locks_verify_locked(file))
return -EAGAIN;
vm_flags |= VM_SHARED | VM_MAYSHARE;
if (!(file->f_mode & FMODE_WRITE))
vm_flags &= ~(VM_MAYWRITE | VM_SHARED);
/* fall through */
case MAP_PRIVATE:
if (!(file->f_mode & FMODE_READ))
return -EACCES;
if (path_noexec(&file->f_path)) {
if (vm_flags & VM_EXEC)
return -EPERM;
vm_flags &= ~VM_MAYEXEC;
}
if (!file->f_op->mmap)
return -ENODEV;
if (vm_flags & (VM_GROWSDOWN|VM_GROWSUP))
return -EINVAL;
break;
default:
return -EINVAL;
}
} else {
switch (flags & MAP_TYPE) {
case MAP_SHARED:
if (vm_flags & (VM_GROWSDOWN|VM_GROWSUP))
return -EINVAL;
/*
* Ignore pgoff.
*/
pgoff = 0;
vm_flags |= VM_SHARED | VM_MAYSHARE;
break;
case MAP_PRIVATE:
/*
* Set pgoff according to addr for anon_vma.
*/
pgoff = addr >> PAGE_SHIFT;
break;
default:
return -EINVAL;
}
}
/*
* Set 'VM_NORESERVE' if we should not account for the
* memory use of this mapping.
*/
if (flags & MAP_NORESERVE) {
/* We honor MAP_NORESERVE if allowed to overcommit */
if (sysctl_overcommit_memory != OVERCOMMIT_NEVER)
vm_flags |= VM_NORESERVE;
/* hugetlb applies strict overcommit unless MAP_NORESERVE */
if (file && is_file_hugepages(file))
vm_flags |= VM_NORESERVE;
}
/*创建和初始化虚拟内存区域,并加入红黑树管理*/
addr = mmap_region(file, addr, len, vm_flags, pgoff);
if (!IS_ERR_VALUE(addr) &&
((vm_flags & VM_LOCKED) ||
/*
假如没有设置MAP_POPULATE标志位内核并不在调用mmap()时就为进程分配物理内存空间,
而是直到下次真正访问地址空间时发现数据不存在于物理内存空间时才触发Page Fault
,将缺失的 Page 换入内存空间
*/
(flags & (MAP_POPULATE | MAP_NONBLOCK)) == MAP_POPULATE))
*populate = len;
return addr;
}代码有很多,但是核心功能其实并不复杂:找到空闲的虚拟内存地址,并根据不同的文件打开方式设置不同的vm标志位flag!在函数末尾处调用了mmap_region函数,核心功能是创建和初始化虚拟内存区域,并加入红黑树节点进行管理,代码如下:
/*创建和初始化虚拟内存区域,并加入红黑树节点进行管理*/
unsigned long mmap_region(struct file *file, unsigned long addr,
        unsigned long len, vm_flags_t vm_flags, unsigned long pgoff)
{
    struct mm_struct *mm = current->mm;
    struct vm_area_struct *vma, *prev;
    int error;
    struct rb_node **rb_link, *rb_parent;
    unsigned long charged = 0;

    /* Check against address space limit.
       申请的虚拟内存空间是否超过了限制 */
    if (!may_expand_vm(mm, vm_flags, len >> PAGE_SHIFT)) {
        unsigned long nr_pages;

        /*
         * MAP_FIXED may remove pages of mappings that intersects with
         * requested mapping. Account for the pages it would unmap.
         */
        nr_pages = count_vma_pages_range(mm, addr, addr + len);

        if (!may_expand_vm(mm, vm_flags,
                    (len >> PAGE_SHIFT) - nr_pages))
            return -ENOMEM;
    }

    /* Clear old maps
    检查[addr, addr+len)的区间是否存在映射空间,假如存在重合的映射空间需要munmap*/
    while (find_vma_links(mm, addr, addr + len, &prev, &rb_link,
                  &rb_parent)) {
        if (do_munmap(mm, addr, len))
            return -ENOMEM;
    }

    /*
     * Private writable mapping: check memory availability
     */
    if (accountable_mapping(file, vm_flags)) {
        charged = len >> PAGE_SHIFT;
        if (security_vm_enough_memory_mm(mm, charged))
            return -ENOMEM;
        vm_flags |= VM_ACCOUNT;
    }

    /*
     * Can we just expand an old mapping?
     检查是否可以合并[addr, addr+len)区间内的虚拟地址空间vma
     */
    vma = vma_merge(mm, prev, addr, addr + len, vm_flags,
            NULL, file, pgoff, NULL, NULL_VM_UFFD_CTX);
    if (vma)/* 假如合并成功,即使用合并后的vma, 并跳转至out */
        goto out;

    /*
     * Determine the object being mapped and call the appropriate
     * specific mapper. the address has already been validated, but
     * not unmapped, but the maps are removed from the list.
     如果不能和已有的虚拟内存区域合并,通过 Memory Descriptor 来申请一个 vma
     */
    vma = kmem_cache_zalloc(vm_area_cachep, GFP_KERNEL);
    if (!vma) {
        error = -ENOMEM;
        goto unacct_error;
    }

    vma->vm_mm = mm;
    vma->vm_start = addr;
    vma->vm_end = addr + len;
    vma->vm_flags = vm_flags;
    vma->vm_page_prot = vm_get_page_prot(vm_flags);
    vma->vm_pgoff = pgoff;
    INIT_LIST_HEAD(&vma->anon_vma_chain);//vma通过链表连接,这里初始化链表头

    /* 假如指定了文件映射 */
    if (file) {
         /* 映射的文件不允许写入,调用 deny_write_accsess(file) 排斥常规的文件操作 */
        if (vm_flags & VM_DENYWRITE) {
            error = deny_write_access(file);
            if (error)
                goto free_vma;
        }
        if (vm_flags & VM_SHARED) {/* 映射的文件允许其他进程可见, 标记文件为可写 */
            error = mapping_map_writable(file->f_mapping);
            if (error)
                goto allow_write_and_free_vma;
        }

        /* ->mmap() can change vma->vm_file, but must guarantee that
         * vma_link() below can deny write-access if VM_DENYWRITE is set
         * and map writably if VM_SHARED is set. This usually means the
         * new file must not have been exposed to user-space, yet.
         */
        vma->vm_file = get_file(file);/* 递增 File 的引用次数,返回 File 赋给 vma */
        error = file->f_op->mmap(file, vma); /* 调用文件系统指定的 mmap 函数*/
        if (error)
            goto unmap_and_free_vma;

        /* Can addr have changed??
         *
         * Answer: Yes, several device drivers can do it in their
         *         f_op->mmap method. -DaveM
         * Bug: If addr is changed, prev, rb_link, rb_parent should
         *      be updated for vma_link()
         */
        WARN_ON_ONCE(addr != vma->vm_start);

        addr = vma->vm_start;
        vm_flags = vma->vm_flags;
        /* 假如标志为 VM_SHARED,但没有指定映射文件,需要调用 shmem_zero_setup()
           shmem_zero_setup() 实际映射的文件是 dev/zero
        */
    } else if (vm_flags & VM_SHARED) {
        error = shmem_zero_setup(vma);
        if (error)
            goto free_vma;
    }
    /*新分配的vma加入红黑树*/
    vma_link(mm, vma, prev, rb_link, rb_parent);
    /* Once vma denies write, undo our temporary denial count */
    if (file) {
        if (vm_flags & VM_SHARED)
            mapping_unmap_writable(file->f_mapping);
        if (vm_flags & VM_DENYWRITE)
            allow_write_access(file);
    }
    file = vma->vm_file;
out:
    perf_event_mmap(vma);
    /* 更新进程的虚拟地址空间 mm */
    vm_stat_account(mm, vm_flags, len >> PAGE_SHIFT);
    if (vm_flags & VM_LOCKED) {
        if (!((vm_flags & VM_SPECIAL) || is_vm_hugetlb_page(vma) ||
                    vma == get_gate_vma(current->mm)))
            mm->locked_vm += (len >> PAGE_SHIFT);
        else
            vma->vm_flags &= VM_LOCKED_CLEAR_MASK;
    }

    if (file)
        uprobe_mmap(vma);

    /*
     * New (or expanded) vma always get soft dirty status.
     * Otherwise user-space soft-dirty page tracker won't
     * be able to distinguish situation when vma area unmapped,
     * then new mapped in-place (which must be aimed as
     * a completely new data area).
     */
    vma->vm_flags |= VM_SOFTDIRTY;

    vma_set_page_prot(vma);

    return addr;

unmap_and_free_vma:
    vma->vm_file = NULL;
    fput(file);

    /* Undo any partial mapping done by a device driver. */
    unmap_region(mm, vma, prev, vma->vm_start, vma->vm_end);
    charged = 0;
    if (vm_flags & VM_SHARED)
        mapping_unmap_writable(file->f_mapping);
allow_write_and_free_vma:
    if (vm_flags & VM_DENYWRITE)
        allow_write_access(file);
free_vma:
    kmem_cache_free(vm_area_cachep, vma);
unacct_error:
    if (charged)
        vm_unacct_memory(charged);
    return error;
}
以上两个函数的核心功能是查找、分配、初始化空闲的vma,并加入链表和红黑树管理,同时设置vma的各种flags属性,便于后续管理!那么问题来了:数据最终都是要存放在物理内存的,截至目前所有的操作都是虚拟内存,这些vma都是在哪和物理内存建立映射的了?关键的函数是remap_pfn_range,在mm/memory.c文件中;
/**
 * remap_pfn_range - remap kernel memory to userspace
   将内核空间的内存映射到用户空间,或者说是
   将用户空间的一个vma虚拟内存区映射到以page开始的一段连续物理页面上
 * @vma: user vma to map to:需要映射(或者说挂载关联)物理地址的vma
 * @addr: target user address to start at:用户空间地址的起始位置
 * @pfn: physical address of kernel memory:内核的物理地址空间
 * @size: size of map area
 * @prot: page protection flags for this mapping:内存页面的属性
 *
 *  Note: this is only safe if the mm semaphore is held when called.
 */
int remap_pfn_range(struct vm_area_struct *vma, unsigned long addr,
            unsigned long pfn, unsigned long size, pgprot_t prot)
{
    pgd_t *pgd;
    unsigned long next;
    /*需要映射的虚拟地址尾部:注意要页对齐,因为cpu硬件是以页为单位管理内存的*/
    unsigned long end = addr + PAGE_ALIGN(size);
    struct mm_struct *mm = vma->vm_mm;
    unsigned long remap_pfn = pfn;
    int err;

    /*
     * Physically remapped pages are special. Tell the
     * rest of the world about it:
     *   VM_IO tells people not to look at these pages
     *    (accesses can have side effects).
     *   VM_PFNMAP tells the core MM that the base pages are just
     *    raw PFN mappings, and do not have a "struct page" associated
     *    with them.
     *   VM_DONTEXPAND
     *      Disable vma merging and expanding with mremap().
     *   VM_DONTDUMP
     *      Omit vma from core dump, even when VM_IO turned off.
     *
     * There's a horrible special case to handle copy-on-write
     * behaviour that some programs depend on. We mark the "original"
     * un-COW'ed pages by matching them up with "vma->vm_pgoff".
     * See vm_normal_page() for details.
     */
    if (is_cow_mapping(vma->vm_flags)) {
        if (addr != vma->vm_start || end != vma->vm_end)
            return -EINVAL;
        vma->vm_pgoff = pfn;
    }

    err = track_pfn_remap(vma, &prot, remap_pfn, addr, PAGE_ALIGN(size));
    if (err)
        return -EINVAL;
    /*改变虚拟地址的标志*/
    vma->vm_flags |= VM_IO | VM_PFNMAP | VM_DONTEXPAND | VM_DONTDUMP;

    BUG_ON(addr >= end);
    pfn -= addr >> PAGE_SHIFT;
    /*
    /* To find an entry in a generic PGD。宏定义展开后如下:
    #define pgd_index(address) (((address) >> PGDIR_SHIFT) & (PTRS_PER_PGD-1))
    #define pgd_offset(mm, address) ((mm)->pgd+pgd_index(address))
    查找addr第1级页目录项中对应的页表项的地址
    */
    pgd = pgd_offset(mm, addr);
    /*刷新TLB缓存;这个缓存和CPU的L1、L2、L3的缓存思想一致,
    既然进行地址转换需要的内存IO次数多,且耗时,
    那么干脆就在CPU里把页表尽可能地cache起来不就行了么,
    所以就有了TLB(Translation Lookaside Buffer),
    专门用于改进虚拟地址到物理地址转换速度的缓存。
    其访问速度非常快,和寄存器相当,比L1访问还快。*/
    flush_cache_range(vma, addr, end);
    do {
        /*
        计算下一个将要被映射的虚拟地址,如果addr到end可以被一个pgd映射的话,那么返回end的值
        */
        next = pgd_addr_end(addr, end);
        /*完成虚拟内存和物理内存映射,本质就是填写完CR3指向的页表;
        过程就是逐级完成:1级是pgd,上面已经完成;2级是pud,3级是pmd,4级是pte
        */
        err = remap_pud_range(mm, pgd, addr, next,
                pfn + (addr >> PAGE_SHIFT), prot);
        if (err)
            break;
    } while (pgd++, addr = next, addr != end);

    if (err)
        untrack_pfn(vma, remap_pfn, PAGE_ALIGN(size));

    return err;
}
最核心的就是remap_pud_range方法了,从这个方法开始,逐级构造页表的各个映射转换!阅读代码前,可以先熟悉一下4级页表转换原理如下:
代码如下:3个方法的结构类似,层层深入,直到最后一级pte!pte内部调用set_pte_at方法最终完成物理地址和虚拟地址的映射!
/*
 * maps a range of physical memory into the requested pages. the old
 * mappings are removed. any references to nonexistent pages results
 * in null mappings (currently treated as "copy-on-access")
 */
static int remap_pte_range(struct mm_struct *mm, pmd_t *pmd,
            unsigned long addr, unsigned long end,
            unsigned long pfn, pgprot_t prot)
{
    pte_t *pte;
    spinlock_t *ptl;

    pte = pte_alloc_map_lock(mm, pmd, addr, &ptl);
    if (!pte)
        return -ENOMEM;
    arch_enter_lazy_mmu_mode();
    do {
        BUG_ON(!pte_none(*pte));
        /*这是映射的最后一级:把物理地址的值填写到pte表项*/
        set_pte_at(mm, addr, pte, pte_mkspecial(pfn_pte(pfn, prot)));
        pfn++;
    } while (pte++, addr += PAGE_SIZE, addr != end);
    arch_leave_lazy_mmu_mode();
    pte_unmap_unlock(pte - 1, ptl);
    return 0;
}

static inline int remap_pmd_range(struct mm_struct *mm, pud_t *pud,
            unsigned long addr, unsigned long end,
            unsigned long pfn, pgprot_t prot)
{
    pmd_t *pmd;
    unsigned long next;

    pfn -= addr >> PAGE_SHIFT;
    pmd = pmd_alloc(mm, pud, addr);
    if (!pmd)
        return -ENOMEM;
    VM_BUG_ON(pmd_trans_huge(*pmd));
    do {
        next = pmd_addr_end(addr, end);
        if (remap_pte_range(mm, pmd, addr, next,
                pfn + (addr >> PAGE_SHIFT), prot))
            return -ENOMEM;
    } while (pmd++, addr = next, addr != end);
    return 0;
}

static inline int remap_pud_range(struct mm_struct *mm, pgd_t *pgd,
            unsigned long addr, unsigned long end,
            unsigned long pfn, pgprot_t prot)
{
    pud_t *pud;
    unsigned long next;

    pfn -= addr >> PAGE_SHIFT;
    /*返回pgd值*/
    pud = pud_alloc(mm, pgd, addr);
    if (!pud)
        return -ENOMEM;
    do {
        next = pud_addr_end(addr, end);
        if (remap_pmd_range(mm, pud, addr, next,
                pfn + (addr >> PAGE_SHIFT), prot))
            return -ENOMEM;
    } while (pud++, addr = next, addr != end);
    return 0;
}
注意事项&总结事项:
1、脱壳的时候如果遇到mmap就要注意了:有可能是要加载壳文件了!
2、页对齐的代码:也可以借鉴用来做其他数字的对齐,把PAGE_SIZE改成其他数字就好
#define PAGE_MASK (~(PAGE_SIZE-1))
#define PAGE_ALIGN(x) ((x + PAGE_SIZE - 1) & PAGE_MASK)
3、核心原理:只分配1块物理内存,把进程的虚拟地址映射到这块物理内存,达到读写一次到位的目的!
参考:
1、https://mp.weixin.qq.com/s/y4LT5rtLZXXSvk66w3tVcQ 三种实现mmap的方式
2、https://www.bilibili.com/video/BV1XK411A7q2 linux mmap机制
3、https://www.bilibili.com/video/BV1mk4y1C76p mmap机制
4、https://www.leviathan.vip/2019/01/13/mmap%E6%BA%90%E7%A0%81%E5%88%86%E6%9E%90/ mmap源码分析
5、https://www.cnblogs.com/pengdonglin137/p/8150981.html remap_pfn_range源码分析
6、https://zhuanlan.zhihu.com/p/79607142 TLB缓存
#384 内核模块 » linux源码解读(二十四):进程间通信IPC方式对比&poll接受数据 » 2022-10-11 15:47:29
- batsom
- 回复: 0
为了确保进程数据的安全,cpu在硬件级别就支持不同进程的内存隔离了,采用的手段分别是:LDT和分页;每个进程都有自己的ldt描述符,严格规定了该进程使用的物理内存!同时还有分页机制,不同进程就算是同样的虚拟地址,也会映射到不同的物理地址!这两项措施严格保证了进程之间的物理内存是严格隔离的,互相无法读写对方的物理内存,进程自身的代码和数据得到了完美的保护,是不是很完美了?呵呵,哪有这么好的事!进程使用的物理内存被严格隔离,同时也堵死了另一条路:进程间通信!举个例子:linux shell命令中用竖线作为管道都用过吧?作用就是把前面命令处理好的结果数据让后面的命令继续处理,本质就是在不同进程之间传输数据,专业名称叫IPC,这个是怎么做到的了?
1、IPC的通信方式有多种,但最核心的原理或本质都是一样的:在内存中开辟一块空间,A进程网里写数据,B进程从里面读数据,是不是很容易理解了?在此基础上很多研究人员又抽象出了消息队列、共享内存、管道、信号量、信号、socket等进程间的通信方式,互相之间对比如下:
尽管原理简单,但是在实现的时候有两点是所有IPC方式都要注意的:
多进程之间的互斥和同步:共享内存区域就这个,可能同时会有多个生产者和消费者,之间的互斥和同步一定要保证,否则读写的数据结果大概率是错的!可以用信号量、互斥体、自旋锁等实现!
由于是生产-消费者模型,生产者肯定占据主动的,随时都可以往共享的内存写数据,那么问题来了:消费者怎么知道有新数据来了?-----还记得epoll么?就是用根据fd来建立红黑树得那个,每次只要有事件产生(比如网卡收到数据后中断通知cpu)就根据fd从红黑树中找到epitem加入readlist队列进一步处理,所以3环的app不需要阻塞(用户也可以指定等待超时的时间),只需要轮询就行,异步通信的效率很高!这里的应用场景和socket等待数据是不是类似啊!但是进程间通信的数量和频繁程度肯定不如socket的网络通信,所以没必要耗费那么多空间建立红黑树,直接建立链表后用线性扫描、也就是轮询的方式就好!以管道pipe为例,配合poll的通信demo如下: demo代码并不复杂, 一般人都能看懂!核心就是 res = poll(&pfds,1,timeout); 这行代码设置等待超时!
#include <stdio.h>
#include <unistd.h>
#include <sys/wait.h>
#include <sys/time.h>
#include <sys/types.h>
#include <sys/poll.h>

int main()
{
    int     res;
    char    *buf = "this is data to trans";
    char    readbuf[64] = {0};
    int     fd[2];
    int     pid;
    int     timeout = 6000;                 //超时时间
    struct pollfd pfds;                     //poll结构体

    res = pipe(fd);
    if(res != 0)
    {
        printf("create pipe error\n");
        return 0;
    }

    //设置读管道为poll句柄
    pfds.fd     = fd[0];
    //设置poll的触发事件
    pfds.events = POLLIN | POLLPRI;

    pid = fork();
    if(pid == -1)
    {
        printf("fork fail\n");
    }
    else if(pid == 0) //child
    {
        printf("this is child\n");
        close(fd[1]);
        //规定时间内,监视pdfs这一个通道有无触发事件发生
        res = poll(&pfds,1,timeout);
        if(res == -1)
        {
            printf("poll error\n");
        }
        else if(res == 0)
        {
            printf("time out\n");
        }
        //有POLLIN或者POLLPRI事件,也意味着有数据可读
        else
        {
            read(fd[0],readbuf,64);
            printf("child rev :%s\n",readbuf);
        }

        close(fd[0]);
    }
    else
    {
        printf("this is parent\n");
        usleep(5000000);
        close(fd[0]);
        write(fd[1],buf,64);
        close(fd[1]);
        //等待子进程结束
        waitpid(pid,NULL,0);
    }

    return 0;
}
2、poll的使用方式很简单,那是因为操作系统在底层做了大量的工作,封装了很多功能(哪有什么开发静好,都是因为操作系统在底层负重前行.....),整个poll在操作系统层面的函数实现和调用链条如下:

调用链很长,个人觉得最核心的要从do_poll函数开始了:这个函数有个for死循环,里面挨个遍历链表检查是否有事件到来!
/*轮询队列检查fd是否有事件发生*/
static int do_poll(struct poll_list *list, struct poll_wqueues *wait,
           struct timespec64 *end_time)
{
    poll_table* pt = &wait->pt;
    ktime_t expire, *to = NULL;
    int timed_out = 0, count = 0;
    u64 slack = 0;
    unsigned int busy_flag = net_busy_loop_on() ? POLL_BUSY_LOOP : 0;
    unsigned long busy_end = 0;

    /* Optimise the no-wait case */
    if (end_time && !end_time->tv_sec && !end_time->tv_nsec) {
        pt->_qproc = NULL;
        timed_out = 1;
    }

    if (end_time && !timed_out)
        slack = select_estimate_accuracy(end_time);
    /*这里是个死循环,就是在这里轮询检查是否有时间发生的*/
    for (;;) {
        struct poll_list *walk;
        bool can_busy_loop = false;
        /*遍历poll_list链表,挨个检查有无事件发生*/
        for (walk = list; walk != NULL; walk = walk->next) {
            struct pollfd * pfd, * pfd_end;

            pfd = walk->entries;
            pfd_end = pfd + walk->len;
            for (; pfd != pfd_end; pfd++) {
                /*
                 * Fish for events. If we found one, record it
                 * and kill poll_table->_qproc, so we don't
                 * needlessly register any other waiters after
                 * this. They'll get immediately deregistered
                 * when we break out and return.
                 检查fd的事件是否发生
                 */
                if (do_pollfd(pfd, pt, &can_busy_loop,
                          busy_flag)) {
                    count++;//有事件发生就+1
                    pt->_qproc = NULL;
                    /* found something, stop busy polling */
                    busy_flag = 0;
                    can_busy_loop = false;
                }
            }
        }
        /*
         * All waiters have already been registered, so don't provide
         * a poll_table->_qproc to them on the next loop iteration.
         */
        pt->_qproc = NULL;
        /*如果count=0,说明没有事件发生,当前进程挂起*/
        if (!count) {
            count = wait->error;
            if (signal_pending(current))
                count = -EINTR;
        }
        /*count!=0说明有事件发生了,需要跳出循环;等待超时也跳出循环*/
        if (count || timed_out)
            break;

        /* only if found POLL_BUSY_LOOP sockets && not out of time */
        if (can_busy_loop && !need_resched()) {
            if (!busy_end) {
                busy_end = busy_loop_end_time();
                continue;
            }
            /*未超时继续死循环*/
            if (!busy_loop_timeout(busy_end))
                continue;
        }
        busy_flag = 0;

        /*
         * If this is the first loop and we have a timeout
         * given, then we convert to ktime_t and set the to
         * pointer to the expiry value.
         */
        if (end_time && !to) {
            expire = timespec64_to_ktime(*end_time);
            to = &expire;
        }
        /*
        1、设置当前进程状态
        2、slepp让出cpu,直到时间到期
        */
        if (!poll_schedule_timeout(wait, TASK_INTERRUPTIBLE, to, slack))
            timed_out = 1;
    }
    return count;
}
其中,具体检查事件的函数是do_pollfd,核心是执行file结构体的poll回调函数:
/*
 * Fish for pollable events on the pollfd->fd file descriptor. We're only
 * interested in events matching the pollfd->events mask, and the result
 * matching that mask is both recorded in pollfd->revents and returned. The
 * pwait poll_table will be used by the fd-provided poll handler for waiting,
 * if pwait->_qproc is non-NULL.
   1、根据fd的值完善mask
   2、执行回调函数
 */
static inline unsigned int do_pollfd(struct pollfd *pollfd, poll_table *pwait,
                     bool *can_busy_poll,
                     unsigned int busy_flag)
{
    unsigned int mask;
    int fd;

    mask = 0;
    fd = pollfd->fd;
    if (fd >= 0) {
        struct fd f = fdget(fd);
        mask = POLLNVAL;
        if (f.file) {
            mask = DEFAULT_POLLMASK;
            if (f.file->f_op->poll) {
                pwait->_key = pollfd->events|POLLERR|POLLHUP;
                pwait->_key |= busy_flag;
                /*事件的回调函数*/
                mask = f.file->f_op->poll(f.file, pwait);
                if (mask & busy_flag)
                    *can_busy_poll = true;
            }
            /* Mask out unneeded events. */
            mask &= pollfd->events | POLLERR | POLLHUP;
            fdput(f);
        }
    }
    pollfd->revents = mask;

    return mask;
}
总结:
1、这里有个epoll、poll、select的效率对比:可以看到,随着连接数增加,epoll的耗时几乎不变;但是poll和select的耗时呈指数型增长!
2、正常情况下,服务器在同一时间可能会和几十万、甚至上百万客户端建立连接!当收到客户端数据时,需要epitem,此时用fd建立红黑树就很适合了! 但类似ipc这种场景,毕竟使用的数量、频率肯定比不上socket,所以没必要额外耗费空间建立红黑树,直接遍历链表即可,效率低不到哪去!
参考:
1、https://xxpcb.gitee.io/2019/09/15/%E8%BF%9B%E7%A8%8B%E9%97%B4%E9%80%9A%E4%BF%A1-IPC/ ipc对比
2、https://cyril3.github.io/2018/01/15/helicopter-view-of-interprocess-communication linux进程通信概览
3、https://blog.csdn.net/spiremoon/article/details/106004076 多进程管道通信以及select、poll函数的应用
4、https://blog.csdn.net/Eunice_fan1207/article/details/99641348 Linux内核剖析-----IO复用函数poll内核源码剖析
#385 内核模块 » linux源码解读(二十三):网络通信简介——网络拥塞控制之BBR算法 » 2022-10-11 15:42:34
- batsom
- 回复: 0
1、从网络问世直到10来年前,tcp拥塞控制采用的都是经典的reno、new-reno、bic、cubic等经典的算法,这些算法在低带宽的有线网络下运行了几十年。随着网络带宽增加、无线网络通信的普及,这些经典算法逐渐开始不适应新环境了:
手机、wifi等的无线通信在空口段由于信道竞争等原因导致数据包传输出错,但其实网络可能并不拥塞,只是单纯的数据包出错,这是不拥塞被误判成了拥塞!
网络设备buffer增加,能容纳的数据包也增加了。当buffer被填满后就产生了拥塞,但此时数据包还未丢失(或则发送端判断还未超时),所以如果以丢包判断拥塞,此时就会误判为不拥塞,导致拥塞判断延迟,和上述情况刚好相反!
究其原因,还是传统的拥塞控制算法把丢包/错包等同于网络拥塞。这种认知的缺陷:
导致整个网络的吞吐率呈现锯齿状:先是努力向上,达到阈值或丢失后就减半,再逐步增加cw,达到阈值或丢失后继续减半,周而复始,产生带宽震荡,导致大部分时候的带宽利用率或吞吐量不高!
端到端延迟大:网络中转设备的buffer被填满,数据包排队等待通行,此时还未丢包,发送端无法判断是否拥塞
算法侵略性强:抢占其他算法的带宽,导致整网的效果不好,带宽分配不均
2、既然传统经典的拥塞控制算法有这么多缺陷,BBR又是怎么做的了?本质上讲,链路拥塞还是源端在短时间内发送了大量数据包,当数据包超过路由器等中转设备的buffer或转发能力后导致的,所以BBR控制拥塞的思路如下:
(1)源端发送数据的速率不要超过瓶颈链路的带宽,避免长时间排队产生拥塞
reno和cubic发送数据包是“brust突发”的:一次性发送4个、8个等,可能导致路由设备buffer瞬间填满,超出瓶颈链路的带宽,所以要控制分组数据包的数量,避免瞬间超出BtlBW;这个间隔该怎么计算了?
节拍参数pacing_gain: 1、1.25、0.75等取值;时间间隔就是packet.size/pacing_rate;next_send_time=now()+packet.size/pacing_rate;
(2)BDP=RTT*BtlBW,源端发送的待确认在途数据包inflight不要超过BDP,换句话说双向链路中数据包总和inflight不要超过RTT*BtlBW
3、BRR采用的拥塞控制算法需要两个变量:RTT(又被称为RTprop:round-trip propagation time)和BtlBW(bottleneck bandwidth),分别是传输延迟和链接瓶颈带宽,这两个变量的值又是怎么精确测量的了?
(1)RTT的定义:源端从发送数据到收到ACK的耗时;也就是数据包一来一回的时间总和;这个时间差在应用受限阶段测量是最合适的,具体方法如下:
双方握手阶段:此时还未发送大量数据,理论上链路的数据还不多,可以把syn+ack的时间作为RTT;
已经握手完成:双方有交互式的应用,导致双方的数据量都不大,还没有把瓶颈链路的带宽打满,也可以把syn+ack的时间作为RTT;
如果双方都开足马力收发数据,导致瓶颈链路都打满了,怎么测RTT了? 只能每隔一定时间段(比如10s到几分钟),选择2%左右的时间段(这里是200ms到几秒),双方主动降低发送速度,目的是让应用回到受限阶段后再测量RTT(这也是BBR算法相对公平、不恶意挤占整个网络带宽的原因)!
(2)瓶颈链路带宽的测量BtlBW:在带宽受限阶段多次测量交付速率,将近期最大的交付速率作为BtlBW,具体测量方法为:双方建立连接后,不断增加在途inflight的数据包,连续三个RTT交付速率不增加25%时算作BL带宽受限状态;测量的时间窗口不低于6个RTT,最好在10个RTT左右!
(3)截至目前涉及到好些个概念,这些概念之间的关系如下图所示:
刚开始源端的发送速度还未达到BDP时,因为链路还有空闲,此时处于应用受限阶段(直白称之为应用不足),所以RTT保持稳定不变,整个网络的delivery rate持续上升!
等达到BDP但小于BDP+BtlBufSize,代表着整个链路都塞满了但瓶颈设备的buffer还未慢,此时处于带宽受限阶段(直白称之为带宽不足);此时如果源端继续加速发送数据,直接导致RTT增加,delivery rate因为链路没了空闲也无法继续提升!
如果源端继续火力全开地发送数据,使得insight的数据量超过了BDP+BtlBufSize,这代表这链路本身的带宽+路由设备的buffer都被填满,此时路由设备只能丢包,此阶段称为缓冲受限(直白称之为缓冲不足)
所谓的拥塞控制,就是要让在途的inflight数据量不要超过BDP!所以是通过RTT和BtlBW这两个变量来控制拥塞的,而不是传统的遇到丢包就减半这种简单粗暴的方式!

4、上述都是BBR出现的背景和原理,具体是怎么落地的了? 分了4个阶段,分别是startup、drain、probeBW和probe_RTT!
(1) Startup: 从名字就能看出来这是初始启动阶段!既然刚启动,通信双方互相发送的数据肯定不多,此时链路吞吐量较小。为了最大化利用链路带宽,Startup为BtlBw 实现了二分查找法:随着传输速率增加,每次用 2/ln2 增益来倍增发送速率,整个链路带宽很快会被填满!当连续三个RTT交付速率不增加25%时就达到了BL带宽受限状态,此时就能测量出BtlBW(也就是RTT*BtlBw)
(2)Drain:经过startup阶段的灌水后,整个链路被洪水漫灌,导致吞吐量下降,此时发送方逐渐降低发送速率,使得inflight<BDP, 避免拥塞
(3) probe_BW:经过第二阶段的排水后,inflight基本稳定,这是整个BBR算法最稳定的状态了;从名字就能看出来,这个阶段是用来探测带宽的!
(4)probe_RTT:由于数据传输时可能会更改路由,之前测量的RTT不再适用,所以需要从probe_BW阶段;测量方法很简单:拿出2%的时间降低到应用受限阶段再探测RTT;不同的流通过重新测量RTT均分带宽,相对公平!
5、通信双方的节点,要么是在发数据,要么是在收数据。google官方提供了伪代码说明了具体的动作事宜!
(1)当收到ack包时,需要做的动作:
function onAck(packet)
  rtt = now - packet.sendtime                      // 收包时间 减去 包中记录的发包时间就是RTT
  update_min_filter(RTpropFilter, rtt)             // 更新对 RTT 的估计

  delivered      += packet.size
  delivered_time =  now
  //计算当前实际的传输速率
  delivery_rate  =  (delivered - packet.delivered) / (delivered_time - packet.delivered_time)

  if (delivery_rate > BtlBwFilter.current_max      // 实际传输速率已经大于当前估计的瓶颈带宽,或
     || !packet.app_limited)                       // 不是应用受限(应用受限的样本对估计 BtlBw 无意义)
     update_max_filter(BtlBwFilter, delivery_rate) // 根更新对 BtlBw 的估计

  if (app_limited_until > 0)                       // 达到瓶颈带宽前,仍然可发送的字节数
     app_limited_until = app_limited_until - packet.size
复制代码
总的来说就是:每个包都更新RTT、但部分包更新BtlBW!
(2)当发送数据包时需要做的动作:
function send(packet)
  bdp = BtlBwFilter.current_max * RTpropFilter.current_min  // 计算 BDP
  if (inflight >= cwnd_gain * bdp)                          // 如果正在传输中的数据量超过了允许的最大值
     return                                                 // 直接返回,接下来就等下一个 ACK,或者等超时重传

  // 能执行到这说明 inflight < cwnd_gain * bdp,即正在传输中的数据量 < 瓶颈容量
  if (now >= next_send_time)
     packet = nextPacketToSend()
     if (!packet)                      // 如果没有数据要发送
        app_limited_until = inflight   // 更新 “在达到瓶颈容量之前,仍然可发送的数据量”
        return

     packet.app_limited = (app_limited_until > 0)  // 如果仍然能发送若干字节才会达到瓶颈容量,说明处于 app_limited 状态
     packet.sendtime = now
     packet.delivered = delivered
     packet.delivered_time = delivered_time
     ship(packet)
     //下次发送数据的时间,通过这个控制拥塞
     next_send_time = now + packet.size / (pacing_gain * BtlBwFilter.current_max)
 //用定时器设置下次发送时间到期后的回调函数,就是继续执行send函数
  timerCallbackAt(send, next_send_time)
复制代码
总的来说就是:先判断inflight的数据量是不是大于了BDP;如果是直接返回,结束send方法;如果不是,继续发送数据,并重新设置下次发送的定时器!
6、接下来看看google提供的BBR源码,在net\ipv4\tcp_bbr.c这个文件里(我用的是linux 4.9的源码)!
(1)BBR所有关键函数一览:还记得拥塞控制注册的结构体么?这个是BBR算法的注册结构体!
static struct tcp_congestion_ops tcp_bbr_cong_ops __read_mostly = {
    .flags        = TCP_CONG_NON_RESTRICTED,
    .name        = "bbr",
    .owner        = THIS_MODULE,
    .init        = bbr_init,
    .cong_control    = bbr_main,
    .sndbuf_expand    = bbr_sndbuf_expand,
    .undo_cwnd    = bbr_undo_cwnd,
    .cwnd_event    = bbr_cwnd_event,
    .ssthresh    = bbr_ssthresh,
    .tso_segs_goal    = bbr_tso_segs_goal,
    .get_info    = bbr_get_info,
    .set_state    = bbr_set_state,
};
(2)因为.cong_control对应的函数是bbr_main,所以很明显这就是拥塞控制算法的入口了!
static void bbr_main(struct sock *sk, const struct rate_sample *rs)
{
    struct bbr *bbr = inet_csk_ca(sk);
    u32 bw;

    bbr_update_model(sk, rs);

    bw = bbr_bw(sk);
    bbr_set_pacing_rate(sk, bw, bbr->pacing_gain);
    bbr_set_tso_segs_goal(sk);
    bbr_set_cwnd(sk, rs, rs->acked_sacked, bw, bbr->cwnd_gain);
}
从调用的函数名称看,有计算带宽的,有设置pacing_rate的(通过这个控制发送速度来控制拥塞),也有设置拥塞窗口的,通过层层调用拨开后,发现几个比较重要的函数如下:
(3)bbr_update_bw:估算带宽值
/* Estimate the bandwidth based on how fast packets are delivered
   估算实际的带宽
    1、更新RTT周期
    2、计算带宽=确认的字节数*BW_UNIT/采样时间
    3、带宽和minirtt样本加入新的rtt、bw样本
*/
static void bbr_update_bw(struct sock *sk, const struct rate_sample *rs)
{
    struct tcp_sock *tp = tcp_sk(sk);
    struct bbr *bbr = inet_csk_ca(sk);
    u64 bw;

    bbr->round_start = 0;
    if (rs->delivered < 0 || rs->interval_us <= 0)
        return; /* Not a valid observation */

    /* See if we've reached the next RTT */
    if (!before(rs->prior_delivered, bbr->next_rtt_delivered)) {
        bbr->next_rtt_delivered = tp->delivered;
        bbr->rtt_cnt++;
        bbr->round_start = 1;
        bbr->packet_conservation = 0;
    }
    bbr_lt_bw_sampling(sk, rs);

    /* Divide delivered by the interval to find a (lower bound) bottleneck
     * bandwidth sample. Delivered is in packets and interval_us in uS and
     * ratio will be <<1 for most connections. So delivered is first scaled.
     计算带宽
     */
    bw = (u64)rs->delivered * BW_UNIT;
    do_div(bw, rs->interval_us);

    /* If this sample is application-limited, it is likely to have a very
     * low delivered count that represents application behavior rather than
     * the available network rate. Such a sample could drag down estimated
     * bw, causing needless slow-down. Thus, to continue to send at the
     * last measured network rate, we filter out app-limited samples unless
     * they describe the path bw at least as well as our bw model.
     *
     * So the goal during app-limited phase is to proceed with the best
     * network rate no matter how long. We automatically leave this
     * phase when app writes faster than the network can deliver :)
     */
    if (!rs->is_app_limited || bw >= bbr_max_bw(sk)) {
        /* Incorporate new sample into our max bw filter.
         带宽和minirtt样本加入新的rtt、bw样本*/
        minmax_running_max(&bbr->bw, bbr_bw_rtts, bbr->rtt_cnt, bw);
    }
}
(4)bbr_set_pacing_rate:通过设置pacing_rate控制发包的速度:
/* Pace using current bw estimate and a gain factor. In order to help drive the
 * network toward lower queues while maintaining high utilization and low
 * latency, the average pacing rate aims to be slightly (~1%) lower than the
 * estimated bandwidth. This is an important aspect of the design. In this
 * implementation this slightly lower pacing rate is achieved implicitly by not
 * including link-layer headers in the packet size used for the pacing rate.

 */
static void bbr_set_pacing_rate(struct sock *sk, u32 bw, int gain)
{
    struct bbr *bbr = inet_csk_ca(sk);
    u64 rate = bw;

    rate = bbr_rate_bytes_per_sec(sk, rate, gain);
    rate = min_t(u64, rate, sk->sk_max_pacing_rate);
    if (bbr->mode != BBR_STARTUP || rate > sk->sk_pacing_rate)
        sk->sk_pacing_rate = rate;
}
(5)bbr_update_min_rtt:更新最小的rtt
/* The goal of PROBE_RTT mode is to have BBR flows cooperatively and
 * periodically drain the bottleneck queue, to converge to measure the true
 * min_rtt (unloaded propagation delay). This allows the flows to keep queues
 * small (reducing queuing delay and packet loss) and achieve fairness among
 * BBR flows.
 *
 * The min_rtt filter window is 10 seconds. When the min_rtt estimate expires,
 * we enter PROBE_RTT mode and cap the cwnd at bbr_cwnd_min_target=4 packets.
 * After at least bbr_probe_rtt_mode_ms=200ms and at least one packet-timed
 * round trip elapsed with that flight size <= 4, we leave PROBE_RTT mode and
 * re-enter the previous mode. BBR uses 200ms to approximately bound the
 * performance penalty of PROBE_RTT's cwnd capping to roughly 2% (200ms/10s).
 *
 * Note that flows need only pay 2% if they are busy sending over the last 10
 * seconds. Interactive applications (e.g., Web, RPCs, video chunks) often have
 * natural silences or low-rate periods within 10 seconds where the rate is low
 * enough for long enough to drain its queue in the bottleneck. We pick up
 * these min RTT measurements opportunistically with our min_rtt filter. :-)
 */
static void bbr_update_min_rtt(struct sock *sk, const struct rate_sample *rs)
{
    struct tcp_sock *tp = tcp_sk(sk);
    struct bbr *bbr = inet_csk_ca(sk);
    bool filter_expired;

    /* Track min RTT seen in the min_rtt_win_sec filter window: */
    filter_expired = after(tcp_time_stamp,
                   bbr->min_rtt_stamp + bbr_min_rtt_win_sec * HZ);
    if (rs->rtt_us >= 0 &&
        (rs->rtt_us <= bbr->min_rtt_us || filter_expired)) {
        bbr->min_rtt_us = rs->rtt_us;
        bbr->min_rtt_stamp = tcp_time_stamp;
    }

    if (bbr_probe_rtt_mode_ms > 0 && filter_expired &&
        !bbr->idle_restart && bbr->mode != BBR_PROBE_RTT) {
        bbr->mode = BBR_PROBE_RTT;  /* dip, drain queue */
        bbr->pacing_gain = BBR_UNIT;
        bbr->cwnd_gain = BBR_UNIT;
        bbr_save_cwnd(sk);  /* note cwnd so we can restore it */
        bbr->probe_rtt_done_stamp = 0;
    }

    if (bbr->mode == BBR_PROBE_RTT) {//如果是probe_rtt状态
        /* Ignore low rate samples during this mode. */
        tp->app_limited =
            (tp->delivered + tcp_packets_in_flight(tp)) ? : 1;
        /* Maintain min packets in flight for max(200 ms, 1 round). */
        if (!bbr->probe_rtt_done_stamp &&
            tcp_packets_in_flight(tp) <= bbr_cwnd_min_target) {
            bbr->probe_rtt_done_stamp = tcp_time_stamp +
                msecs_to_jiffies(bbr_probe_rtt_mode_ms);
            bbr->probe_rtt_round_done = 0;
            bbr->next_rtt_delivered = tp->delivered;
        } else if (bbr->probe_rtt_done_stamp) {
            if (bbr->round_start)
                bbr->probe_rtt_round_done = 1;
            if (bbr->probe_rtt_round_done &&
                after(tcp_time_stamp, bbr->probe_rtt_done_stamp)) {
                bbr->min_rtt_stamp = tcp_time_stamp;
                bbr->restore_cwnd = 1;  /* snap to prior_cwnd */
                bbr_reset_mode(sk);
            }
        }
    }
    bbr->idle_restart = 0;
}
6、总结:BBR算法不再基于丢包判断,也不再使用AIMD线性增乘性减策略来维护拥塞窗口,而是分别采样估计(网络链路拓扑情况对于发送端和接收端来说都是黑盒,不太可能完全实时掌控,只能不停地采样)极大带宽和极小延时,并用二者乘积作为发送窗口。同事BBR引入了Pacing Rate限制数据发送速率,配合cwnd使用来降低冲击!
参考:
1、https://www.cnblogs.com/HadesBlog/p/13347418.html google bbr源码分析
2、https://www.bilibili.com/video/BV1iq4y1H7Zf/?spm_id_from=333.788.recommend_more_video.-1 BBR拥塞控制算法
3、http://arthurchiao.art/blog/bbr-paper-zh/ google论文:基于拥塞(而非丢包)的拥塞控制
#386 内核模块 » linux源码解读(二十二):网络通信简介——网络拥塞控制之cubic算法 » 2022-10-11 12:58:30
- batsom
- 回复: 0
网络拥塞的概念大家一定不陌生,肯定都有亲生体会:比如节假日的高速路堵车。本来车流量已经很大了,如果再不限制高速口的车进入,整条路只会越来越堵,所以交管部门可能会临时限流,只允许车辆下高速,不允许上高速!互联网刚发明的那会还没有拥塞的概念,各个节点死命地传输数据,导致网络中各种路由设备的buff瞬间被填满,新来的包只能丢弃(像不像针对网络中专设备的DOS攻击了?)!为了维持网络的正常运转,需要接入网络的所有节点有节制地发送数据,避免网络拥塞!但如果节点过于节制,发送的数据报文过少,又会降低整个网络的吞吐量、利用率(这些网络设备闲着也是闲着)等,怎么才能尽可能最大化吞吐量,又能避免网络拥塞了?拥塞控制算法诞生了!拥塞控制的算法很多,我这个版本采用的是cubic算法(算法细节可以参考链接2和3),本文以这个为准分析算法实现的细节!
1、拥塞控制的控制引擎介绍:
(1)由于拥塞控制涉及到很多复杂的计算公式,每个公式都有很多计算因子factor,所以要先给这些factor初始化赋值,这些赋值在cubictcp_register函数中统一完成,如下:
/*初始化各种计算的factor*/
static int __init cubictcp_register(void)
{
    BUILD_BUG_ON(sizeof(struct bictcp) > ICSK_CA_PRIV_SIZE);

    /* Precompute a bunch of the scaling factors that are used per-packet
     * based on SRTT of 100ms;计算SRTT=100ms时的缩放因子
     */

    beta_scale = 8*(BICTCP_BETA_SCALE+beta) / 3
        / (BICTCP_BETA_SCALE - beta);

    cube_rtt_scale = (bic_scale * 10);    /* 1024*c/rtt */

    /* calculate the "K" for (wmax-cwnd) = c/rtt * K^3
     *  so K = cubic_root( (wmax-cwnd)*rtt/c )
     * the unit of K is bictcp_HZ=2^10, not HZ
     *
     *  c = bic_scale >> 10
     *  rtt = 100ms
     *
     * the following code has been designed and tested for
     * cwnd < 1 million packets
     * RTT < 100 seconds
     * HZ < 1,000,00  (corresponding to 10 nano-second)
     */

    /* 1/c * 2^2*bictcp_HZ * srtt */
    cube_factor = 1ull << (10+3*BICTCP_HZ); /* 2^40 */

    /* divide by bic_scale and by constant Srtt (100ms) */
    do_div(cube_factor, bic_scale * 10);

    return tcp_register_congestion_control(&cubictcp);
}
(2)由于cubic只是拥塞控制的算法之一(还有其他好几种算法),并且未来可能还会诞生新的拥塞控制算法,为了便于管理现有算法,同时也能给新增的算法预留空间,linux采用了链表来保存/注册所有的拥塞控制算法,实现的方法就是初始化函数最后一行的tcp_register_congestion_control,如下:
/*
 * Attach new congestion control algorithm to the list
 * of available options.
 */
int tcp_register_congestion_control(struct tcp_congestion_ops *ca)
{
    int ret = 0;

    /* all algorithms must implement ssthresh and cong_avoid ops */
    if (!ca->ssthresh || !(ca->cong_avoid || ca->cong_control)) {
        pr_err("%s does not implement required ops\n", ca->name);
        return -EINVAL;
    }
    //根据名称、长度等计算出一个hash值,加快比对速度(早期版本是对比字符串,效率低;key是32bit的整数,比对效率比字符串快多了)
    ca->key = jhash(ca->name, sizeof(ca->name), strlen(ca->name));

    spin_lock(&tcp_cong_list_lock);
    if (ca->key == TCP_CA_UNSPEC || tcp_ca_find_key(ca->key)) {//检查一下是不是已经在list里面了
        pr_notice("%s already registered or non-unique key\n",
              ca->name);
        ret = -EEXIST;
    } else {//新的拥塞控制算法加入链表
        list_add_tail_rcu(&ca->list, &tcp_cong_list);
        pr_debug("%s registered\n", ca->name);
    }
    spin_unlock(&tcp_cong_list_lock);

    return ret;
}
(3)从注释的地方可以看到加入链表的是tcp_congestion_ops结构体,这个结构体也是所有拥塞控制算法需要实现的结构体;每次有拥塞算法被发明后,就实现这个结构体中的部分甚至全部方法,然后调用上面的注册方法把新算法加入链表,后续可以通过遍历链表的方式选择合适的拥塞控制算法!结构体如下:
struct tcp_congestion_ops {
    struct list_head    list;
    u32 key;/* 算法名称的哈希值 */
    u32 flags;

    /* initialize private data (optional) */
    void (*init)(struct sock *sk);
    /* cleanup private data  (optional) */
    void (*release)(struct sock *sk);

    /* return slow start threshold (required) */
    u32 (*ssthresh)(struct sock *sk);
    /* do new cwnd calculation (required) */
    void (*cong_avoid)(struct sock *sk, u32 ack, u32 acked);
    /* call before changing ca_state (optional) */
    void (*set_state)(struct sock *sk, u8 new_state);
    /* call when cwnd event occurs (optional) */
    void (*cwnd_event)(struct sock *sk, enum tcp_ca_event ev);
    /* call when ack arrives (optional) */
    void (*in_ack_event)(struct sock *sk, u32 flags);
    /* new value of cwnd after loss (optional) */
    u32  (*undo_cwnd)(struct sock *sk);
    /* hook for packet ack accounting (optional) */
    void (*pkts_acked)(struct sock *sk, const struct ack_sample *sample);
    /* suggest number of segments for each skb to transmit (optional) */
    u32 (*tso_segs_goal)(struct sock *sk);
    /* returns the multiplier used in tcp_sndbuf_expand (optional) */
    u32 (*sndbuf_expand)(struct sock *sk);
    /* call when packets are delivered to update cwnd and pacing rate,
     * after all the ca_state processing. (optional)
     */
    void (*cong_control)(struct sock *sk, const struct rate_sample *rs);
    /* get info for inet_diag (optional) */
    size_t (*get_info)(struct sock *sk, u32 ext, int *attr,
               union tcp_cc_info *info);

    char         name[TCP_CA_NAME_MAX];/* 拥塞控制算法的名称 */
    struct module     *owner;
};
有成员字段,也有函数指针;函数名是固定的,也就是说函数的功能都是固定的,每种拥塞控制算法各自实现这些函数功能就行了,这个思路和驱动类似:linux定义了驱动的接口函数名称,每个驱动厂家自己实现接口函数的功能!事实上拥塞算法也是和驱动一样,都是以模块的形式加载到内核的!
(4)上面的结构体定义了每种拥塞控制算法的接口名称和功能,那么具体到cubic算法,这些功能都是在哪些函数实现的了?在net\ipv4\tcp_cubic.c文件里面做的映射:
static struct tcp_congestion_ops cubictcp __read_mostly = {
    .init        = bictcp_init,
    .ssthresh    = bictcp_recalc_ssthresh,
    .cong_avoid    = bictcp_cong_avoid,
    .set_state    = bictcp_state,
    .undo_cwnd    = bictcp_undo_cwnd,
    .cwnd_event    = bictcp_cwnd_event,
    .pkts_acked     = bictcp_acked,
    .owner        = THIS_MODULE,
    .name        = "cubic",
};
这个结构体的名称叫cubictcp,刚好就在文章开头介绍的cubictcp_register函数中注册的!
2、上述介绍围绕着初始化、注册等重要功能,这些功能抽象出的框架就是拥塞控制引擎!尽管拥塞算法实现的细节可以不同,但是使用的引擎框架都是一样的,不得不佩服linux研发人员的模块抽象和概括能力(好多大厂职级晋升答辩的重要考核之一就是这种模块总结抽象、举一反三的能力!);
(1)cubic算法的实现涉及到很变量,为了统一管理,这了变量都定义在bictcp结构体中了,如下:
/* BIC TCP Parameters */
struct bictcp {
    u32    cnt;        /* increase cwnd by 1 after ACKs; 每次 cwnd 增长 1/cnt 的比例*/
    u32    last_max_cwnd;    /* last maximum snd_cwnd; snd_cwnd 之前的最大值*/
    u32    loss_cwnd;    /* congestion window at last loss;最近一次发生丢失的时候的拥塞窗口 */
    u32    last_cwnd;    /* the last snd_cwnd;最近的 snd_cwnd */
    u32    last_time;    /* time when updated last_cwnd;更新 last_cwnd 的时间 */
    u32    epoch_start;    /* beginning of an epoch;一轮的开始 */
#define ACK_RATIO_SHIFT    4
    /*限制了delayed_ack的最大值为(32 << 4),也就是说Packets/ACKs的最大估计值限制为32;
    为什么要增加这个限制呢?这是因为如果发送窗口很大,并且这个窗口的数据包的ACK大量丢失,那
    么发送端就会得到一个累积确认了非常多数据包的ACK,这会造成delayed_ack值剧烈的增大。如果
    一个ACK累积确认的数据包超过4096个,那么16位的delayed_ack就会溢出,最后的值可能为0。我
    们知道delayed_ack在bictcp_update中是作为除数的,这时会产生除数为0的错误*/
    u32    delayed_ack;    /* estimate the ratio of Packets/ACKs << 4 */
};
(2)这么多变量,使用之前肯定是要初始化的,如下:
//将必要的参数都初始化为 0
static inline void bictcp_reset(struct bictcp *ca)
{
    ca->cnt = 0;
    ca->last_max_cwnd = 0;
    ca->last_cwnd = 0;
    ca->last_time = 0;
    ca->epoch_start = 0;
    ca->delayed_ack = 2 << ACK_RATIO_SHIFT;
}

static void bictcp_init(struct sock *sk)
{
    struct bictcp *ca = inet_csk_ca(sk);

    bictcp_reset(ca);
    ca->loss_cwnd = 0;//此时尚未发送任何丢失,所以初始化为 0

    if (initial_ssthresh)
        tcp_sk(sk)->snd_ssthresh = initial_ssthresh;
}
(2)这么多变量,使用之前肯定是要初始化的,如下:
//将必要的参数都初始化为 0
static inline void bictcp_reset(struct bictcp *ca)
{
    ca->cnt = 0;
    ca->last_max_cwnd = 0;
    ca->last_cwnd = 0;
    ca->last_time = 0;
    ca->epoch_start = 0;
    ca->delayed_ack = 2 << ACK_RATIO_SHIFT;
}

static void bictcp_init(struct sock *sk)
{
    struct bictcp *ca = inet_csk_ca(sk);

    bictcp_reset(ca);
    ca->loss_cwnd = 0;//此时尚未发送任何丢失,所以初始化为 0

    if (initial_ssthresh)
        tcp_sk(sk)->snd_ssthresh = initial_ssthresh;
}
(3)算法开始执行后,需要计算ssthresh,在bictcp_recalc_ssthresh中实现:
/*
 *    behave like Reno until low_window is reached,
 *    then increase congestion window slowly
 */
static u32 bictcp_recalc_ssthresh(struct sock *sk)
{
    const struct tcp_sock *tp = tcp_sk(sk);
    struct bictcp *ca = inet_csk_ca(sk);

    ca->epoch_start = 0;    /* end of epoch */

    /* Wmax and fast convergence */
    if (tp->snd_cwnd < ca->last_max_cwnd && fast_convergence)
        ca->last_max_cwnd = (tp->snd_cwnd * (BICTCP_BETA_SCALE + beta))
            / (2 * BICTCP_BETA_SCALE);
    else
        ca->last_max_cwnd = tp->snd_cwnd;

    ca->loss_cwnd = tp->snd_cwnd;

    if (tp->snd_cwnd <= low_window)
        return max(tp->snd_cwnd >> 1U, 2U);
    else
        return max((tp->snd_cwnd * beta) / BICTCP_BETA_SCALE, 2U);
}
这里面最核心的就是Fast Convergence机制了!在网络中,一旦有新的节点加入通信,肯定是要占用网络带宽的,势必需要其他正在通信的节点让渡出部分带宽。为了让旧节点尽快释放带宽,这里采用了Fast Convergence机制:每次发生丢包后,会对比此次丢包时拥塞窗口的大小和之前的拥塞窗口大小,如小于上次的拥塞窗口,说明有新节点加入通信,占用了部分带宽。此时旧节点需要多留一些带宽给新节点使用,以使得网络尽快收敛到稳定状态!
(3)当发生丢包时,记录当前窗口为W-max, 减小窗口后的大小为W,BIC算法就是根据这个原理在(W, W-max]区间内做二分搜索;当接近于W-max时曲线应该更平滑,当离W-max较远的时候,曲线可以更加陡峭;
/*
 * Compute congestion window to use.
   二分法重新计算拥塞窗口
 */
static inline void bictcp_update(struct bictcp *ca, u32 cwnd)
{
    if (ca->last_cwnd == cwnd &&
        (s32)(tcp_time_stamp - ca->last_time) <= HZ / 32)
        return;

    ca->last_cwnd = cwnd;
    ca->last_time = tcp_time_stamp;

    if (ca->epoch_start == 0) /* record the beginning of an epoch */
        ca->epoch_start = tcp_time_stamp;

    /* start off normal */
    if (cwnd <= low_window) {
        ca->cnt = cwnd;
        return;
    }

    /* binary increase :二分增加;相比reno的线性增加,这里的效率明显高很多*/
    if (cwnd < ca->last_max_cwnd) {
        __u32    dist = (ca->last_max_cwnd - cwnd)
            / BICTCP_B;

        if (dist > max_increment)
            /* linear increase */
            ca->cnt = cwnd / max_increment;
        else if (dist <= 1U)
            /* binary search increase */
            ca->cnt = (cwnd * smooth_part) / BICTCP_B;
        else
            /* binary search increase */
            ca->cnt = cwnd / dist;
    } else {
        /* slow start AMD linear increase */
        if (cwnd < ca->last_max_cwnd + BICTCP_B)
            /* slow start */
            ca->cnt = (cwnd * smooth_part) / BICTCP_B;
        else if (cwnd < ca->last_max_cwnd + max_increment*(BICTCP_B-1))
            /* slow start */
            ca->cnt = (cwnd * (BICTCP_B-1))
                / (cwnd - ca->last_max_cwnd);
        else
            /* linear increase */
            ca->cnt = cwnd / max_increment;
    }

    /* if in slow start or link utilization is very low */
    if (ca->last_max_cwnd == 0) {
        if (ca->cnt > 20) /* increase cwnd 5% per RTT */
            ca->cnt = 20;
    }

    ca->cnt = (ca->cnt << ACK_RATIO_SHIFT) / ca->delayed_ack;
    if (ca->cnt == 0)            /* cannot be zero */
        ca->cnt = 1;
}

static void bictcp_cong_avoid(struct sock *sk, u32 ack, u32 acked)
{
    struct tcp_sock *tp = tcp_sk(sk);
    struct bictcp *ca = inet_csk_ca(sk);

    if (!tcp_is_cwnd_limited(sk))
        return;

    if (tcp_in_slow_start(tp))
        tcp_slow_start(tp, acked);
    else {
        bictcp_update(ca, tp->snd_cwnd);//计算ca->cnt, 表示增加一个cwnd需要的ack数量
        tcp_cong_avoid_ai(tp, ca->cnt, 1);// 根据ca->cnt计算snd_cwnd
    }
}
计算snd_cwnd值:
/* In theory this is tp->snd_cwnd += 1 / tp->snd_cwnd (or alternative w),
 * for every packet that was ACKed.
 */
void tcp_cong_avoid_ai(struct tcp_sock *tp, u32 w, u32 acked)
{
    /* If credits accumulated at a higher w, apply them gently now. */
    /*如果 w 很大,那么, snd_cwnd_cnt 可能会积累为一个很大的值;
      此后, w 由于种种原因突然被缩小了很多。那么下面计算处理的 delta 就会很大。
      这可能导致流量的爆发。为了避免这种情况,这里提前增加了一个特判
    */
    if (tp->snd_cwnd_cnt >= w) {
        tp->snd_cwnd_cnt = 0;
        tp->snd_cwnd++;
    }
    /* 累计被确认的包的数目 */
    tp->snd_cwnd_cnt += acked;
    if (tp->snd_cwnd_cnt >= w) {
        /* 窗口增大的大小应当为被确认的包的数目除以当前窗口大小。
        * 以往都是直接加一,但直接加一并不是正确的加法增加 (AI) 的实现。
        * 例如, w 为 10, acked 为 20 时,应当增加 20/10=2,而不是 1。
        */
        u32 delta = tp->snd_cwnd_cnt / w;

        tp->snd_cwnd_cnt -= delta * w;
        tp->snd_cwnd += delta;
    }
    tp->snd_cwnd = min(tp->snd_cwnd, tp->snd_cwnd_clamp);
}
(4)重新计算epoch_start的值:
/*  如果目前没有任何数据包在传输了,那么需要重新设定epoch_start。这个是为了
    解决当应用程序在一段时间内不发送任何数据时, now-epoch_start 会变得很大,由此,
    根据 Cubic 函数计算出来的目标拥塞窗口值也会变得很大。但显然,这是一个错误。因此,
    需要在应用程序重新开始发送数据时,重置epoch_start 的值。在这里CA_EVENT_TX_START事
    件表明目前所有的包都已经被确认了(即没有任何正在传输的包),而应用程序又开始
    发送新的数据包了。所有的包都被确认说明应用程序有一段时间没有发包。因而,在程
    序又重新开始发包时,需要重新设定 epoch_start的值,以便在计算拥塞窗口的大小时,
    仍能合理地遵循 cubic 函数的曲线*/
static void bictcp_cwnd_event(struct sock *sk, enum tcp_ca_event event)
{
    if (event == CA_EVENT_TX_START) {
        struct bictcp *ca = inet_csk_ca(sk);
        u32 now = tcp_time_stamp;
        s32 delta;

        delta = now - tcp_sk(sk)->lsndtime;

        /* We were application limited (idle) for a while.
         * Shift epoch_start to keep cwnd growth to cubic curve.
         */
        if (ca->epoch_start && delta > 0) {
            ca->epoch_start += delta;
            if (after(ca->epoch_start, now))
                ca->epoch_start = now;
        }
        return;
    }
}
(5)发送到收到ACK后,需要重新计算链路的延迟情况,以确认后续的各种窗口
/* Track delayed acknowledgment ratio using sliding window
 * ratio = (15*ratio + sample) / 16
 */
static void bictcp_acked(struct sock *sk, const struct ack_sample *sample)
{
    const struct inet_connection_sock *icsk = inet_csk(sk);

    if (icsk->icsk_ca_state == TCP_CA_Open) {
        struct bictcp *ca = inet_csk_ca(sk);

        ca->delayed_ack += sample->pkts_acked -
            (ca->delayed_ack >> ACK_RATIO_SHIFT);
    }
}
总结:
1、拥塞控制本质:
(1)目的:控制发送方发数据包的速度,避免少数节点无节制发数据导致整个网络被占满,其他节点无法通信;但如果过度节制又会导致网络大幅空闲,利用率降低,所以需要在拥塞和利用率之间找到平衡!
(2)节点新加入时,不知道网络是否拥塞,只能不停地探测:依次同时发送1、2、4、8个.....(按照2^N增长)数据包!当然,这种指数级别的增长肯定是会到头的,达到以下3个条件之一后就要考虑减少同时发送的数据包了:
达到了人为事先设置的ssthresh值
等待的ack超时,可能是发送的包丢了,也可能是ack的包丢了;当然也可能没丢,还在路上了!
收到多个(一般是3个)冗余的ack,说明对方没收到前序的某个包
(3)减少同时发送的数据包,具体减少到多少了?一般是从一半的量重新开始!比如同时发送16个数据包时触发了上述3个条件之一,那么重新从每次发送8个数据包开始探测!
(4)重新开始探测后,每次同时发送的数据包需要增加多少个了?reno是线性增加,BIC是二分增加,cubic用的是3次方的公式计算增加值!
reno的线性增加: 
bic的二分增加:
cubic的三次函数:
2、jhash是个比较好的hash算法,这个版本的实现如下:
/* jhash - hash an arbitrary key
 * @k: sequence of bytes as key
 * @length: the length of the key
 * @initval: the previous hash, or an arbitray value
 *
 * The generic version, hashes an arbitrary sequence of bytes.
 * No alignment or length assumptions are made about the input key.
 *
 * Returns the hash value of the key. The result depends on endianness.
 */
static inline u32 jhash(const void *key, u32 length, u32 initval)
{
    u32 a, b, c;
    const u8 *k = key;

    /* Set up the internal state */
    a = b = c = JHASH_INITVAL + length + initval;

    /* All but the last block: affect some 32 bits of (a,b,c) */
    while (length > 12) {
        a += __get_unaligned_cpu32(k);
        b += __get_unaligned_cpu32(k + 4);
        c += __get_unaligned_cpu32(k + 8);
        __jhash_mix(a, b, c);
        length -= 12;
        k += 12;
    }
    /* Last block: affect all 32 bits of (c) */
    /* All the case statements fall through */
    switch (length) {
    case 12: c += (u32)k[11]<<24;
    case 11: c += (u32)k[10]<<16;
    case 10: c += (u32)k[9]<<8;
    case 9:  c += k[8];
    case 8:  b += (u32)k[7]<<24;
    case 7:  b += (u32)k[6]<<16;
    case 6:  b += (u32)k[5]<<8;
    case 5:  b += k[4];
    case 4:  a += (u32)k[3]<<24;
    case 3:  a += (u32)k[2]<<16;
    case 2:  a += (u32)k[1]<<8;
    case 1:  a += k[0];
         __jhash_final(a, b, c);
    case 0: /* Nothing left to add */
        break;
    }

    return c;
}
参考:
1、https://www.bilibili.com/video/BV1L4411a7RN?from=search&seid=9607714680684056910 拥塞控制
2、https://www.bilibili.com/video/BV1MU4y157SY/ cubic拥塞控制
3、https://www.cnblogs.com/huang-xiang/p/13226229.html cubic拥塞控制算法
#387 内核模块 » linux源码解读(二十一):网络通信简介——tcp三次握手 » 2022-10-11 12:50:24
- batsom
- 回复: 1
前面介绍了用来管理存放网络数据包的sk_buff,以及描述通信协议的socket和sock结构体,现在终于轮到怎么和远程的计算机通信了!从常识上讲,通信之前必须要建立连接,比如有线的键盘给电脑发送信号,需要先让键盘通过usb接口连接到电脑,否则电脑怎么接受键盘的电信号了?同理:我要想使用鼠标,比如先把鼠标插入电脑的usb接口,移动鼠标后鼠标才会给电脑发送电信号,这两个都需要先建立物理连接!那么两台相距十万八千里的主机互相通信,这个连接该怎么建立了?物理上的连接当然是通过交换机、路由器以及电缆、光纤这些设备完成的,逻辑上的连接又是怎么建立的了?本文以tcp协议为例说明!
1、tcp协议在业界使用了这么多年,已经非常成熟,三次握手的原理我就不再赘述!3次握手的流程如下图所示:
从上图可以看出,client调用connect、server调用listen函数就完成了3次握手,app的开发人员完全不需要关心这3次握手是怎么完成的!第一次时client给server发消息,表示我想和你通信,并给了一个数字M;第二次是server给client回复,表示我同意和你通信,回复的内容包括了M+1,表示这次回复是你上次发送的SYN包,同时也附上自己的N!第三次是client给server发消息,附上M+1,表示回复的是server的SYN N的包!至此双方来回一共3次通信后连接建立完毕!接下来我们挨个拆解看看每一步具体都干了啥!
(1)client给server发送SYN M数据包,用wireshark抓包可以看到SYN数据包的内容,如下:
linux内核构造并发送SYN包的函数叫tcp_v4_connect,代码如下:代码不算多,重要部分加了中文注释
/* This will initiate an outgoing connection. */
int tcp_v4_connect(struct sock *sk, struct sockaddr *uaddr, int addr_len)
{
    struct sockaddr_in *usin = (struct sockaddr_in *)uaddr;
    struct inet_sock *inet = inet_sk(sk);
    struct tcp_sock *tp = tcp_sk(sk);
    __be16 orig_sport, orig_dport;
    __be32 daddr, nexthop;
    struct flowi4 *fl4;
    struct rtable *rt;
    int err;
    struct ip_options_rcu *inet_opt;

    if (addr_len < sizeof(struct sockaddr_in))
        return -EINVAL;
    /*AF_INET是用户调用socket函数创建套接字时传入的参数,
      这里校验地址长度和协议簇*/
    if (usin->sin_family != AF_INET)
        return -EAFNOSUPPORT;
    /*将下一跳地址和目的地址的临时变量都暂时设为用户提交的地址*/
    nexthop = daddr = usin->sin_addr.s_addr;
    inet_opt = rcu_dereference_protected(inet->inet_opt,
                         lockdep_sock_is_held(sk));
    /*  如果使用了来源地址路由,选择一个合适的下一跳地址。*/
    if (inet_opt && inet_opt->opt.srr) {
        if (!daddr)
            return -EINVAL;
        nexthop = inet_opt->opt.faddr;
    }
    /*获取数据包的ip层路由信息*/
    orig_sport = inet->inet_sport;
    orig_dport = usin->sin_port;
    fl4 = &inet->cork.fl.u.ip4;
    /*一台主机可能有多个ip地址,用哪个ip地址发送数据包了?
      根据nexthop参数(也就是connect传递下来的服务器ip)查路由表,
      命中的路由表项中包含有本地ip地址*/
    rt = ip_route_connect(fl4, nexthop, inet->inet_saddr,
                  RT_CONN_FLAGS(sk), sk->sk_bound_dev_if,
                  IPPROTO_TCP,
                  orig_sport, orig_dport, sk);
    if (IS_ERR(rt)) {
        err = PTR_ERR(rt);
        if (err == -ENETUNREACH)
            IP_INC_STATS(sock_net(sk), IPSTATS_MIB_OUTNOROUTES);
        return err;
    }
    /* 进行路由查找,并校验返回的路由的类型,
        TCP是不被允许使用多播和广播的。*/
    if (rt->rt_flags & (RTCF_MULTICAST | RTCF_BROADCAST)) {
        ip_rt_put(rt);
        return -ENETUNREACH;
    }

    if (!inet_opt || !inet_opt->opt.srr)
        daddr = fl4->daddr;
    /*如果用户之前没有bind源,inet->inet_saddr将会是0.
      此处判断如果saddr是0,就把查路由返回的fl4->saddr赋值给inet->inet_saddr。
      inet->inet_saddr的值将来会作为syn报文的源ip;

      1、如果在这里更改源ip,用随机数填充后发送给服务器,
      服务器会不会不停地发送ack数据包导致达到DDOS的效果了?
      2、如果把这里的源ip改成受害服务器的地址,然后随机发给第三方服务器,第三方服务器收到
      SYN数据包后分分给受害服务器发送ack数据包,是不是达到了反射DDOS的效果了?
    */
    if (!inet->inet_saddr)
        inet->inet_saddr = fl4->saddr;
    sk_rcv_saddr_set(sk, inet->inet_saddr);

    if (tp->rx_opt.ts_recent_stamp && inet->inet_daddr != daddr) {
        /* Reset inherited state */
        tp->rx_opt.ts_recent       = 0;
        tp->rx_opt.ts_recent_stamp = 0;
        if (likely(!tp->repair))
            tp->write_seq       = 0;
    }

    if (tcp_death_row.sysctl_tw_recycle &&
        !tp->rx_opt.ts_recent_stamp && fl4->daddr == daddr)
        tcp_fetch_timewait_stamp(sk, &rt->dst);

    inet->inet_dport = usin->sin_port;
    sk_daddr_set(sk, daddr);

    inet_csk(sk)->icsk_ext_hdr_len = 0;
    if (inet_opt)
        inet_csk(sk)->icsk_ext_hdr_len = inet_opt->opt.optlen;

    tp->rx_opt.mss_clamp = TCP_MSS_DEFAULT;

    /* Socket identity is still unknown (sport may be zero).
     * However we set state to SYN-SENT and not releasing socket
     * lock select source port, enter ourselves into the hash tables and
     * complete initialization after this.
       将TCP的状态设为TCP_SYN_SENT,动态绑定一个本地端口
     */
    tcp_set_state(sk, TCP_SYN_SENT);
    err = inet_hash_connect(&tcp_death_row, sk);
    if (err)
        goto failure;

    sk_set_txhash(sk);
    /*最终调用的是fib_table_lookup函数从trie树中查找最长匹配的ip地址*/
    rt = ip_route_newports(fl4, rt, orig_sport, orig_dport,
                   inet->inet_sport, inet->inet_dport, sk);
    if (IS_ERR(rt)) {
        err = PTR_ERR(rt);
        rt = NULL;
        goto failure;
    }
    /* OK, now commit destination to socket.  */
    sk->sk_gso_type = SKB_GSO_TCPV4;
    sk_setup_caps(sk, &rt->dst);

    if (!tp->write_seq && likely(!tp->repair))
        tp->write_seq = secure_tcp_sequence_number(inet->inet_saddr,
                               inet->inet_daddr,
                               inet->inet_sport,
                               usin->sin_port);

    inet->inet_id = tp->write_seq ^ jiffies;
    /*生成SYN数据包并发送*/
    err = tcp_connect(sk);

    rt = NULL;
    if (err)
        goto failure;

    return 0;

failure:
    /*
     * This unhashes the socket and releases the local port,
     * if necessary.
     */
    tcp_set_state(sk, TCP_CLOSE);
    ip_rt_put(rt);
    sk->sk_route_caps = 0;
    inet->inet_dport = 0;
    return err;
}
注意:这两行代码是用来构造源ip地址的,可以通过更改这里达到反射DDOS攻击!
if (!inet->inet_saddr)
inet->inet_saddr = fl4->saddr;
这个函数前面都是各种前置条件检查、容错等,真正构造syn数据包并发送的函数是tcp_connect函数中的tcp_send_syn_data和tcp_transmit_skb函数!由于两者是调用关系,这里重点解析transmit函数,如下:
/* This routine actually transmits TCP packets queued in by
 * tcp_do_sendmsg().  This is used by both the initial
 * transmission and possible later retransmissions.
 * All SKB's seen here are completely headerless.  It is our
 * job to build the TCP header, and pass the packet down to
 * IP so it can do the same plus pass the packet off to the
 * device.
 *
 * We are working here with either a clone of the original
 * SKB, or a fresh unique copy made by the retransmit engine.
 复制或者拷贝skb,构造skb中的tcp首部,并将调用网络层的发送函数发送skb;
 在发送前,首先需要克隆或者复制skb,因为在成功发送到网络设备之后,skb会释放,
 而tcp层不能真正的释放,是需要等到对该数据段的ack才可以释放;然后构造tcp首部和选项;
 最后调用网络层提供的发送回调函数发送skb,ip层的回调函数为ip_queue_xmit
 */
static int tcp_transmit_skb(struct sock *sk, struct sk_buff *skb, int clone_it,
                gfp_t gfp_mask)
{
    const struct inet_connection_sock *icsk = inet_csk(sk);
    struct inet_sock *inet;
    struct tcp_sock *tp;
    struct tcp_skb_cb *tcb;
    struct tcp_out_options opts;
    unsigned int tcp_options_size, tcp_header_size;
    struct tcp_md5sig_key *md5;
    struct tcphdr *th;
    int err;

    BUG_ON(!skb || !tcp_skb_pcount(skb));
    tp = tcp_sk(sk);
    //如果还有其他进程使用skb,就需要复制skb
    if (clone_it) {
        skb_mstamp_get(&skb->skb_mstamp);
        TCP_SKB_CB(skb)->tx.in_flight = TCP_SKB_CB(skb)->end_seq
            - tp->snd_una;
        tcp_rate_skb_sent(sk, skb);

        if (unlikely(skb_cloned(skb)))
            skb = pskb_copy(skb, gfp_mask);
        else
            skb = skb_clone(skb, gfp_mask);
        if (unlikely(!skb))
            return -ENOBUFS;
    }

    inet = inet_sk(sk);
    tcb = TCP_SKB_CB(skb);
    memset(&opts, 0, sizeof(opts));
    //是否是SYN请求数据包
    if (unlikely(tcb->tcp_flags & TCPHDR_SYN))
        //构建TCP选项包括时间戳、窗口大小、选择回答SACK
        tcp_options_size = tcp_syn_options(sk, skb, &opts, &md5);
    else//构建常规TCP选项
        tcp_options_size = tcp_established_options(sk, skb, &opts,
                               &md5);
    //tCP头部长度包括选择长度+ TCP头部
    tcp_header_size = tcp_options_size + sizeof(struct tcphdr);

    /* if no packet is in qdisc/device queue, then allow XPS to select
     * another queue. We can be called from tcp_tsq_handler()
     * which holds one reference to sk_wmem_alloc.
     *
     * TODO: Ideally, in-flight pure ACK packets should not matter here.
     * One way to get this would be to set skb->truesize = 2 on them.
     */
    skb->ooo_okay = sk_wmem_alloc_get(sk) < SKB_TRUESIZE(1);

    skb_push(skb, tcp_header_size);
    skb_reset_transport_header(skb);

    skb_orphan(skb);
    skb->sk = sk;
    skb->destructor = skb_is_tcp_pure_ack(skb) ? __sock_wfree : tcp_wfree;
    skb_set_hash_from_sk(skb, sk);
    atomic_add(skb->truesize, &sk->sk_wmem_alloc);

    /* Build TCP header and checksum it.
    前面做了大量的准备工作,这里终于开始构造tcp包头了
    */
    th = (struct tcphdr *)skb->data;
    th->source        = inet->inet_sport;
    th->dest        = inet->inet_dport;
    th->seq            = htonl(tcb->seq);
    th->ack_seq        = htonl(tp->rcv_nxt);
    *(((__be16 *)th) + 6)    = htons(((tcp_header_size >> 2) << 12) |
                    tcb->tcp_flags);

    th->check        = 0;
    th->urg_ptr        = 0;

    /* The urg_mode check is necessary during a below snd_una win probe */
    //SYN包不需要计算窗口
    if (unlikely(tcp_urg_mode(tp) && before(tcb->seq, tp->snd_up))) {
        if (before(tp->snd_up, tcb->seq + 0x10000)) {
            th->urg_ptr = htons(tp->snd_up - tcb->seq);
            th->urg = 1;
        } else if (after(tcb->seq + 0xFFFF, tp->snd_nxt)) {
            th->urg_ptr = htons(0xFFFF);
            th->urg = 1;
        }
    }

    tcp_options_write((__be32 *)(th + 1), tp, &opts);
    skb_shinfo(skb)->gso_type = sk->sk_gso_type;
    if (likely(!(tcb->tcp_flags & TCPHDR_SYN))) {
        th->window      = htons(tcp_select_window(sk));
        tcp_ecn_send(sk, skb, th, tcp_header_size);
    } else {
        /* RFC1323: The window in SYN & SYN/ACK segments
         * is never scaled.
         */
        th->window    = htons(min(tp->rcv_wnd, 65535U));
    }
#ifdef CONFIG_TCP_MD5SIG
    /* Calculate the MD5 hash, as we have all we need now */
    if (md5) {
        sk_nocaps_add(sk, NETIF_F_GSO_MASK);
        tp->af_specific->calc_md5_hash(opts.hash_location,
                           md5, sk, skb);
    }
#endif

    icsk->icsk_af_ops->send_check(sk, skb);

    if (likely(tcb->tcp_flags & TCPHDR_ACK))
        tcp_event_ack_sent(sk, tcp_skb_pcount(skb));//清楚定时器
    /* 有数据要发送 */
    if (skb->len != tcp_header_size) {
        tcp_event_data_sent(tp, sk);
        tp->data_segs_out += tcp_skb_pcount(skb);
    }
    /* 统计分段数 */
    if (after(tcb->end_seq, tp->snd_nxt) || tcb->seq == tcb->end_seq)
        TCP_ADD_STATS(sock_net(sk), TCP_MIB_OUTSEGS,
                  tcp_skb_pcount(skb));

    tp->segs_out += tcp_skb_pcount(skb);
    /* OK, its time to fill skb_shinfo(skb)->gso_{segs|size} */
    /* skb中分段数统计 */
    skb_shinfo(skb)->gso_segs = tcp_skb_pcount(skb);
    skb_shinfo(skb)->gso_size = tcp_skb_mss(skb);

    /* Our usage of tstamp should remain private */
    skb->tstamp.tv64 = 0;

    /* Cleanup our debris for IP stacks */
    /* 清空tcb,ip层要使用 */
    memset(skb->cb, 0, max(sizeof(struct inet_skb_parm),
                   sizeof(struct inet6_skb_parm)));
    //数据包给ip层继续添加ip地址;函数指针实际指向ip_queue_ximit,这也是实际调用的ip层函数
    err = icsk->icsk_af_ops->queue_xmit(sk, skb, &inet->cork.fl);

    if (likely(err <= 0))
        return err;
    /* 拥塞控制 */
    tcp_enter_cwr(sk);

    return net_xmit_eval(err);
}
不难发现,最终还是把skb穿给ip层的ip_queue_ximit继续构造ip数据包,代码如下:
/* Note: skb->sk can be different from sk, in case of tunnels */
int ip_queue_xmit(struct sock *sk, struct sk_buff *skb, struct flowi *fl)
{
    struct inet_sock *inet = inet_sk(sk);
    struct net *net = sock_net(sk);
    struct ip_options_rcu *inet_opt;
    struct flowi4 *fl4;
    struct rtable *rt;
    struct iphdr *iph;
    int res;

    /* Skip all of this if the packet is already routed,
     * f.e. by something like SCTP.
     */
    rcu_read_lock();
    inet_opt = rcu_dereference(inet->inet_opt);
    fl4 = &fl->u.ip4;
    /* 获取skb中的路由缓存 */
    rt = skb_rtable(skb);
    if (rt)
        goto packet_routed;

    /* Make sure we can route this packet. */
    /* 检查控制块中的路由缓存 */
    rt = (struct rtable *)__sk_dst_check(sk, 0);
    /* 缓存过期 */
    if (!rt) {
        __be32 daddr;

        /* Use correct destination address if we have options. */
        //终于看到了目的ip地址
        daddr = inet->inet_daddr;
        if (inet_opt && inet_opt->opt.srr)
            daddr = inet_opt->opt.faddr;

        /* If this fails, retransmit mechanism of transport layer will
         * keep trying until route appears or the connection times
         * itself out. 重新查找路由缓存
         */
        rt = ip_route_output_ports(net, fl4, sk,
                       daddr, inet->inet_saddr,
                       inet->inet_dport,
                       inet->inet_sport,
                       sk->sk_protocol,
                       RT_CONN_FLAGS(sk),
                       sk->sk_bound_dev_if);
        if (IS_ERR(rt))
            goto no_route;
        /* 设置控制块的路由缓存 */
        sk_setup_caps(sk, &rt->dst);
    }
     /* 将路由设置到skb中 */
    skb_dst_set_noref(skb, &rt->dst);

packet_routed:
    if (inet_opt && inet_opt->opt.is_strictroute && rt->rt_uses_gateway)
        goto no_route;

    /* OK, we know where to send it, allocate and build IP header. */
    /*找到目标后开始在tcp包的基础上构造ip包*/
    /*在skb中加上ip的头*/
    skb_push(skb, sizeof(struct iphdr) + (inet_opt ? inet_opt->opt.optlen : 0));
    skb_reset_network_header(skb);
    iph = ip_hdr(skb);
    *((__be16 *)iph) = htons((4 << 12) | (5 << 8) | (inet->tos & 0xff));
    if (ip_dont_fragment(sk, &rt->dst) && !skb->ignore_df)
        iph->frag_off = htons(IP_DF);
    else
        iph->frag_off = 0;
    iph->ttl      = ip_select_ttl(inet, &rt->dst);
    iph->protocol = sk->sk_protocol;
    ip_copy_addrs(iph, fl4);

    /* Transport layer set skb->h.foo itself. */
    /* 构造ip选项 */
    if (inet_opt && inet_opt->opt.optlen) {
        iph->ihl += inet_opt->opt.optlen >> 2;
        ip_options_build(skb, &inet_opt->opt, inet->inet_daddr, rt, 0);
    }
    /* 设置id */
    ip_select_ident_segs(net, skb, sk,
                 skb_shinfo(skb)->gso_segs ?: 1);

    /* TODO : should we use skb->sk here instead of sk ? */
    skb->priority = sk->sk_priority;
    skb->mark = sk->sk_mark;
    //发送ip包
    res = ip_local_out(net, sk, skb);
    rcu_read_unlock();
    return res;

no_route://无路由处理
    rcu_read_unlock();
    IP_INC_STATS(net, IPSTATS_MIB_OUTNOROUTES);
    kfree_skb(skb);
    return -EHOSTUNREACH;
}
ip层调用的是ip_local_out,继续往下面最终调用的是这个函数通过网卡把数据发到network:
/* Output packet to network from transport.  */
static inline int dst_output(struct net *net, struct sock *sk, struct sk_buff *skb)
{
    return skb_dst(skb)->output(net, sk, skb);
}
纵观整个过程:核心都在一层一层地构通过添加包头造数据包!
(2)server的ack数据包:
server在收到SYN数据包后,需要回复ACK数据包,数据包地内容如上图所示;server构造包的过程和client没任何区别,本质上都是一层一层地添加包头(增加skb字符串的数据和长度)!核心函数如下:
/*
 *    Send a SYN-ACK after having received a SYN.
 *    This still operates on a request_sock only, not on a big
 *    socket.
 */
static int tcp_v4_send_synack(const struct sock *sk, struct dst_entry *dst,
                  struct flowi *fl,
                  struct request_sock *req,
                  struct tcp_fastopen_cookie *foc,
                  enum tcp_synack_type synack_type)
{
    const struct inet_request_sock *ireq = inet_rsk(req);
    struct flowi4 fl4;
    int err = -1;
    struct sk_buff *skb;

    /* First, grab a route. */
    if (!dst && (dst = inet_csk_route_req(sk, &fl4, req)) == NULL)
        return -1;
    /*构造syn-sck的包,并返回skb*/
    skb = tcp_make_synack(sk, dst, req, foc, synack_type);

    if (skb) {
        __tcp_v4_send_check(skb, ireq->ir_loc_addr, ireq->ir_rmt_addr);
        /*添加ip包头并发送*/
        err = ip_build_and_send_pkt(skb, sk, ireq->ir_loc_addr,
                        ireq->ir_rmt_addr,
                        ireq->opt);
        err = net_xmit_eval(err);
    }

    return err;
}
其中构造和发送数据包的函数分别是tcp_make_synack和ip_build_and_send_pkt,第一个函数要分配skb并填充tcp头部,这里就是DDOS攻击点之一:
/**
 * tcp_make_synack - Prepare a SYN-ACK.
 * sk: listener socket
 * dst: dst entry attached to the SYNACK
 * req: request_sock pointer
 *
 * Allocate one skb and build a SYNACK packet.
 * @dst is consumed : Caller should not use it again.
   生成SYN-ACK数据包
 */
struct sk_buff *tcp_make_synack(const struct sock *sk, struct dst_entry *dst,
                struct request_sock *req,
                struct tcp_fastopen_cookie *foc,
                enum tcp_synack_type synack_type)
{
    struct inet_request_sock *ireq = inet_rsk(req);
    const struct tcp_sock *tp = tcp_sk(sk);
    struct tcp_md5sig_key *md5 = NULL;
    struct tcp_out_options opts;
    struct sk_buff *skb;
    int tcp_header_size;
    struct tcphdr *th;
    u16 user_mss;
    int mss;
    /*分配skb,这是DDOS攻击生效的原因之一:
    如果一个client不停的更改源ip给server发送syn包,server还以为有很多
    client想和自己通信,然后不停地分配skb为
    接下来的通信做准备,可能导致内存耗尽
    */
    skb = alloc_skb(MAX_TCP_HEADER, GFP_ATOMIC);
    if (unlikely(!skb)) {
        dst_release(dst);
        return NULL;
    }
    /* Reserve space for headers. */
    skb_reserve(skb, MAX_TCP_HEADER);

    switch (synack_type) {
    case TCP_SYNACK_NORMAL:
        skb_set_owner_w(skb, req_to_sk(req));
        break;
    case TCP_SYNACK_COOKIE:
        /* Under synflood, we do not attach skb to a socket,
         * to avoid false sharing.
         */
        break;
    case TCP_SYNACK_FASTOPEN:
        /* sk is a const pointer, because we want to express multiple
         * cpu might call us concurrently.
         * sk->sk_wmem_alloc in an atomic, we can promote to rw.
         */
        skb_set_owner_w(skb, (struct sock *)sk);
        break;
    }
    skb_dst_set(skb, dst);

    mss = dst_metric_advmss(dst);
    user_mss = READ_ONCE(tp->rx_opt.user_mss);
    if (user_mss && user_mss < mss)
        mss = user_mss;

    memset(&opts, 0, sizeof(opts));
#ifdef CONFIG_SYN_COOKIES
    if (unlikely(req->cookie_ts))
        skb->skb_mstamp.stamp_jiffies = cookie_init_timestamp(req);
    else
#endif
    skb_mstamp_get(&skb->skb_mstamp);

#ifdef CONFIG_TCP_MD5SIG
    rcu_read_lock();
    md5 = tcp_rsk(req)->af_specific->req_md5_lookup(sk, req_to_sk(req));
#endif
    skb_set_hash(skb, tcp_rsk(req)->txhash, PKT_HASH_TYPE_L4);
    tcp_header_size = tcp_synack_options(req, mss, skb, &opts, md5, foc) +
              sizeof(*th);
    //开始填充tcp头部了
    skb_push(skb, tcp_header_size);
    skb_reset_transport_header(skb);

    th = (struct tcphdr *)skb->data;
    memset(th, 0, sizeof(struct tcphdr));
    th->syn = 1;
    th->ack = 1;
    tcp_ecn_make_synack(req, th);
    th->source = htons(ireq->ir_num);
    th->dest = ireq->ir_rmt_port;
    /* Setting of flags are superfluous here for callers (and ECE is
     * not even correctly set)
     */
    tcp_init_nondata_skb(skb, tcp_rsk(req)->snt_isn,
                 TCPHDR_SYN | TCPHDR_ACK);

    th->seq = htonl(TCP_SKB_CB(skb)->seq);
    /* XXX data is queued and acked as is. No buffer/window check */
    th->ack_seq = htonl(tcp_rsk(req)->rcv_nxt);

    /* RFC1323: The window in SYN & SYN/ACK segments is never scaled. */
    th->window = htons(min(req->rsk_rcv_wnd, 65535U));
    tcp_options_write((__be32 *)(th + 1), NULL, &opts);
    th->doff = (tcp_header_size >> 2);
    __TCP_INC_STATS(sock_net(sk), TCP_MIB_OUTSEGS);

#ifdef CONFIG_TCP_MD5SIG
    /* Okay, we have all we need - do the md5 hash if needed */
    if (md5)
        tcp_rsk(req)->af_specific->calc_md5_hash(opts.hash_location,
                           md5, req_to_sk(req), skb);
    rcu_read_unlock();
#endif

    /* Do not fool tcpdump (if any), clean our debris */
    skb->tstamp.tv64 = 0;
    return skb;
}
EXPORT_SYMBOL(tcp_make_synack);
最后在skb添加ip头,调用ip_local_out把数据包发送出去,代码逻辑很简单:
/*
 *        Add an ip header to a skbuff and send it out.
 *
 */
int ip_build_and_send_pkt(struct sk_buff *skb, const struct sock *sk,
              __be32 saddr, __be32 daddr, struct ip_options_rcu *opt)
{
    struct inet_sock *inet = inet_sk(sk);
    struct rtable *rt = skb_rtable(skb);
    struct net *net = sock_net(sk);
    struct iphdr *iph;

    /* Build the IP header. 构造ip头*/
    skb_push(skb, sizeof(struct iphdr) + (opt ? opt->opt.optlen : 0));
    skb_reset_network_header(skb);
    iph = ip_hdr(skb);
    iph->version  = 4;
    iph->ihl      = 5;
    iph->tos      = inet->tos;
    iph->ttl      = ip_select_ttl(inet, &rt->dst);
    iph->daddr    = (opt && opt->opt.srr ? opt->opt.faddr : daddr);
    iph->saddr    = saddr;
    iph->protocol = sk->sk_protocol;
    if (ip_dont_fragment(sk, &rt->dst)) {
        iph->frag_off = htons(IP_DF);
        iph->id = 0;
    } else {
        iph->frag_off = 0;
        __ip_select_ident(net, iph, 1);
    }

    if (opt && opt->opt.optlen) {
        iph->ihl += opt->opt.optlen>>2;
        ip_options_build(skb, &opt->opt, daddr, rt, 0);
    }

    skb->priority = sk->sk_priority;
    skb->mark = sk->sk_mark;

    /* Send it out. */
    return ip_local_out(net, skb->sk, skb);
}
server发送SYN-ACK就完毕了!
(3)client的ack数据包
这个ack是client给server发送的,本质还是个字符串,构造出这个字符串发送出去就行了,所以最核心的还是调用tcp_transmit_skb函数,整个函数代码如下:
/* This routine sends an ack and also updates the window. */
void tcp_send_ack(struct sock *sk)
{
    struct sk_buff *buff;

    /* If we have been reset, we may not send again. */
    /* 如果当前的套接字已经被关闭了,那么直接返回。 */
    if (sk->sk_state == TCP_CLOSE)
        return;
    /* 拥塞避免 */
    tcp_ca_event(sk, CA_EVENT_NON_DELAYED_ACK);

    /* We are not putting this on the write queue, so
     * tcp_transmit_skb() will set the ownership to this
     * sock.
     */
    buff = alloc_skb(MAX_TCP_HEADER,
             sk_gfp_mask(sk, GFP_ATOMIC | __GFP_NOWARN));
    if (unlikely(!buff)) {
        inet_csk_schedule_ack(sk);
        inet_csk(sk)->icsk_ack.ato = TCP_ATO_MIN;
        inet_csk_reset_xmit_timer(sk, ICSK_TIME_DACK,
                      TCP_DELACK_MAX, TCP_RTO_MAX);
        return;
    }

    /* Reserve space for headers and prepare control bits. */
    /* 初始化 ACK 包 */
    skb_reserve(buff, MAX_TCP_HEADER);
    tcp_init_nondata_skb(buff, tcp_acceptable_seq(sk), TCPHDR_ACK);

    /* We do not want pure acks influencing TCP Small Queues or fq/pacing
     * too much.
     * SKB_TRUESIZE(max(1 .. 66, MAX_TCP_HEADER)) is unfortunately ~784
     * We also avoid tcp_wfree() overhead (cache line miss accessing
     * tp->tsq_flags) by using regular sock_wfree()
     */
    skb_set_tcp_pure_ack(buff);

    /* Send it off, this clears delayed acks for us. */
    /* 添加时间戳并发送 ACK 包 */
    skb_mstamp_get(&buff->skb_mstamp);
    //还是从这里构造和发送ack包,老演员了!
    tcp_transmit_skb(sk, buff, 0, (__force gfp_t)0);
}
EXPORT_SYMBOL_GPL(tcp_send_ack);
总结:
1、网卡只负责简单粗暴地收发数据(说白了就是字符串),协议什么的需要操作系统考虑,网卡这种硬件是不care的!
2、socket、sock、sk_buff、tcphdr等结构体存在的最终目的都是为了构造协议不同层级的数据包(说白了就是不同的字符串,为了方便理解和维护、避免眉毛胡子一把抓的毛病,把字符串的不同位置抽象成了不同的属性或标识);所以不同操作系统肯定有不同的结构体和方法来生成和解析数据包,只要保证发出去的字符串符合协议规定的格式就行了!
3、逻辑层面所谓的建立连接:双方通过SYN和ACK确定要互相通信后,会分配skb来存储收发的数据!DDOS攻击的一种就是想办法让server不停地分配skb来接受即将到来的数据!然而server的内存是有限的,分配了大量的skb最终会导致内存被耗尽!
参考:
1、https://network.51cto.com/article/648928.html?mobile tcp三次握手之connect
2、https://www.leviathan.vip/2018/08/09/Linux%E5%86%85%E6%A0%B8%E6%BA%90%E7%A0%81%E5%88%86%E6%9E%90-TCP%E5%8D%8F%E8%AE%AE-1/ tcp协议分析
3、http://45.76.5.96/opensource/tcp/tcp.pdf linux tcp源码分析
#388 内核模块 » linux源码解读(二十):网络通信简介——socket&sock结构体介绍 » 2022-10-11 12:43:39
- batsom
- 回复: 0
linux下的网络编程离不开socket,中文被翻译为套接字。任何网络通信都必须先建立socket,再通过socket给对方收发数据!数据接受的demo代码如下:
#include <string.h>
#include <sys/socket.h>
#include <sys/types.h>
#define SET_PORT 3490
int main(void)
{
    int sockfd, new_fd;
    struct sockaddr_in my_addr;
    struct sockaddr_in their_addr;
    int sin_size;
    sockfd = socket(PF_INET, SOCK_STREAM, 0);
    my_addr.sin_family = AF_INET;
    my_addr.sin_port = htons(_INT_PORT);
    my_addr.sin_addr.s_addr = INADDR_ANY;
    bzero(&(my_addr.sin_zero),sizeof(my_addr.sin_zero));
    bind(sockfd, (struct sockaddr *)&my_addr,sizeof(struct sockaddr));// 绑定套接字
    listen(sockfd, 10);                                                     // 监听套接字
    sin_size = sizeof(struct sockaddr_in);
    new_fd = accept(sockfd, &their_addr, &sin_size);                        // 接收套接字
}
可以看出,需要先调用socket函数建立socket,再绑定套接字,最后监听和接受数据。 这个socket到底是啥?linux在内核中又是怎么使用的了?
1、(1)socket是个结构体,字段不多,但是嵌套了其他结构体,各种嵌套的关系标识如下:
proto_ops:用户层调用的各种接口就是在这里注册的(篇幅有限,截图的字段不全)
wq:等待该socket的进程队列和异步通知队列;换句话说:同一个socket可能有多个进程都在等待使用!
sock:应该是socket结构体最核心的嵌套结构体了(篇幅有限,截图的字段不全)!

(2)socket结构体有了,接下来就是创建和初始化了!linux内核创建socket的函数是__sock_create,核心代码如下:
int __sock_create(struct net *net, int family, int type, int protocol,
             struct socket **res, int kern)
{
    int err;
    struct socket *sock;
    const struct net_proto_family *pf;
        .........

     /*
     *    Allocate the socket and allow the family to set things up. if
     *    the protocol is 0, the family is instructed to select an appropriate
     *    default.
        本质:创建socket结构体,存放在inode,通过superblock统一检索和管理
     */
    sock = sock_alloc();
        .........
        /*socket就是在这里创建的,实际调用的是inet_create
          af_inet.c文件中:
          static const struct net_proto_family inet_family_ops = {
               .family = PF_INET,
               .create = inet_create,
               .owner    = THIS_MODULE,
    };*/
    err = pf->create(net, sock, protocol, kern);
    ..................
}
创建socket的核心函数就2个:sock_alloc,还有pf->create!先看第一个sock_alloc,代码如下:
/**
 *    sock_alloc    -    allocate a socket
 *
 *    Allocate a new inode and socket object. The two are bound together
 *    and initialised. The socket is then returned. If we are out of inodes
 *    NULL is returned.
    明明是申请socket,底层却分配inode,这是为啥了?
    1、socket也需要管理,放在inode后通过super_bloc统一检索和管理
    2、socket的属性字段自然也存放在inode节点了
    3、符合万物皆文件的理念
 */

struct socket *sock_alloc(void)
{
    struct inode *inode;
    struct socket *sock;
    //从超级块里分配一个inode
    inode = new_inode_pseudo(sock_mnt->mnt_sb);
    if (!inode)
        return NULL;
    /*把inode和socket绑定在一起,通过inode寻址socket,便于管理*/
    sock = SOCKET_I(inode);

    kmemcheck_annotate_bitfield(sock, type);//标记shadow memory来表示这块内存已经使用了
    inode->i_ino = get_next_ino();
    inode->i_mode = S_IFSOCK | S_IRWXUGO;
    inode->i_uid = current_fsuid();
    inode->i_gid = current_fsgid();
    inode->i_op = &sockfs_inode_ops;

    this_cpu_add(sockets_in_use, 1);
    return sock;
}
本质上就是分配一个inode,然后和socket结构体绑定,通过inode寻址socket结构体!socket结构体有了,接下来就是在socket内部嵌套的sock结构体了!其生成和初始化的工作都是在inet_create内部完成的,代码如下:
static int inet_create(struct net *net, struct socket *sock, int protocol,
               int kern)
{
    struct sock *sk;
    struct inet_protosw *answer;
    struct inet_sock *inet;
    struct proto *answer_prot;
    unsigned char answer_flags;
    int try_loading_module = 0;
    int err;

    if (protocol < 0 || protocol >= IPPROTO_MAX)
        return -EINVAL;

    sock->state = SS_UNCONNECTED;//初始化状态当然设置成未连接了

    /* Look for the requested type/protocol pair. */
lookup_protocol:
    err = -ESOCKTNOSUPPORT;
    rcu_read_lock();
    list_for_each_entry_rcu(answer, &inetsw[sock->type], list) {

        err = 0;
        /* Check the non-wild match. */
        if (protocol == answer->protocol) {
            if (protocol != IPPROTO_IP)
                break;
        } else {
            /* Check for the two wild cases. */
            if (IPPROTO_IP == protocol) {
                protocol = answer->protocol;
                break;
            }
            if (IPPROTO_IP == answer->protocol)
                break;
        }
        err = -EPROTONOSUPPORT;
    }

    if (unlikely(err)) {
        if (try_loading_module < 2) {
            rcu_read_unlock();
            /*
             * Be more specific, e.g. net-pf-2-proto-132-type-1
             * (net-pf-PF_INET-proto-IPPROTO_SCTP-type-SOCK_STREAM)
             */
            if (++try_loading_module == 1)
                request_module("net-pf-%d-proto-%d-type-%d",
                           PF_INET, protocol, sock->type);
            /*
             * Fall back to generic, e.g. net-pf-2-proto-132
             * (net-pf-PF_INET-proto-IPPROTO_SCTP)
             */
            else
                request_module("net-pf-%d-proto-%d",
                           PF_INET, protocol);
            goto lookup_protocol;
        } else
            goto out_rcu_unlock;
    }

    err = -EPERM;
    if (sock->type == SOCK_RAW && !kern &&
        !ns_capable(net->user_ns, CAP_NET_RAW))
        goto out_rcu_unlock;

    sock->ops = answer->ops;
    answer_prot = answer->prot;
    answer_flags = answer->flags;
    rcu_read_unlock();

    WARN_ON(!answer_prot->slab);

    err = -ENOBUFS;
    /*从cpu缓存或堆内存分配空间存储sock实例,并初始化*/
    sk = sk_alloc(net, PF_INET, GFP_KERNEL, answer_prot, kern);
    if (!sk)
        goto out;

    err = 0;
    if (INET_PROTOSW_REUSE & answer_flags)
        sk->sk_reuse = SK_CAN_REUSE;
    /*
    1、强制转换成inet_sock类型,便于继续初始化;
    2、inet和sk指针并未改变,指向的是同一块内存地址,两个指针可以同时使用
    */
    inet = inet_sk(sk);
    inet->is_icsk = (INET_PROTOSW_ICSK & answer_flags) != 0;

    inet->nodefrag = 0;

    if (SOCK_RAW == sock->type) {
        inet->inet_num = protocol;
        if (IPPROTO_RAW == protocol)
            inet->hdrincl = 1;
    }

    if (net->ipv4.sysctl_ip_no_pmtu_disc)
        inet->pmtudisc = IP_PMTUDISC_DONT;
    else
        inet->pmtudisc = IP_PMTUDISC_WANT;

    inet->inet_id = 0;
    /*
    1、初始化sk_buff的读、写、错误队列
    2、关联socket和sock的实例
    3、定义sock的回调函数
    4、初始化其他sock字段
    */
    sock_init_data(sock, sk);

    sk->sk_destruct       = inet_sock_destruct;//析构时的回调函数
    sk->sk_protocol       = protocol;//协议类型
    sk->sk_backlog_rcv = sk->sk_prot->backlog_rcv;
    //sk和inet交替使用来初始化
    inet->uc_ttl    = -1;
    inet->mc_loop    = 1;
    inet->mc_ttl    = 1;
    inet->mc_all    = 1;
    inet->mc_index    = 0;
    inet->mc_list    = NULL;
    inet->rcv_tos    = 0;

    sk_refcnt_debug_inc(sk);//引用计数+1

    if (inet->inet_num) {
        /* It assumes that any protocol which allows
         * the user to assign a number at socket
         * creation time automatically
         * shares.
         */
        inet->inet_sport = htons(inet->inet_num);
        /* Add to protocol hash chains. */
        err = sk->sk_prot->hash(sk);
        if (err) {
            sk_common_release(sk);
            goto out;
        }
    }

    if (sk->sk_prot->init) {
        err = sk->sk_prot->init(sk);
        if (err)
            sk_common_release(sk);
    }
out:
    return err;
out_rcu_unlock:
    rcu_read_unlock();
    goto out;
}
整个逻辑并不复杂,先是调用sk_alloc函数生成sock实例,再调用sock_init_data初始化sock实力,并和socket实例关联,所以我个人认为sock_init_data是最核心的函数,如下:
/*
1、初始化sk_buff的读、写、错误队列
2、关联socket和sock的实例
3、定义sock的回调函数
4、初始化其他sock字段
*/
void sock_init_data(struct socket *sock, struct sock *sk)
{
    /*初始化sk_buff的读写、错误队列*/
    skb_queue_head_init(&sk->sk_receive_queue);
    skb_queue_head_init(&sk->sk_write_queue);
    skb_queue_head_init(&sk->sk_error_queue);

    sk->sk_send_head    =    NULL;
    //初始化定时器
    init_timer(&sk->sk_timer);

    sk->sk_allocation    =    GFP_KERNEL;
    sk->sk_rcvbuf        =    sysctl_rmem_default;
    sk->sk_sndbuf        =    sysctl_wmem_default;
    sk->sk_state        =    TCP_CLOSE;
    //这里终于把socket和sock实例关联起来了
    sk_set_socket(sk, sock);

    sock_set_flag(sk, SOCK_ZAPPED);

    if (sock) {
        sk->sk_type    =    sock->type;
        sk->sk_wq    =    sock->wq;
        sock->sk    =    sk;
    } else
        sk->sk_wq    =    NULL;

    rwlock_init(&sk->sk_callback_lock);
    lockdep_set_class_and_name(&sk->sk_callback_lock,
            af_callback_keys + sk->sk_family,
            af_family_clock_key_strings[sk->sk_family]);

    sk->sk_state_change    =    sock_def_wakeup;//状态改变后的回调函数
    sk->sk_data_ready    =    sock_def_readable;//有数据可读的回调函数
    sk->sk_write_space    =    sock_def_write_space;//有缓存可写的回调函数
    sk->sk_error_report    =    sock_def_error_report;//发生io错误时的回调函数
    sk->sk_destruct        =    sock_def_destruct;

    sk->sk_frag.page    =    NULL;
    sk->sk_frag.offset    =    0;
    sk->sk_peek_off        =    -1;

    sk->sk_peer_pid     =    NULL;
    sk->sk_peer_cred    =    NULL;
    sk->sk_write_pending    =    0;
    sk->sk_rcvlowat        =    1;
    sk->sk_rcvtimeo        =    MAX_SCHEDULE_TIMEOUT;
    sk->sk_sndtimeo        =    MAX_SCHEDULE_TIMEOUT;

    sk->sk_stamp = ktime_set(-1L, 0);

#ifdef CONFIG_NET_RX_BUSY_POLL
    sk->sk_napi_id        =    0;
    sk->sk_ll_usec        =    sysctl_net_busy_read;
#endif

    sk->sk_max_pacing_rate = ~0U;
    sk->sk_pacing_rate = ~0U;
    sk->sk_incoming_cpu = -1;
    /*
     * Before updating sk_refcnt, we must commit prior changes to memory
     * (Documentation/RCU/rculist_nulls.txt for details)
     */
    smp_wmb();
    atomic_set(&sk->sk_refcnt, 1);
    atomic_set(&sk->sk_drops, 0);
}
上面有几个回调函数,其实实现的逻辑的代码结构基本是一样的:
/*
 *    Default Socket Callbacks
 当sock的状态发生改变时,会调用此函数来进行处理
 */

static void sock_def_wakeup(struct sock *sk)
{
    struct socket_wq *wq;

    rcu_read_lock();
    wq = rcu_dereference(sk->sk_wq);
    if (skwq_has_sleeper(wq))//有进程阻塞在这个socket
    //唤醒所有在等待这个socket的进程,核心就是执行进程唤醒的回调函数
        wake_up_interruptible_all(&wq->wait);
    rcu_read_unlock();
}
/*sock有输入数据可读时,会调用此函数来处理*/
static void sock_def_readable(struct sock *sk)
{
    struct socket_wq *wq;

    rcu_read_lock();
    wq = rcu_dereference(sk->sk_wq);
    if (skwq_has_sleeper(wq))
        /* 唤醒等待数据的进程,核心还是执行回调函数 */
        wake_up_interruptible_sync_poll(&wq->wait, POLLIN | POLLPRI |
                        POLLRDNORM | POLLRDBAND);
    /* 异步通知队列的处理。
     * 检查应用程序是否通过recv()类调用来等待接收数据,如果没有就发送SIGIO信号,
     * 告知它有数据可读。
     * how为函数的处理方式,band为用来告知的IO类型。
     */
    sk_wake_async(sk, SOCK_WAKE_WAITD, POLL_IN);
    rcu_read_unlock();
}
当有可读数据的时候,肯定第一时间通知相应的进程来读取数据,核心是通过sk_wake_async函数实现的;而sk_wake_async最终调用了kill_fasync_rcu来给排队等待的队列发出SIGIO信号,通知这些队列中的进程来取数据了!异步的好处在这里就凸显了:进程不用在这里空转等数据,而是可以释放cpu去执行其他进程的代码;等socket有数据后再通过类似中断的形式通知等待的进程来取数据了!
/*
 * rcu_read_lock() is held
   函数名有kill,但实际是向队列的进程发送SIGIO信号
 */
static void kill_fasync_rcu(struct fasync_struct *fa, int sig, int band)
{
    while (fa) {
        struct fown_struct *fown;
        unsigned long flags;

        if (fa->magic != FASYNC_MAGIC) {
            printk(KERN_ERR "kill_fasync: bad magic number in "
                   "fasync_struct!\n");
            return;
        }
        spin_lock_irqsave(&fa->fa_lock, flags);
        if (fa->fa_file) {
            fown = &fa->fa_file->f_owner;
            /* Don't send SIGURG to processes which have not set a
               queued signum: SIGURG has its own default signalling
               mechanism. */
            if (!(sig == SIGURG && fown->signum == 0))
                send_sigio(fown, fa->fa_fd, band);
        }
        spin_unlock_irqrestore(&fa->fa_lock, flags);
        fa = rcu_dereference(fa->fa_next);
    }
}#389 内核模块 » linux源码解读(十九):网络通信简介——sk_buff结构体介绍 » 2022-10-11 12:38:24
- batsom
- 回复: 0
1、时至今日,已经找不到单机设备了,所有的IT硬件设备都会联网和其他的IT设备通信。设备之间传递数据总要遵守特定的协议规范吧,避免出现“鸡同鸭讲”的尴尬局面,这个就是至今世界范围内最流行的tcp/ip协议! 为了简化,又被分成了5层,各种体系的对应关系如下图:
看网络原理解析的各种技术文章时,经常会提起报文、数据包、包头这些名词,然后配上协议不同层级的包头字段图示,初学者可能会懵逼:这些概念到底指的是啥了?概念背后的本质又是啥了?先说说我个人的理解:所谓的报文也好、数据包也好、包头也好,本质就是个字符串!不同层级的封装,本质就是不停地在字符串前面添加新的字符!理解这个本质后,网络数据包的构造过程就很容易理解了,图示如下:
假如李雷想给韩梅梅发一条内容为“hello”的消息,操作系统怎么才能把这消息准确无误地发送给韩梅梅了?很简单:操作系统通过网卡发送的数据包遵从TCP/IP协议即可!李雷和韩梅梅之间可能有很多路由器、交换机这些帮忙转发数据包的设备,为了能正确识别并转发,需要操作系统发送的数据有特定的格式,这种特定格式的数据包制作过程如上如图所以:应用层的app构造“hello”字符串,然后调用send函数发送数据。操作系统提供的send函数会继续在“hello”这个字符串前面添加各种标识的字段(这就是所谓的包头,本质还是字符串)。比如:
应用层的下一层是传输层,这一层是tcp或udp协议,需要加上端口(识别进程)和其他tcp或udp的属性字段;
再往下是网络层,需要加上源和目的ip地址,以及其他ip协议的属性字段
继续往下是链路层,加上网卡的硬件id,也就是MAC号
以上一切都做完后,由网卡发送出去!本质就是网卡发送了一串字符串,用户负责构造字符串的应用层,然后调用操作系统提供的send函数!操作系统负责继续构造字符串的传输层、网络层和链路层!整个网络通信数据源构造的原理就是这样的,其实并不复杂,搞清楚协议每一层需要添加的字段就行了,没啥难的!原理搞懂了,linux操作系统在代码层面又是怎么做的了?
2、操作系统既然发出去的是字符串,围绕着这段字符串有以下几点需要明确:
肯定需要在内存找个地方存储这串字符串
应用有很多,不同的应用可能会发送不同的应用数据;就算是同一个应用,也可能在不同的时间段发送不同的数据;换句话说这类的字符串有很多很多,绝对不止1个!
那么问题来了:大量的字符串该怎么管理了?linux操作系统使用了sk_buff结构体!这个结构体非常大,个人觉得重要的字段额外加了注释:
/**
 *    struct sk_buff - socket buffer
 *    @next: Next buffer in list
 *    @prev: Previous buffer in list
 *    @tstamp: Time we arrived/left
 *    @rbnode: RB tree node, alternative to next/prev for netem/tcp
 *    @sk: Socket we are owned by
 *    @dev: Device we arrived on/are leaving by
 *    @cb: Control buffer. Free for use by every layer. Put private vars here
 *    @_skb_refdst: destination entry (with norefcount bit)
 *    @sp: the security path, used for xfrm
 *    @len: Length of actual data
 *    @data_len: Data length
 *    @mac_len: Length of link layer header
 *    @hdr_len: writable header length of cloned skb
 *    @csum: Checksum (must include start/offset pair)
 *    @csum_start: Offset from skb->head where checksumming should start
 *    @csum_offset: Offset from csum_start where checksum should be stored
 *    @priority: Packet queueing priority
 *    @ignore_df: allow local fragmentation
 *    @cloned: Head may be cloned (check refcnt to be sure)
 *    @ip_summed: Driver fed us an IP checksum
 *    @nohdr: Payload reference only, must not modify header
 *    @nfctinfo: Relationship of this skb to the connection
 *    @pkt_type: Packet class
 *    @fclone: skbuff clone status
 *    @ipvs_property: skbuff is owned by ipvs
 *    @peeked: this packet has been seen already, so stats have been
 *        done for it, don't do them again
 *    @nf_trace: netfilter packet trace flag
 *    @protocol: Packet protocol from driver
 *    @destructor: Destruct function
 *    @nfct: Associated connection, if any
 *    @nf_bridge: Saved data about a bridged frame - see br_netfilter.c
 *    @skb_iif: ifindex of device we arrived on
 *    @tc_index: Traffic control index
 *    @tc_verd: traffic control verdict
 *    @hash: the packet hash
 *    @queue_mapping: Queue mapping for multiqueue devices
 *    @xmit_more: More SKBs are pending for this queue
 *    @ndisc_nodetype: router type (from link layer)
 *    @ooo_okay: allow the mapping of a socket to a queue to be changed
 *    @l4_hash: indicate hash is a canonical 4-tuple hash over transport
 *        ports.
 *    @sw_hash: indicates hash was computed in software stack
 *    @wifi_acked_valid: wifi_acked was set
 *    @wifi_acked: whether frame was acked on wifi or not
 *    @no_fcs:  Request NIC to treat last 4 bytes as Ethernet FCS
  *    @napi_id: id of the NAPI struct this skb came from
 *    @secmark: security marking
 *    @mark: Generic packet mark
 *    @vlan_proto: vlan encapsulation protocol
 *    @vlan_tci: vlan tag control information
 *    @inner_protocol: Protocol (encapsulation)
 *    @inner_transport_header: Inner transport layer header (encapsulation)
 *    @inner_network_header: Network layer header (encapsulation)
 *    @inner_mac_header: Link layer header (encapsulation)
 *    @transport_header: Transport layer header
 *    @network_header: Network layer header
 *    @mac_header: Link layer header
 *    @tail: Tail pointer
 *    @end: End pointer
 *    @head: Head of buffer
 *    @data: Data head pointer
 *    @truesize: Buffer size
 *    @users: User count - see {datagram,tcp}.c
 */

struct sk_buff {
    union {
        struct {
            /* These two members must be first. */
            /*双向链表结构,用来存储网络数据包*/
            struct sk_buff        *next;
            struct sk_buff        *prev;

            union {
                /*报文到达或者离开的时间戳; Time we arrived 表示这个skb的接收到的时间,
                一般是在包从驱动中往二层发送的接口函数中设置 */
                ktime_t        tstamp;
                struct skb_mstamp skb_mstamp;
            };
        };
        /**/
        struct rb_node    rbnode; /* used in netem & tcp stack */
    };
    struct sock        *sk;//该数据包属于哪个socket
    struct net_device    *dev;//收到这个报文的设备

    /*
     * This is the control buffer. It is free to use for every
     * layer. Please put your private variables there. If you
     * want to keep them across layers you have to do a skb_clone()
     * first. This is owned by whoever has the skb queued ATM.
     */
    char            cb[48] __aligned(8);

    unsigned long        _skb_refdst;
    //析构函数,一般都是设置为sock_rfree或者sock_wfree
    void            (*destructor)(struct sk_buff *skb);
#ifdef CONFIG_XFRM
    struct    sec_path    *sp;
#endif
#if defined(CONFIG_NF_CONNTRACK) || defined(CONFIG_NF_CONNTRACK_MODULE)
    struct nf_conntrack    *nfct;
#endif
#if IS_ENABLED(CONFIG_BRIDGE_NETFILTER)
    struct nf_bridge_info    *nf_bridge;
#endif
    /*表示当前的skb中的数据的长度,这个长度即包括buf中的数据也包括切片的数据,
    也就是保存在skb_shared_info中的数据*/
    unsigned int        len,
                data_len;//只表示切片数据的长度,也就是skb_shared_info中的长度
    __u16            mac_len,//mac头的长度
                hdr_len;//用于clone的时候,它表示clone的skb的头的长度

    /* Following fields are _not_ copied in __copy_skb_header()
     * Note that queue_mapping is here mostly to fill a hole.
     */
    kmemcheck_bitfield_begin(flags1);
    __u16            queue_mapping;//多队列设备的映射,也就是说映射到那个队列。

/* if you move cloned around you also must adapt those constants */
#ifdef __BIG_ENDIAN_BITFIELD
#define CLONED_MASK    (1 << 7)
#else
#define CLONED_MASK    1
#endif
#define CLONED_OFFSET()        offsetof(struct sk_buff, __cloned_offset)

    __u8            __cloned_offset[0];
    __u8            cloned:1,
                nohdr:1,
                fclone:2,
                peeked:1,
                head_frag:1,
                xmit_more:1,
                __unused:1; /* one bit hole */
    kmemcheck_bitfield_end(flags1);

    /* fields enclosed in headers_start/headers_end are copied
     * using a single memcpy() in __copy_skb_header()
     */
    /* private: */
    __u32            headers_start[0];
    /* public: */

/* if you move pkt_type around you also must adapt those constants */
#ifdef __BIG_ENDIAN_BITFIELD
#define PKT_TYPE_MAX    (7 << 5)
#else
#define PKT_TYPE_MAX    7
#endif
#define PKT_TYPE_OFFSET()    offsetof(struct sk_buff, __pkt_type_offset)

    __u8            __pkt_type_offset[0];
    __u8            pkt_type:3;
    __u8            pfmemalloc:1;
    __u8            ignore_df:1;
    __u8            nfctinfo:3;

    __u8            nf_trace:1;
    __u8            ip_summed:2;
    __u8            ooo_okay:1;
    __u8            l4_hash:1;
    __u8            sw_hash:1;
    __u8            wifi_acked_valid:1;
    __u8            wifi_acked:1;

    __u8            no_fcs:1;
    /* Indicates the inner headers are valid in the skbuff. */
    __u8            encapsulation:1;
    __u8            encap_hdr_csum:1;
    __u8            csum_valid:1;
    __u8            csum_complete_sw:1;
    __u8            csum_level:2;
    __u8            csum_bad:1;

#ifdef CONFIG_IPV6_NDISC_NODETYPE
    __u8            ndisc_nodetype:2;
#endif
    __u8            ipvs_property:1;
    __u8            inner_protocol_type:1;
    __u8            remcsum_offload:1;
#ifdef CONFIG_NET_SWITCHDEV
    __u8            offload_fwd_mark:1;
#endif
    /* 2, 4 or 5 bit hole */

#ifdef CONFIG_NET_SCHED
    __u16            tc_index;    /* traffic control index */
#ifdef CONFIG_NET_CLS_ACT
    __u16            tc_verd;    /* traffic control verdict */
#endif
#endif

    union {
        __wsum        csum;
        struct {
            __u16    csum_start;
            __u16    csum_offset;
        };
    };
    __u32            priority;/*优先级,主要用于QOS*/
    int            skb_iif;
    __u32            hash;
    __be16            vlan_proto;
    __u16            vlan_tci;
#if defined(CONFIG_NET_RX_BUSY_POLL) || defined(CONFIG_XPS)
    union {
        unsigned int    napi_id;
        unsigned int    sender_cpu;
    };
#endif
#ifdef CONFIG_NETWORK_SECMARK
    __u32        secmark;
#endif

    union {
        __u32        mark;
        __u32        reserved_tailroom;
    };

    union {
        __be16        inner_protocol;
        __u8        inner_ipproto;
    };

    __u16            inner_transport_header;
    __u16            inner_network_header;
    __u16            inner_mac_header;

    __be16            protocol;//协议类型
    __u16            transport_header;//传输层头部
    __u16            network_header;//网络层头部
    __u16            mac_header;//链路层头部

    /* private: */
    __u32            headers_end[0];
    /* public: */

    /* These elements must be at the end, see alloc_skb() for details.
    sk_buff_data_t就是unsigned char *
    */
    sk_buff_data_t        tail;//指向报文尾巴
    sk_buff_data_t        end;//指向报文最后一个字节
    unsigned char        *head,//分配的内存块的起始位置;指向数据区中开始的位置(非实际数据区域开始位置)
                *data;//保存数据内容的首地址;(实际数据区域开始位置)
    /*缓冲区的总长度,包括sk_buff结构和数据部分。
    如果申请一个len字节的缓冲区,alloc_skb函数会把它初始化成len+sizeof(sk_buff)。
    当skb->len变化时,这个变量也会变化*/
    unsigned int        truesize;
    /*atomic_t  users;这是个引用计数,表明了有多少实体引用了这个skb。
    其作用就是在销毁skb结构体时,先查看下users是否为零,
    若不为零,则调用函数递减下引用计数users即可;当某一次销毁时,users为零才真正释放内存空间。
    有两个操作函数:atomic_inc()引用计数增加1;atomic_dec()引用计数减去1;*/
    atomic_t        users;
};
有几点需要注意:
这个结构体并不直接存储网络数据包,而是存放了数据包的指针,就是上面的tail、end、head、data等!
这几个指针的关系如图所示:这下看明白了吧!应用层数据前面加上协议其他层级的头部数据,用data指针保存!应用层尾部用tail指针保存!如果是从L4传输到L2,则是通过往sk_buff结构体中增加该层协议头来操作;如果是从L4到L2,则是通过移动sk_buff结构体中的data指针来实现,不会删除各层协议头,这样做可以提高CPU的工作效率!

3、结构体有了,接着就是操作这些结构体的方法了!既然网络通信最核心的就是构造数据包,落实到结构体就是移动head、data、tail、end这4大指针了!linux内核采用了__skb_put、__skb_push、__pskb_pull、skb_reserve 4大函数,这4个函数参数是一样的,都有啥区别了?
(1)先看看put函数:在数据区的尾部添加数据,也就是增加tail指针!
/*在数据区的末端添加某协议的尾部*/
static inline unsigned char *__skb_put(struct sk_buff *skb, unsigned int len)
{
    unsigned char *tmp = skb_tail_pointer(skb);//获取当前skb->tail
    SKB_LINEAR_ASSERT(skb);
    skb->tail += len;
    skb->len  += len;
    return tmp;
}
如下图所示:data指针减少n
(3)再看看pull函数:把data指针增加n,相当于弹出数据!
/*把data指针增加n,相当于弹出数据*/
unsigned char *skb_pull(struct sk_buff *skb, unsigned int len);
static inline unsigned char *__skb_pull(struct sk_buff *skb, unsigned int len)
{
    skb->len -= len;
    BUG_ON(skb->len < skb->data_len);
    return skb->data += len;
}
如下如所示:
(4)skb_reserve函数:当skb还是空的时候,需要给协议不同层级预留存储头部信息的空间
/**
 *    skb_reserve - adjust headroom
 *    @skb: buffer to alter
 *    @len: bytes to move
 *
 *    Increase the headroom of an empty &sk_buff by reducing the tail
 *    room. This is only allowed for an empty buffer.
    给协议预留head的存储空间,只能对空的skb使用;
 */
static inline void skb_reserve(struct sk_buff *skb, int len)
{
    skb->data += len;
    skb->tail += len;
}
如下图所示:
参考:
1、https://www.jianshu.com/p/3738da62f5f6 sk_buff结构体详解
2、https://blog.csdn.net/farmwang/article/details/54234176 sk_buff详解
3、http://www.360doc.com/content/14/0310/16/2306903_359316839.shtml sk_buff操作函数
#390 内核模块 » linux源码解读(十八):红黑树在内核的应用——timer定时器 » 2022-10-11 11:58:22
- batsom
- 回复: 0
定时器都知道吧?个人认为是linux最核心的功能之一了!比如线程sleep(5000),5s后再唤醒执行,cpu是怎么知道5s的时间到了?还有nginx这种反向代理每隔一段时间都要检测客户端的是否还在,如果掉线了就没必要再分配资源维护连接关系啦。那么间隔固定时间检测心跳的定时机制是怎么实现的了?
1、(1) linux系统和时间相关最核心的变量就是jiffies!在include\linux\raid\pq.h中的定义如下:
# define jiffies    raid6_jiffies()
#define HZ 1000
//返回当前时间的毫秒值,比如时间戳
static inline uint32_t raid6_jiffies(void)
{
    struct timeval tv;
    gettimeofday(&tv, NULL);
    return tv.tv_sec*1000 //tv_sec是秒,乘以1000转成毫秒
            + tv.tv_usec/1000;//tv_usec是微秒,除以1000转成毫秒
}
这段代码的信息量很大,最核心的有两点:
有个宏定义是HZ,值是1000;既然HZ在这里和时间相关,猜都能猜到应该是毫秒单位,因为1s=1000ms;正规的定义:HZ表示1秒产生时钟中断的次数,这里是每秒产生1000次时钟中断,也就是每次时钟中断的间隔是1毫秒!
gettimeofday函数把当前时间戳的值存放在了timeval结构体,两个字段分别是秒和微妙单位;最后raid6_jiffies统一转成毫秒单位返回。所以,这不就是个时间戳么?
继续深入gettimeofday函数,发现最终是通过系统调用获取当前时间的!核心的结构体就是vsyscall_gtod_data!
如果是32位系统,jiffies最大值也就是2^32,超过这个值会产生溢出,回绕到0重新开始计数!所以为了处理回绕问题,linux内核专门提供了比较的方法:
#define time_after(a,b)         \
        (typecheck(unsigned long, a) && \
         typecheck(unsigned long, b) && \
         ((long)(b) - (long)(a) < 0))
#define time_before(a,b)        time_after(b,a)
#define time_after_eq(a,b)      \
        (typecheck(unsigned long, a) && \
         typecheck(unsigned long, b) && \
         ((long)(a) - (long)(b) >= 0))
#define time_before_eq(a,b)     time_after_eq(b,a)
(2) 定时器、定时器,本质就是在特定的时间干特定的活!比如社畜码农早上7:20起床,7:50上班车,9点打开电脑开始搬砖等!在linux系统内核,怎么把特定时间和特定的动作关联在一起了?C++可以创建一个类,成员变量是时间,成员函数是特定的动作;linux内核用C写的,用结构体也能完成同样的功能。这一切都是用timer_list结构体实现的,如下:
struct timer_list {
    /*
     * All fields that change during normal runtime grouped to the
     * same cacheline
     */
    struct hlist_node    entry;//链表结构,串接timer_list
    unsigned long        expires;//到期时间,一般用jiffies+5*HZ:表示5秒后触发定时器的回到函数
    void            (*function)(unsigned long);//定时器时间到后的回调函数
    unsigned long        data;//回调函数的参数
    u32            flags;

#ifdef CONFIG_TIMER_STATS
    int            start_pid;
    void            *start_site;
    char            start_comm[16];
#endif
#ifdef CONFIG_LOCKDEP
    struct lockdep_map    lockdep_map;
#endif
};
结构体定义好了,该怎么用了?先看一段demo代码,形象理解一下timer的用法:
#include <linux/module.h>
#include <linux/timer.h>
#include <linux/jiffies.h>

void time_pre(struct timer_list *timer);
struct timer_list mytimer;
// DEFINE_TIMER(mytimer, time_pre);
void time_pre(struct timer_list *timer)
{
    printk("%s\n", __func__);
    mytimer.expires = jiffies + 500 * HZ/1000;  // 500ms 运行一次
    mod_timer(&mytimer, mytimer.expires);       // 2.2 如果需要周期性执行任务,在定时器回调函数中添加 mod_timer
}

// 驱动接口
int __init chr_init(void)
{
    timer_setup(&mytimer, time_pre, 0);        // 1. 初始化
    mytimer.expires = jiffies + 500 * HZ/1000;  //0.5秒触发一次
    add_timer(&mytimer);                       // 2.1 向内核中添加定时器
    printk("init success\n");
    return 0;
}

void __exit chr_exit(void)
{
    if(timer_pending(&mytimer))
    {
        del_timer(&mytimer);    // 3.释放定时器
    }
    printk("exit Success \n");
}

module_init(chr_init);
module_exit(chr_exit);

MODULE_LICENSE("GPL");
MODULE_AUTHOR("XXX");
MODULE_DESCRIPTION("a simple char device example");
大概的思路: 生成timer_list结构体并初始化,然后用add_timer注册刚才初始化的timer,等expire时间到后就调用callback回调函数!思路很简单,从这里能看到核心的函数时add_timer和mod_timer函数,而这两个函数最终都调用了__mod_timer函数;从函数的源码看,用的都是队列来组织timer的,传说中的红黑树了?
上面的这些定时器都是依赖HZ的,这种定时器称之为低分辨率定时器,从名字就能看出来精度不高。低分辨率定时器使用的timer wheel机制来管理系统中定时器。在timer wheel的机制下,系统中的定时器不是使用单一的链表进行管理。为了达到高效访问,并且消耗极小的cpu资源,linux系统采用了五个链表数组来进行管理(原理和进程调度的O(1)算法类似,把原来单一的队列按照优先级分成若干个):五个数组之间就像手表一样存在分秒进位的操作。在tv1中存放这timer_jiffies到timer_jiffies+256,也就是说tv1存放定时器范围为0-255。如果在每一个tick上可能有多个相同的定时器都要处理,这时候就使用链表将相同的定时器串在一起超时的时候处理。tv2有64个单元,每个单元有256个tick,因此tv2的超时范围为256-256*64-1(2^14 -1), 就这样一次类推到tv3, tv4, tv5上,各个tv的范围如下:
数组 idx范围
tv1 0--2^8-1
tv2 2^8--2^14-1
tv3 2^14--2^20-1
tv4 2^20--2^26-1
tv5 2^26--2^32-1
整个timer wheel图示如下:
2、(1)低精度定时器已经不适用于某些要求高的场景了(比如看门狗、usb、ethernet、块设备、kvm等子系统);为了提高精度,同时兼容低版本的linux内核,需要重新设计新的定时器,取名为hrtimer。和hrtimer配套的结构体有好几个,为了直观感受这些结构体的关系,这里用下图表示:
(2)hrtimer结构体和timer_list类似,都有expire字段和回调函数字段。可以发现结构体之间地关系比较复杂,甚至还互相嵌套,怎么复杂的结构体,linux内核是怎么使用的了?
不管是哪中定时器,首先要生成定时器的实例,主要记录expire时间和回调函数,所以先调用__hrtimer_init方法初始化定时器,代码如下:
static void __hrtimer_init(struct hrtimer *timer, clockid_t clock_id,
               enum hrtimer_mode mode)
{
    struct hrtimer_cpu_base *cpu_base;
    int base;

    memset(timer, 0, sizeof(struct hrtimer));
    //初始化hrtimer的base字段
    cpu_base = raw_cpu_ptr(&hrtimer_bases);

    if (clock_id == CLOCK_REALTIME && mode != HRTIMER_MODE_ABS)
        clock_id = CLOCK_MONOTONIC;

    base = hrtimer_clockid_to_base(clock_id);
    timer->base = &cpu_base->clock_base[base];
    //初始化红黑树的node节点
    timerqueue_init(&timer->node);

#ifdef CONFIG_TIMER_STATS
    timer->start_site = NULL;
    timer->start_pid = -1;
    memset(timer->start_comm, 0, TASK_COMM_LEN);
#endif
}
核心功能就是给base字段的属性赋值,然后初始化红黑树的node节点!随后就是把该节点加入红黑树了,便于后续动态快速地增删改查定时器!构建红黑树的函数是hrtimer_start_range_ns,代码如下:
/**
 * hrtimer_start_range_ns - (re)start an hrtimer on the current CPU
 * @timer:    the timer to be added
 * @tim:    expiry time
 * @delta_ns:    "slack" range for the timer
 * @mode:    expiry mode: absolute (HRTIMER_MODE_ABS) or
 *        relative (HRTIMER_MODE_REL)
 */
void hrtimer_start_range_ns(struct hrtimer *timer, ktime_t tim,
                u64 delta_ns, const enum hrtimer_mode mode)
{
    struct hrtimer_clock_base *base, *new_base;
    unsigned long flags;
    int leftmost;

    base = lock_hrtimer_base(timer, &flags);

    /* Remove an active timer from the queue:
    最终是调用timerqueue_del函数从红黑树删除
    */
    remove_hrtimer(timer, base, true);
    /* 如果是相对时间,则需要加上当前时间,因为内部是使用绝对时间 */
    if (mode & HRTIMER_MODE_REL)
        tim = ktime_add_safe(tim, base->get_time());

    tim = hrtimer_update_lowres(timer, tim, mode);
    /* 设置到期的时间范围 */
    hrtimer_set_expires_range_ns(timer, tim, delta_ns);

    /* Switch the timer base, if necessary: */
    new_base = switch_hrtimer_base(timer, base, mode & HRTIMER_MODE_PINNED);

    timer_stats_hrtimer_set_start_info(timer);
    /* 把hrtime按到期时间排序,加入到对应时间基准系统的红黑树中 */
    /* 如果该定时器的是最早到期的,将会返回true
    最终调用的是timerqueue_add函数
    */
    leftmost = enqueue_hrtimer(timer, new_base);
    if (!leftmost)
        goto unlock;

    if (!hrtimer_is_hres_active(timer)) {
        /*
         * Kick to reschedule the next tick to handle the new timer
         * on dynticks target.
         */
        if (new_base->cpu_base->nohz_active)
            wake_up_nohz_cpu(new_base->cpu_base->cpu);
    } else {
        hrtimer_reprogram(timer, new_base);
    }
unlock:
    unlock_hrtimer_base(timer, &flags);
}
(3)定时器的红黑树建好后,该怎么用了?既然和时间相关,必然绕不开的机制:时钟中断!计算机主板上有种特殊的硬件,每间隔相同的时长就会给cpu发出脉冲信号,作用相当于计算机的“脉搏”;cpu收到这个信号后可以做出某些动作回应,这个机制就是时钟中断。最常见的时钟中断动作就是进程切换了!然而除此之外,时钟中断还有个非常重要的作用:触发和管理定时器!回顾一下上述的结构体定义和使用流程,会发现多个进程可能会需要在同一时间触发定时器,图示如下:比如在第1s的时候,进程A和B都有定时器需要被触发;再比如第7s的时候,进程A、E、F也都有定时器需要被触发,操作系统都是怎么知道应该在什么时候触发哪些定时器的了?
https://img2022.cnblogs.com/blog/2052730/202201/2052730-20220128120520815-1974947758.png此时红黑树的作用就凸显了:每次发生时钟中断,除了必要的进程/线程切换,还需要检查红黑树,看看最左边节点的expire是不是已经到了,如果还没有就不处理,等下一个时钟中断再检查;如果已经到了,就执行该节点的回调函数,同时删除该节点;这个过程是在hrtimer_interrupt中执行的,该函数代码如下:
/*
 * High resolution timer interrupt
 * Called with interrupts disabled
 */
void hrtimer_interrupt(struct clock_event_device *dev)
{
    struct hrtimer_cpu_base *cpu_base = this_cpu_ptr(&hrtimer_bases);
    ktime_t expires_next, now, entry_time, delta;
    int retries = 0;

    BUG_ON(!cpu_base->hres_active);
    cpu_base->nr_events++;
    dev->next_event.tv64 = KTIME_MAX;

    raw_spin_lock(&cpu_base->lock);
    entry_time = now = hrtimer_update_base(cpu_base);
retry:
    cpu_base->in_hrtirq = 1;
    /*
     * We set expires_next to KTIME_MAX here with cpu_base->lock
     * held to prevent that a timer is enqueued in our queue via
     * the migration code. This does not affect enqueueing of
     * timers which run their callback and need to be requeued on
     * this CPU.
     */
    cpu_base->expires_next.tv64 = KTIME_MAX;
    /*查看红黑树的最下节点,如果到期就执行回调函数,并删除该节点*/
    __hrtimer_run_queues(cpu_base, now);

    /* Reevaluate the clock bases for the next expiry
    找到下一个到期的定时器
    */
    expires_next = __hrtimer_get_next_event(cpu_base);
    /*
     * Store the new expiry value so the migration code can verify
     * against it.
     */
    cpu_base->expires_next = expires_next;
    cpu_base->in_hrtirq = 0;
    raw_spin_unlock(&cpu_base->lock);

    /* Reprogramming necessary ? */
    if (!tick_program_event(expires_next, 0)) {
        cpu_base->hang_detected = 0;
        return;
    }

    /*
     * The next timer was already expired due to:
     * - tracing
     * - long lasting callbacks
     * - being scheduled away when running in a VM
     *
     * We need to prevent that we loop forever in the hrtimer
     * interrupt routine. We give it 3 attempts to avoid
     * overreacting on some spurious event.
     *
     * Acquire base lock for updating the offsets and retrieving
     * the current time.
     */
    raw_spin_lock(&cpu_base->lock);
    now = hrtimer_update_base(cpu_base);
    cpu_base->nr_retries++;
    if (++retries < 3)
        goto retry;
    /*
     * Give the system a chance to do something else than looping
     * here. We stored the entry time, so we know exactly how long
     * we spent here. We schedule the next event this amount of
     * time away.
     */
    cpu_base->nr_hangs++;
    cpu_base->hang_detected = 1;
    raw_spin_unlock(&cpu_base->lock);
    delta = ktime_sub(now, entry_time);
    if ((unsigned int)delta.tv64 > cpu_base->max_hang_time)
        cpu_base->max_hang_time = (unsigned int) delta.tv64;
    /*
     * Limit it to a sensible value as we enforce a longer
     * delay. Give the CPU at least 100ms to catch up.
     */
    if (delta.tv64 > 100 * NSEC_PER_MSEC)
        expires_next = ktime_add_ns(now, 100 * NSEC_PER_MSEC);
    else
        expires_next = ktime_add(now, delta);
    tick_program_event(expires_next, 1);
    printk_once(KERN_WARNING "hrtimer: interrupt took %llu ns\n",
            ktime_to_ns(delta));
}
最重要的就是__hrtimer_run_queues以及继续调用的__run_hrtimer函数了,代码如下,重要部分加了中文注释:
/*
 * The write_seqcount_barrier()s in __run_hrtimer() split the thing into 3
 * distinct sections:
 *
 *  - queued:    the timer is queued
 *  - callback:    the timer is being ran
 *  - post:    the timer is inactive or (re)queued
 *
 * On the read side we ensure we observe timer->state and cpu_base->running
 * from the same section, if anything changed while we looked at it, we retry.
 * This includes timer->base changing because sequence numbers alone are
 * insufficient for that.
 *
 * The sequence numbers are required because otherwise we could still observe
 * a false negative if the read side got smeared over multiple consequtive
 * __run_hrtimer() invocations.
 */

static void __run_hrtimer(struct hrtimer_cpu_base *cpu_base,
              struct hrtimer_clock_base *base,
              struct hrtimer *timer, ktime_t *now)
{
    enum hrtimer_restart (*fn)(struct hrtimer *);
    int restart;

    lockdep_assert_held(&cpu_base->lock);

    debug_deactivate(timer);
    cpu_base->running = timer;

    /*
     * Separate the ->running assignment from the ->state assignment.
     *
     * As with a regular write barrier, this ensures the read side in
     * hrtimer_active() cannot observe cpu_base->running == NULL &&
     * timer->state == INACTIVE.
     */
    raw_write_seqcount_barrier(&cpu_base->seq);
    /*调用timerqueue_del从红黑树删除节点*/
    __remove_hrtimer(timer, base, HRTIMER_STATE_INACTIVE, 0);
    timer_stats_account_hrtimer(timer);
    /*最重要的回调函数*/
    fn = timer->function;

    /*
     * Clear the 'is relative' flag for the TIME_LOW_RES case. If the
     * timer is restarted with a period then it becomes an absolute
     * timer. If its not restarted it does not matter.
     */
    if (IS_ENABLED(CONFIG_TIME_LOW_RES))
        timer->is_rel = false;

    /*
     * Because we run timers from hardirq context, there is no chance
     * they get migrated to another cpu, therefore its safe to unlock
     * the timer base.
     定时器是被硬件层面的时钟中断触发的,所以这个回调函数肯定是当前cpu执行的
     */
    raw_spin_unlock(&cpu_base->lock);
    trace_hrtimer_expire_entry(timer, now);
    //终于执行了回调函数
    restart = fn(timer);
    trace_hrtimer_expire_exit(timer);
    raw_spin_lock(&cpu_base->lock);

    /*
     * Note: We clear the running state after enqueue_hrtimer and
     * we do not reprogram the event hardware. Happens either in
     * hrtimer_start_range_ns() or in hrtimer_interrupt()
     *
     * Note: Because we dropped the cpu_base->lock above,
     * hrtimer_start_range_ns() can have popped in and enqueued the timer
     * for us already.
     */
    if (restart != HRTIMER_NORESTART &&
        !(timer->state & HRTIMER_STATE_ENQUEUED))
        enqueue_hrtimer(timer, base);//调用timerqueue_add把timer加入红黑树

    /*
     * Separate the ->running assignment from the ->state assignment.
     *
     * As with a regular write barrier, this ensures the read side in
     * hrtimer_active() cannot observe cpu_base->running == NULL &&
     * timer->state == INACTIVE.
     */
    raw_write_seqcount_barrier(&cpu_base->seq);

    WARN_ON_ONCE(cpu_base->running != timer);
    cpu_base->running = NULL;
}

static void __hrtimer_run_queues(struct hrtimer_cpu_base *cpu_base, ktime_t now)
{
    struct hrtimer_clock_base *base = cpu_base->clock_base;
    unsigned int active = cpu_base->active_bases;
    /*遍历各个时间基准系统,查询每个hrtimer_clock_base对应红黑树的左下节点,
    判断它的时间是否到期,如果到期,通过__run_hrtimer函数,对到期定时器进行处理,
    包括:调用定时器的回调函数、从红黑树中移除该定时器、
           根据回调函数的返回值决定是否重新启动该定时器*/
    for (; active; base++, active >>= 1) {
        struct timerqueue_node *node;
        ktime_t basenow;

        if (!(active & 0x01))
            continue;

        basenow = ktime_add(now, base->offset);
        /*
        返回红黑树中的左下节点,之所以可以在while循环中使用该函数,
        是因为__run_hrtimer会在移除旧的左下节点时,
        新的左下节点会被更新到base->active->next字段中,
        使得循环可以继续执行,直到没有新的到期定时器为止
        */
        while ((node = timerqueue_getnext(&base->active))) {
            struct hrtimer *timer;

            timer = container_of(node, struct hrtimer, node);

            /*
             * The immediate goal for using the softexpires is
             * minimizing wakeups, not running timers at the
             * earliest interrupt after their soft expiration.
             * This allows us to avoid using a Priority Search
             * Tree, which can answer a stabbing querry for
             * overlapping intervals and instead use the simple
             * BST we already have.
             * We don't add extra wakeups by delaying timers that
             * are right-of a not yet expired timer, because that
             * timer will have to trigger a wakeup anyway.
             */
            if (basenow.tv64 < hrtimer_get_softexpires_tv64(timer))
                break;

            __run_hrtimer(cpu_base, base, timer, &basenow);
        }
    }
}
lib\timerqueue.c文件中比较重要的3个工具函数:都是红黑树常规的操作!
/**
 * timerqueue_add - Adds timer to timerqueue.
 *
 * @head: head of timerqueue
 * @node: timer node to be added
 *
 * Adds the timer node to the timerqueue, sorted by the
 * node's expires value.
 */
bool timerqueue_add(struct timerqueue_head *head, struct timerqueue_node *node)
{
    struct rb_node **p = &head->head.rb_node;
    struct rb_node *parent = NULL;
    struct timerqueue_node  *ptr;

    /* Make sure we don't add nodes that are already added */
    WARN_ON_ONCE(!RB_EMPTY_NODE(&node->node));

    while (*p) {
        parent = *p;
        ptr = rb_entry(parent, struct timerqueue_node, node);
        if (node->expires.tv64 < ptr->expires.tv64)
            p = &(*p)->rb_left;
        else
            p = &(*p)->rb_right;
    }
    rb_link_node(&node->node, parent, p);
    rb_insert_color(&node->node, &head->head);

    if (!head->next || node->expires.tv64 < head->next->expires.tv64) {
        head->next = node;
        return true;
    }
    return false;
}
EXPORT_SYMBOL_GPL(timerqueue_add);

/**
 * timerqueue_del - Removes a timer from the timerqueue.
 *
 * @head: head of timerqueue
 * @node: timer node to be removed
 *
 * Removes the timer node from the timerqueue.
 */
bool timerqueue_del(struct timerqueue_head *head, struct timerqueue_node *node)
{
    WARN_ON_ONCE(RB_EMPTY_NODE(&node->node));

    /* update next pointer */
    if (head->next == node) {
        struct rb_node *rbn = rb_next(&node->node);

        head->next = rbn ?
            rb_entry(rbn, struct timerqueue_node, node) : NULL;
    }
    rb_erase(&node->node, &head->head);
    RB_CLEAR_NODE(&node->node);
    return head->next != NULL;
}
EXPORT_SYMBOL_GPL(timerqueue_del);

/**
 * timerqueue_iterate_next - Returns the timer after the provided timer
 *
 * @node: Pointer to a timer.
 *
 * Provides the timer that is after the given node. This is used, when
 * necessary, to iterate through the list of timers in a timer list
 * without modifying the list.
 */
struct timerqueue_node *timerqueue_iterate_next(struct timerqueue_node *node)
{
    struct rb_node *next;

    if (!node)
        return NULL;
    next = rb_next(&node->node);
    if (!next)
        return NULL;
    return container_of(next, struct timerqueue_node, node);
}
EXPORT_SYMBOL_GPL(timerqueue_iterate_next);
整个函数的调用过程:tick_program_event(注册clock_event_device)->hrtimer_inerrupt->__hrtimer_run_queues->__run_hrtimer
(4)定时器中最重要的莫过于执行回调函数了,研发人员设计了这么复杂的流程、结构体,最终的目的不就是为了在正确的时间执行正确的回调函数么? 由于回调函数是异步执行的,它类似于一种“软件中断”,而且是处于非进程的上下文中,所以回调函数有以下3点需要注意:
没有 current 指针、不允许访问用户空间。因为没有进程上下文,相关代码和被中断的进程没有任何联系。
不能执行休眠(或可能引起休眠的函数)和调度。
任何被访问的数据结构都应该针对并发访问进行保护,以防止竞争条件。
3、为什么hrtimer比timer_list精度高?
(1)低分辨率定时器的计时单位基于jiffies值的计数,也就是说,它的精度只有1/HZ。假如内核配置的HZ是1000,那意味着系统中的低分辨率定时器的精度就是1ms; 那么问题来了,为了提高精度,为啥不把HZ值设置地更大了?比如10000、1000000等?提高时钟中断频率也会产生副作用,中断频率越高,系统的负担就增加了,处理器需要花时间来执行中断处理程序,中断处理器占用cpu时间越多。这样处理器执行其他工作的时间及越少,并且还会打乱处理器高速缓存(进程切换导致地)。所以选择时钟中断频率时要考虑多方面,要取得各方面的折中的一个合适频率。
(2)大部分时间里,time wheel可以实现O(1)时间复杂度。但是当有进位发生时,不可预测的O(N)定时器级联迁移时间大大地影响了定时器的精度;刚好红黑树的增删改查时间复杂度可以控制在O(lgN),再加上硬件的计数进步,所以可以比较好地把精度控制在纳秒级别!
参考:
1、https://blog.csdn.net/droidphone/article/details/8051405 低分辨率定时器的原理
2、https://blog.csdn.net/hongzg1982/article/details/54881361 高精度定时器hrtimer的原理
3、https://cloud.tencent.com/developer/article/1603333?from=15425 内核低分辨率定时器的实现
4、https://zhuanlan.zhihu.com/p/83078387 高精度定时器原理简介
#391 内核模块 » linux源码解读(十七):红黑树在内核的应用——epoll » 2022-10-11 11:48:34
- batsom
- 回复: 0
1、简单介绍一下epoll的出现的背景:这里以java代码为例,最原始的server代码如下:
while(true){
         ServerSocket ss = new ServerSocket(8888);
         System.out.println("启动服务器....");
         Socket s = ss.accept();//阻塞点
         System.out.println("客户端:"+s.getInetAddress().getLocalHost()+"已连接到服务器");

         BufferedReader br = new BufferedReader(new InputStreamReader(s.getInputStream()));
         //读取客户端发送来的消息
         String mess = br.readLine();//阻塞2
         System.out.println("客户端:"+mess);
         BufferedWriter bw = new BufferedWriter(new OutputStreamWriter(s.getOutputStream()));
         bw.write(mess+"\n");
         bw.flush();

}
单线程中,一个死循环不停地接受客户端的连接和数据;上述代码有两个“卡点”:第一个是accept函数,server在8888端口监听有没有client来连接,如果没有就一直阻塞,代码没法往下继续执行!第二个是readLine函数,server和client建立连接后要等client发送数据;如果没收到client的数据也一直阻塞,后面的代码还是没法执行!这种代码的缺陷就很明显了:单线程同时只能处理一个client的连接和收数据,如果没有就一直阻塞,其他client的连接请求无法处理!
既然上述问题是单线程导致的,改成多线程不就解决了?每个线程单独accept和readLine,就算阻塞也只阻塞单个线程;但凡有新client连接,server就单独开个线程去accept和readLine,client之间互不影响,问题完美解决?????( ̄▽ ̄)" 如果真有这么简单,就没epoll啥事了!多线程也有缺陷:client连接后不见的会持续发数据,但是server却要分配线程去监听,同时做好接收数据的准备;server这边单独开一个sockt(linux操作系统底层用的是fd表示)+线程会明显会消耗server的硬件资源;如果有大量的client连接后却不发送数据,server会因为分配了大量的线程+socket,让cpu(大量线程之间轮询,产生上下文切换)甚至内存被打满(这不就是DDOS攻击么?),整个服务器没法继续干活了,这可咋整?
2、回顾上面的问题,本质都是因为accept和readLine阻塞引起的,如果改成单线程+非阻塞能不能解决了?epoll孕育而生!
(1)还是按照以往的思路,先看看有哪些相关的结构体:eventpoll,包含了红黑树的root节点和readList链表!既然包含了root节点,肯定需要先生成该结构体实例的!
struct eventpoll {
  ...
  /*红黑树的根节点,这棵树中存储着所有添加到epoll中的事件,
  也就是这个epoll监控的事件*/
  struct rb_root rbr;
  /*双向链表rdllist保存着将要通过epoll_wait返回给用户的、满足条件的事件*/
  struct list_head rdllist;
  ...
};
epitem:组成了红黑树的节点。和epoll这种业务相关的字段就是epoll_event了!
struct epitem {
  ...
  //红黑树节点
  struct rb_node rbn;
  //双向链表节点
  struct list_head rdllink;
  //事件句柄等信息
  struct epoll_filefd ffd;
  //指向其所属的eventepoll对象
  struct eventpoll *ep;
  //期待的事件类型
/* The structure that describe the interested events and the source fd */
  struct epoll_event event;
   //下一个epitem实例
   struct epitem *next;  ...
}; // 这里包含每一个事件对应着的信息。
复制代码
从源码的英文注释看,epoll_event结构体就两个字段:由事件和fd组成的,让事件和fd产生映射关系,避免事件和fd张冠李戴!比如明明是进程A的socket收到了数据,却错误映射到了进程B的socket就尴尬了!
struct epoll_event {
    __u32 events;
    __u64 data;
} EPOLL_PACKED;
这3个结构体之间的脉络关系如下:这里标注了3个函数,也正是这3个函数构建了红黑树和两个双向链表!
注意:这个图上有两个链表,task链表组成的struct字段如下:最核心的就是第2个和第3个字段了!当进程没收到数据时,会进入这个wait_queue;当网卡收到数据后,会通过中断通知cpu来取数据,再执行第三个回调函数func!
struct __wait_queue {
    unsigned int        flags;
    void            *private;//等待队列的task_struct指针
    wait_queue_func_t    func;//进程唤醒后执行的回调函数
    struct list_head    task_list;
};
这个结构体实例之间的关系:
(2)既然红黑树的根节点是在eventpoll结构体中,那么肯定要先生成eventpoll实例,这个是在epoll_create函数中实现的,如下:
/*
 * Open an eventpoll file descriptor.
 */
SYSCALL_DEFINE1(epoll_create1, int, flags)
{
    int error, fd;
    struct eventpoll *ep = NULL;
    struct file *file;

    /* Check the EPOLL_* constant for consistency.  */
    BUILD_BUG_ON(EPOLL_CLOEXEC != O_CLOEXEC);

    if (flags & ~EPOLL_CLOEXEC)
        return -EINVAL;
    /*
     * Create the internal data structure ("struct eventpoll").
       创建一个eventpoll实例,里面初始化红黑树、链表的节点
     */
    error = ep_alloc(&ep);
    if (error < 0)
        return error;
    /*
     * Creates all the items needed to setup an eventpoll file. That is,
     * a file structure and a free file descriptor.
     */
    fd = get_unused_fd_flags(O_RDWR | (flags & O_CLOEXEC));
    if (fd < 0) {
        error = fd;
        goto out_free_ep;
    }
    file = anon_inode_getfile("[eventpoll]", &eventpoll_fops, ep,
                 O_RDWR | (flags & O_CLOEXEC));
    if (IS_ERR(file)) {
        error = PTR_ERR(file);
        goto out_free_fd;
    }
    ep->file = file;
    fd_install(fd, file);
    return fd;

out_free_fd:
    put_unused_fd(fd);
out_free_ep:
    ep_free(ep);
    return error;
}
既然是create函数,核心功能就是生成eventpoll结构体的实例,这个是通过调用ep_alloc实现的!
/*生成eventpoll实例*/
static int ep_alloc(struct eventpoll **pep)
{
    int error;
    struct user_struct *user;
    struct eventpoll *ep;

    user = get_current_user();
    error = -ENOMEM;
    ep = kzalloc(sizeof(*ep), GFP_KERNEL);
    if (unlikely(!ep))
        goto free_uid;

    spin_lock_init(&ep->lock);
    mutex_init(&ep->mtx);
    init_waitqueue_head(&ep->wq);
    init_waitqueue_head(&ep->poll_wait);
    INIT_LIST_HEAD(&ep->rdllist);//readList第一个节点初始化
    ep->rbr = RB_ROOT;//红黑树根节点
    ep->ovflist = EP_UNACTIVE_PTR;
    ep->user = user;

    *pep = ep;

    return 0;

free_uid:
    free_uid(user);
    return error;
}
红黑树的根节点、链表头节点都生成后,接下来就是构建整颗树以及链表了,这些都是在epoll_ctl中实现的;先看看epoll操作的类型:主要有下面3种:增加、删除和修改!
static const char *epoll_ctl_ops[] = { "ADD", "DEL", "MOD", };
这还是个系统调用,核心代码如下(函数开始有很多容错的代码忽略了,避免影响对主干代码的理解):就是个switch结构,3种不同的options对应3种不同的操作!本质上就是让内核知道用户关注哪些事件;事件发生的时候需要回调哪些函数!
/*
 * The following function implements the controller interface for
 * the eventpoll file that enables the insertion/removal/change of
 * file descriptors inside the interest set.
 */
SYSCALL_DEFINE4(epoll_ctl, int, epfd, int, op, int, fd,
        struct epoll_event __user *, event)
{
    int error;
    int full_check = 0;
    struct fd f, tf;
    struct eventpoll *ep;
    struct epitem *epi;
    struct epoll_event epds;
    struct eventpoll *tep = NULL;
        ..........
        /*
     * Try to lookup the file inside our RB tree, Since we grabbed "mtx"
     * above, we can be sure to be able to use the item looked up by
     * ep_find() till we release the mutex. 在红黑树中根据fd找到epi结构体
     */
    epi = ep_find(ep, tf.file, fd);

    error = -EINVAL;
    switch (op) {
    case EPOLL_CTL_ADD:
        if (!epi) {
            epds.events |= POLLERR | POLLHUP;
            /*epoll节点插入,包括list节点和红黑树节点*/
            error = ep_insert(ep, &epds, tf.file, fd, full_check);
        } else
            error = -EEXIST;
        if (full_check)
            clear_tfile_check_list();
        break;
    case EPOLL_CTL_DEL:
        if (epi)
            /*epoll节点删除,包括list节点和红黑树节点*/
            error = ep_remove(ep, epi);
        else
            error = -ENOENT;
        break;
    case EPOLL_CTL_MOD:
        if (epi) {
            if (!(epi->event.events & EPOLLEXCLUSIVE)) {
                epds.events |= POLLERR | POLLHUP;
                /*epoll节点更改,包括list节点和红黑树节点*/
                error = ep_modify(ep, epi, &epds);
            }
        } else
            error = -ENOENT;
        break;
    }
        ..........
}
从上面的代码可知,其实核心的函数是ep_insert、ep_remove、ep_modify! 先看看ep_insert函数(为了突出重点,省略末尾的容错代码),主要干了这么几件事:
构建wait_queue队列(通过链表实现)
构建红黑树
注册唤醒task后的回调函数
/*
 * Must be called with "mtx" held.
 */
static int ep_insert(struct eventpoll *ep, struct epoll_event *event,
             struct file *tfile, int fd, int full_check)
{
    int error, revents, pwake = 0;
    unsigned long flags;
    long user_watches;
    struct epitem *epi;
    struct ep_pqueue epq;

    user_watches = atomic_long_read(&ep->user->epoll_watches);
    if (unlikely(user_watches >= max_user_watches))
        return -ENOSPC;
    if (!(epi = kmem_cache_alloc(epi_cache, GFP_KERNEL)))
        return -ENOMEM;

    /* Item initialization follow here ... */
    INIT_LIST_HEAD(&epi->rdllink);//初始化readyList链表头
    INIT_LIST_HEAD(&epi->fllink);
    INIT_LIST_HEAD(&epi->pwqlist);
    epi->ep = ep;
    ep_set_ffd(&epi->ffd, tfile, fd);
    epi->event = *event;
    epi->nwait = 0;
    epi->next = EP_UNACTIVE_PTR;
    if (epi->event.events & EPOLLWAKEUP) {
        error = ep_create_wakeup_source(epi);
        if (error)
            goto error_create_wakeup_source;
    } else {
        RCU_INIT_POINTER(epi->ws, NULL);
    }

    /* Initialize the poll table using the queue callback */
    epq.epi = epi;
    /*注册回到函数*/
    init_poll_funcptr(&epq.pt, ep_ptable_queue_proc);

    /*
     * Attach the item to the poll hooks and get current event bits.
     * We can safely use the file* here because its usage count has
     * been increased by the caller of this function. Note that after
     * this operation completes, the poll callback can start hitting
     * the new item.
     */
    revents = ep_item_poll(epi, &epq.pt);

    /*
     * We have to check if something went wrong during the poll wait queue
     * install process. Namely an allocation for a wait queue failed due
     * high memory pressure.
     */
    error = -ENOMEM;
    if (epi->nwait < 0)
        goto error_unregister;

    /* Add the current item to the list of active epoll hook for this file */
    spin_lock(&tfile->f_lock);
    list_add_tail_rcu(&epi->fllink, &tfile->f_ep_links);
    spin_unlock(&tfile->f_lock);

    /*
     * Add the current item to the RB tree. All RB tree operations are
     * protected by "mtx", and ep_insert() is called with "mtx" held.
       epitem节点就是在这里插入红黑树的
     */
    ep_rbtree_insert(ep, epi);

    /* now check if we've created too many backpaths */
    error = -EINVAL;
    if (full_check && reverse_path_check())
        goto error_remove_epi;

    /* We have to drop the new item inside our item list to keep track of it */
    spin_lock_irqsave(&ep->lock, flags);

    /* If the file is already "ready" we drop it inside the ready list
    */
    if ((revents & event->events) && !ep_is_linked(&epi->rdllink)) {
        list_add_tail(&epi->rdllink, &ep->rdllist);//把当前event加入readyList的尾部
        ep_pm_stay_awake(epi);

        /* Notify waiting tasks that events are available
        如果网卡收到数据,需要唤醒等待的task,并执行实现设置好的回调函数
        */
        if (waitqueue_active(&ep->wq))
            wake_up_locked(&ep->wq);//唤醒进程后执行的回调函数
        if (waitqueue_active(&ep->poll_wait))
            pwake++;
    }

    spin_unlock_irqrestore(&ep->lock, flags);

    atomic_long_inc(&ep->user->epoll_watches);

    /* We have to call this outside the lock */
    if (pwake)
        ep_poll_safewake(&ep->poll_wait);

    return 0;
}
相比增加,删除节点就容易多了:直接从红黑树和readyList删除
/*
 * Removes a "struct epitem" from the eventpoll RB tree and deallocates
 * all the associated resources. Must be called with "mtx" held.
 */
static int ep_remove(struct eventpoll *ep, struct epitem *epi)
{
    unsigned long flags;
    struct file *file = epi->ffd.file;

    /*
     * Removes poll wait queue hooks. We _have_ to do this without holding
     * the "ep->lock" otherwise a deadlock might occur. This because of the
     * sequence of the lock acquisition. Here we do "ep->lock" then the wait
     * queue head lock when unregistering the wait queue. The wakeup callback
     * will run by holding the wait queue head lock and will call our callback
     * that will try to get "ep->lock".
     */
    ep_unregister_pollwait(ep, epi);

    /* Remove the current item from the list of epoll hooks */
    spin_lock(&file->f_lock);
    list_del_rcu(&epi->fllink);
    spin_unlock(&file->f_lock);

    rb_erase(&epi->rbn, &ep->rbr);//从红黑树删除

    spin_lock_irqsave(&ep->lock, flags);
    if (ep_is_linked(&epi->rdllink))
        list_del_init(&epi->rdllink);//从readyList删除
    spin_unlock_irqrestore(&ep->lock, flags);

    wakeup_source_unregister(ep_wakeup_source(epi));
    /*
     * At this point it is safe to free the eventpoll item. Use the union
     * field epi->rcu, since we are trying to minimize the size of
     * 'struct epitem'. The 'rbn' field is no longer in use. Protected by
     * ep->mtx. The rcu read side, reverse_path_check_proc(), does not make
     * use of the rbn field.
     */
    call_rcu(&epi->rcu, epi_rcu_free);

    atomic_long_dec(&ep->user->epoll_watches);

    return 0;
}
最后就是epoll_wait函数了: 也是个系统调用。为了突出主干,省略了前面的容错代码,核心就是调用了ep_poll函数;
/*
 * Implement the event wait interface for the eventpoll file. It is the kernel
 * part of the user space epoll_wait(2).
 */
SYSCALL_DEFINE4(epoll_wait, int, epfd, struct epoll_event __user *, events,
        int, maxevents, int, timeout)
{
    int error;
    struct fd f;
    struct eventpoll *ep;
        ..........
     /*
     * At this point it is safe to assume that the "private_data" contains
     * our own data structure.
     */
    ep = f.file->private_data;

    /* Time to fish for events ... */
    error = ep_poll(ep, events, maxevents, timeout);

}
ep_poll函数的实现逻辑也不复杂:在超时允许的时间内查看readyList;如果不为空说明有事件准备好了,然后把这些事件推送到用户空间!
/**
 * ep_poll - Retrieves ready events, and delivers them to the caller supplied
 *           event buffer.
 *           找到ready的事件
 * @ep: Pointer to the eventpoll context.
 * @events: Pointer to the userspace buffer where the ready events should be
 *          stored.
 * @maxevents: Size (in terms of number of events) of the caller event buffer.
 * @timeout: Maximum timeout for the ready events fetch operation, in
 *           milliseconds. If the @timeout is zero, the function will not block,
 *           while if the @timeout is less than zero, the function will block
 *           until at least one event has been retrieved (or an error
 *           occurred).
 *
 * Returns: Returns the number of ready events which have been fetched, or an
 *          error code, in case of error.
 */
static int ep_poll(struct eventpoll *ep, struct epoll_event __user *events,
           int maxevents, long timeout)
{
    int res = 0, eavail, timed_out = 0;
    unsigned long flags;
    u64 slack = 0;
    wait_queue_t wait;
    ktime_t expires, *to = NULL;

    if (timeout > 0) {
        struct timespec64 end_time = ep_set_mstimeout(timeout);

        slack = select_estimate_accuracy(&end_time);
        to = &expires;
        *to = timespec64_to_ktime(end_time);
    } else if (timeout == 0) {
        /*
         * Avoid the unnecessary trip to the wait queue loop, if the
         * caller specified a non blocking operation.
         */
        timed_out = 1;
        spin_lock_irqsave(&ep->lock, flags);
        goto check_events;
    }

fetch_events:
    spin_lock_irqsave(&ep->lock, flags);

    if (!ep_events_available(ep)) {
        /* 如果没有任何事件发生,就让出cpu;一旦有事件到达,会被ep_poll_callback函数唤醒!
         * We don't have any available event to return to the caller.
         * We need to sleep here, and we will be wake up by
         * ep_poll_callback() when events will become available.
         */
        init_waitqueue_entry(&wait, current);//把当前进程放入等待队列,并注册唤醒回调函数
        __add_wait_queue_exclusive(&ep->wq, &wait);

        for (;;) {
            /*
             * We don't want to sleep if the ep_poll_callback() sends us
             * a wakeup in between. That's why we set the task state
             * to TASK_INTERRUPTIBLE before doing the checks.
             */
            set_current_state(TASK_INTERRUPTIBLE);
            if (ep_events_available(ep) || timed_out)//如果有ready的事件,或已经等待超时就跳出死循环
                break;
            if (signal_pending(current)) {
                res = -EINTR;
                break;
            }

            spin_unlock_irqrestore(&ep->lock, flags);            //主动让出cpu,进入随眠状态;等有事件发生时,进程切换回来继续执行for循环,到上面的break代码跳出
            if (!schedule_hrtimeout_range(to, slack, HRTIMER_MODE_ABS))
                timed_out = 1;

            spin_lock_irqsave(&ep->lock, flags);
        }

        __remove_wait_queue(&ep->wq, &wait);//移除wait_queue
        __set_current_state(TASK_RUNNING);//唤醒后进程状态设置为running
    }
check_events:
    /* Is it worth to try to dig for events ? */
    eavail = ep_events_available(ep);//遍历readyList,发现不为空哦,说明有事件产生了!

    spin_unlock_irqrestore(&ep->lock, flags);

    /*
     * Try to transfer events to user space. In case we get 0 events and
     * there's still timeout left over, we go trying again in search of
     * more luck. 把ready的事件拷贝到用户空间,让上层应用继续处理
     */
    if (!res && eavail &&
        !(res = ep_send_events(ep, events, maxevents)) && !timed_out)
        goto fetch_events;

    return res;
}
上面epoll_create、epoll_ctl和epoll_wait看起来很多,其实用起来很简单,demo代码如下(完整的用例见文章末尾):先用epoll_create创建epoll实例,再用epoll_ctl添加fd和事件的映射,个人觉得epoll思路的精髓就体现在epoll_wait这里了:这函数可以设置等待(或则阻塞)的时长。如果执行的时候发现readyList有准备好的事件,或者说超时就返回继续执行,不会一直阻塞在这里傻等;再加上这里是单线程循环执行,完美解决了文章开头的多线程+阻塞的问题!
当网卡收到数据,也就是有事件发生时,会挨个唤醒wait_queue的task,然后执行每个task的回调函数,执行回调函数的名称是ep_poll_callback,其调用的核心代码如下:
/*
 * The core wakeup function. Non-exclusive wakeups (nr_exclusive == 0) just
 * wake everything up. If it's an exclusive wakeup (nr_exclusive == small +ve
 * number) then we wake all the non-exclusive tasks and one exclusive task.
 *
 * There are circumstances in which we can try to wake a task which has already
 * started to run but is not in state TASK_RUNNING. try_to_wake_up() returns
 * zero in this (rare) case, and we handle it by continuing to scan the queue.
   执行等待队列中每个task被唤醒后的回调函数
 */
static void __wake_up_common(wait_queue_head_t *q, unsigned int mode,
            int nr_exclusive, int wake_flags, void *key)
{
    wait_queue_t *curr, *next;

    list_for_each_entry_safe(curr, next, &q->task_list, task_list) {
        unsigned flags = curr->flags;
        /*执行回调函数*/
        if (curr->func(curr, mode, wake_flags, key) &&
                (flags & WQ_FLAG_EXCLUSIVE) && !--nr_exclusive)
            break;
    }
}
windows下用vmware+kali+qemu+vscode调试的效果如下:
epoll回调函数断点:左上方能看到各个变量的值,左下方能看到函数的调用栈!这个在逆向特别有用:比如在malloc断下,就能查到是哪个函数在分配内存,进而存放加密数据了!
3、epoll的一个完整的demo用例,方便直观理解epoll的功能:
#include <iostream>
#include <sys/socket.h>
#include <sys/epoll.h>
#include <netinet/in.h>
#include <arpa/inet.h>
#include <fcntl.h>
#include <unistd.h>
#include <stdio.h>
#include <errno.h>

using namespace std;

#define MAXLINE 100
#define OPEN_MAX 100
#define LISTENQ 20
#define SERV_PORT 5000
#define INFTIM 1000

void setnonblocking(int sock)
{
    int opts;
     opts=fcntl(sock,F_GETFL);
    if(opts<0)
    {
        perror("fcntl(sock,GETFL)");
        exit(1);
    }
     opts = opts|O_NONBLOCK;
    if(fcntl(sock,F_SETFL,opts)<0)
    {
        perror("fcntl(sock,SETFL,opts)");
        exit(1);
    }
}

int main(int argc, char* argv[])
{
    int i, maxi, listenfd, connfd, sockfd,epfd,nfds, portnumber;
    ssize_t n;
    char line[MAXLINE];
    socklen_t clilen;
    string szTemp("");

    if ( 2 == argc )
    {
        if( (portnumber = atoi(argv[1])) < 0 )
        {
            fprintf(stderr,"Usage:%s portnumber\a\n",argv[0]);
            return 1;
        }
    }
    else
    {
        fprintf(stderr,"Usage:%s portnumber\a\n",argv[0]);
        return 1;
    }

    //声明epoll_event结构体的变量,ev用于注册事件,数组用于回传要处理的事件
    struct epoll_event ev, events[20];

    //创建一个epoll的句柄,size用来告诉内核这个监听的数目一共有多大
    epfd = epoll_create(256); //生成用于处理accept的epoll专用的文件描述符

    struct sockaddr_in clientaddr;
    struct sockaddr_in serveraddr;
    listenfd = socket(AF_INET, SOCK_STREAM, 0);

    //把socket设置为非阻塞方式
    //setnonblocking(listenfd);

    //设置与要处理的事件相关的文件描述符
    //要监听的fd
    ev.data.fd=listenfd;

    //设置要处理的事件类型
    //要监听的事件:收到数据后可读、边缘触发
    ev.events=EPOLLIN|EPOLLET;

    //注册epoll事件 ,也就上述要是监听fd+监听的事件,通过ev传入
    //本质就是在红黑树上增删改查
    epoll_ctl(epfd,EPOLL_CTL_ADD,listenfd,&ev);

    bzero(&serveraddr, sizeof(serveraddr)); /*配置Server socket的相关信息 */
    serveraddr.sin_family = AF_INET;
    char *local_addr="127.0.0.1";
    inet_aton(local_addr,&(serveraddr.sin_addr));//htons(portnumber);
    serveraddr.sin_port=htons(portnumber);
    bind(listenfd,(sockaddr *)&serveraddr, sizeof(serveraddr));
    listen(listenfd, LISTENQ);

    maxi = 0;

    for ( ; ; ) {

        //等待epoll事件的发生
        //返回需要处理的事件数目nfds,如返回0表示已超时。
        nfds=epoll_wait(epfd,events,20,500);

        //处理所发生的所有事件
        for(i=0; i < nfds; ++i)
        {
            //如果新监测到一个SOCKET用户连接到了绑定的SOCKET端口,建立新的连接。
            if(events[i].data.fd == listenfd)
            {
                //收到了用户建立连接的请求再调用accept,避免阻塞浪费时间
                connfd = accept(listenfd,(sockaddr *)&clientaddr, &clilen);
                if(connfd < 0)
                {
                    perror("connfd < 0");
                    exit(1);
                }
                //setnonblocking(connfd);
                char *str = inet_ntoa(clientaddr.sin_addr);
                cout << "accapt a connection from " << str << endl;

                //设置用于读操作的文件描述符
                  ev.data.fd=connfd;

                //设置用于注册的读操作事件
                  ev.events=EPOLLIN|EPOLLET;

                //注册ev
                epoll_ctl(epfd,EPOLL_CTL_ADD,connfd,&ev); /* 添加新建立的fd,同样需要监控这个fd有没有收发数据、边缘触发等 */
            }
            //如果是已经连接的用户,并且收到数据,那么进行读入。
            else if(events[i].events&EPOLLIN)
            {
                cout << "EPOLLIN" << endl;
                if ( (sockfd = events[i].data.fd) < 0)
                    continue;
                //网卡收到了数据再调用recv把数据拷贝到用户空间,避免阻塞浪费时间
                if ( (n = recv(sockfd, line, sizeof(line), 0)) < 0)
                {
                    // Connection Reset:你连接的那一端已经断开了,而你却还试着在对方已断开的socketfd上读写数据!
                    if (errno == ECONNRESET)
                    {
                        close(sockfd);
                        events[i].data.fd = -1;
                    }
                    else
                        std::cout<<"readline error"<<std::endl;
                }
                else if (n == 0) //读入的数据为空
                {
                    close(sockfd);
                    events[i].data.fd = -1;
                }

                szTemp = "";
                szTemp += line;
                szTemp = szTemp.substr(0,szTemp.find('\r')); /* remove the enter key */
                memset(line,0,100); /* clear the buffer */
                //line[n] = '\0';
                cout << "Readin: " << szTemp << endl;

                //设置用于写操作的文件描述符
                ev.data.fd=sockfd;

                //设置用于注册的写操作事件
                ev.events=EPOLLOUT|EPOLLET;

                //修改sockfd上要处理的事件为EPOLLOUT,即fd上可写了、可以发送数据了
                epoll_ctl(epfd,EPOLL_CTL_MOD,sockfd,&ev); /* 修改红黑树 */

            }
            else if(events[i].events&EPOLLOUT) // 如果有数据发送
            {
                sockfd = events[i].data.fd;
                szTemp = "Server:" + szTemp + "\n";
                send(sockfd, szTemp.c_str(), szTemp.size(), 0);

                //设置用于读操作的文件描述符
                ev.data.fd=sockfd;

                //设置用于注册的读操作事件
                ev.events=EPOLLIN|EPOLLET;

                //修改sockfd上要处理的事件为EPOLIN ,即fd上可读了、可以接收数据了
                epoll_ctl(epfd,EPOLL_CTL_MOD,sockfd,&ev); /* 修改红黑树 */
            }
        } //(over)处理所发生的所有事件
    } //(over)等待epoll事件的发生

    close(epfd);
    return 0;
}
总结:
1、红黑树的作用:当有事件发生时,可以快速根据fd查找epitem(找到得epiterm会组成链表传递给用户空间做进一步处理),比遍历链表快多了!
2、内核中链表适用的场景:用来做队列或栈,存储的每个节点都要处理(说白了就是需要遍历),不存在查找的需求场景!
3、epoll事件底层最终是中断触发的:当网卡收到数据后,通过中断通知操作系统来取数据,进而触发epoll事件!
参考:
1、https://www.bilibili.com/video/BV15z4y1m7Gt/?spm_id_from=333.788.recommend_more_video.-1 epoll源码剖析
2、https://os.51cto.com/article/649405.html epoll原理
3、https://www.bilibili.com/video/BV1Sq4y1q7Gv?zw https://zhuanlan.zhihu.com/p/445453676 linux内核调试环境搭建
4、https://blog.csdn.net/Eunice_fan1207/article/details/99674021 Linux内核剖析-----IO复用函数epoll内核源码剖析
5、https://www.cnblogs.com/carekee/articles/2760693.html epoll用例
#392 内核模块 » linux源码解读(十六):红黑树在内核的应用——虚拟内存管理 » 2022-10-11 11:35:49
- batsom
- 回复: 0
1、linux内核中利用红黑树增删改查快速、稳定的特性来管理的还有另一个非常重要的功能:虚拟内存管理!前面介绍了buddy和slab算法是用来管理物理页面的。由于早期物理页面远比虚拟页面小很多,而且只需要分配和回收合并,所以也没用树形结构来组织,简单粗暴地用链表来管理!但是虚拟内存不一样了:以32位的系统为例,虚拟内存有4GB,能划分的虚拟内存块有很多,划分后需要快速增删查虚拟内存块(需要频繁地读取代码、读写数据、加载动态链接库等),此时用红黑树就很合适了!老规矩,先上结构体:
task_struct中嵌套了一个mm_struct结构体指针,这个结构体大有乾坤:
struct task_struct {
.......
    struct mm_struct *mm;
.......
}
继续深入:又发现了红黑树的根节点!另外两个vm_area_struct结构体又是干嘛的了?
struct mm_struct {
          struct vm_area_struct * mmap;       /* list of VMAs */
          struct rb_root mm_rb;/*又是红黑树的根节点*/
          struct vm_area_struct * mmap_cache;      /* last find_vma result */
.......
}
继续深入:
发现rb_node结构体了么?这明显是红黑树的节点呀!和上面的rb_root不是刚好组成红黑树么?
进程的虚拟内存空间会被分成不同的若干区域,每个区域都有其相关的属性和用途;一个合法的地址总是落在某个区域当中的,这些区域也不会重叠。在linux内核中,这样的区域被称之为虚拟内存区域(virtual memory areas),简称 VMA。一个vma就是一块连续的线性地址空间的抽象,它拥有自身的权限(可读,可写,可执行等等) ;
struct vm_area_struct {
    struct mm_struct * vm_mm;    /* 所属的内存描述符 */
    unsigned long vm_start;    /* vma的起始地址 */
    unsigned long vm_end;        /* vma的结束地址 */

    /* 该vma的在一个进程的vma链表中的前驱vma和后驱vma指针,链表中的vma都是按地址来排序的*/
    struct vm_area_struct *vm_next, *vm_prev;

    pgprot_t vm_page_prot;        /* vma的访问权限 */
    unsigned long vm_flags;    /* 标识集 */

    struct rb_node vm_rb;      /* 红黑树中对应的节点 */
        ...............
}
为了直观展示这些结构体之间的关系,我画了一张图供大家参考,要点说明如下:
vm_area_struct有vm_start和vm_end两个字段,分别指向虚拟内存区域的开始和结束地址;
vm_area_struct的vm_rb又组成了红黑树:便于根据特定的条件快速查找目标区域;
vm_area_struct实例之间也用链表连接:主要用来遍历节点(不需要像树形结构一样前序、中序、后序等方式遍历,速度快一些;树形结构遍历需要递归或借助栈/队列等结构,空间复杂度是O(N))
2、(1)结构体定义好了,下一步就是操作这些结构体了。既然用到了红黑树管理VMA,第一件事肯定是建树、建链表啦(所有的操作都在mm\mmap.c文件里),最直接的api是__vma_link函数,如下:
/*将新创建的vm_area_struct挂在mm_struct中管理的红黑树上*/
static void
__vma_link(struct mm_struct *mm, struct vm_area_struct *vma,
    struct vm_area_struct *prev, struct rb_node **rb_link,
    struct rb_node *rb_parent)
{
    __vma_link_list(mm, vma, prev, rb_parent);
    __vma_link_rb(mm, vma, rb_link, rb_parent);
}
调用了两个函数,从名称看就知道一个是建立链表,另一个是建立红黑树;先看第一个_vma_link_list函数,如下:就是把vma实例加入到mm的mmap字段,然后让vma的next指针指向下一个vma实例,完成链表的建立!
void __vma_link_list(struct mm_struct *mm, struct vm_area_struct *vma,
        struct vm_area_struct *prev, struct rb_node *rb_parent)
{
    struct vm_area_struct *next;

    vma->vm_prev = prev;
    if (prev) {
        next = prev->vm_next;
        prev->vm_next = vma;
    } else {
        mm->mmap = vma;
        if (rb_parent)
            next = rb_entry(rb_parent,
                    struct vm_area_struct, vm_rb);
        else
            next = NULL;
    }
    vma->vm_next = next;
    if (next)
        next->vm_prev = vma;
}
另一个是__vma_link_rb函数在红黑树中插入节点,如下:
void __vma_link_rb(struct mm_struct *mm, struct vm_area_struct *vma,
        struct rb_node **rb_link, struct rb_node *rb_parent)
{
    /* Update tracking information for the gap following the new vma. */
    if (vma->vm_next)
        vma_gap_update(vma->vm_next);
    else
        mm->highest_vm_end = vma->vm_end;

    /*
     * vma->vm_prev wasn't known when we followed the rbtree to find the
     * correct insertion point for that vma. As a result, we could not
     * update the vma vm_rb parents rb_subtree_gap values on the way down.
     * So, we first insert the vma with a zero rb_subtree_gap value
     * (to be consistent with what we did on the way down), and then
     * immediately update the gap to the correct value. Finally we
     * rebalance the rbtree after all augmented values have been set.
     */
    rb_link_node(&vma->vm_rb, rb_parent, rb_link);
    vma->rb_subtree_gap = 0;
    vma_gap_update(vma);
    /*传入的vma插入红黑树*/
    vma_rb_insert(vma, &mm->mm_rb);
}
(2)上述代码执行完毕,红黑树也就建好了!接下来就是查询了;因为红黑树是用来管理vma的,建树的时候所用的key值就是vma的线性地址了,所以红黑树节点左孩vma的地址都比当前节点小,右孩vma的地址都比当前节点大;代码如下:
/* Look up the first VMA which satisfies  addr < vm_end,  NULL if none. */
struct vm_area_struct *find_vma(struct mm_struct *mm, unsigned long addr)
{
    struct rb_node *rb_node;
    struct vm_area_struct *vma;

    /* Check the cache first. */
    vma = vmacache_find(mm, addr);
    if (likely(vma))
        return vma;
    /*红黑树的根节点*/
    rb_node = mm->mm_rb.rb_node;

    while (rb_node) {
        struct vm_area_struct *tmp;

        tmp = rb_entry(rb_node, struct vm_area_struct, vm_rb);

        if (tmp->vm_end > addr) {
            vma = tmp;
            /*要查找的addr刚好在这个vma实例的vm_start和vm_end之间,说明找到了*/
            if (tmp->vm_start <= addr)
                break;
            /*addr比vm_start都大,继续从左子树查找*/
            rb_node = rb_node->rb_left;
        } else /*addr比vm_end小,继续从右子树查找*/
            rb_node = rb_node->rb_right;
    }

    if (vma)
        vmacache_update(addr, vma);
    return vma;
}
(3)上面是根据用户指定的线性地址查找第一个符合的vma实例,用户实际使用时,还需要查找空闲未使用的虚拟内存块,用来存储重要的数据,这个又该怎么实现了?linux的实现方法为:arch_get_unmapped_area函数,如下:最核心的代码加了中文注释;思路就是根据addr查找vma;如果vma为空,并且大小、边界等条件也都满足,这块内存就可以拿来用了!
unsigned long
arch_get_unmapped_area(struct file *filp, unsigned long addr,
        unsigned long len, unsigned long pgoff, unsigned long flags)
{
    struct mm_struct *mm = current->mm;
    struct vm_area_struct *vma;
    struct vm_unmapped_area_info info;

    if (len > TASK_SIZE - mmap_min_addr)
        return -ENOMEM;

    if (flags & MAP_FIXED)
        return addr;

    if (addr) {
        addr = PAGE_ALIGN(addr);//将addr调整成页大小的倍数
        /*通过addr查找对应的vma是否为空;如果是空,说明该区域还未被使用
          ,如果其他条件也满足,就直接使用这块地址了*/
        vma = find_vma(mm, addr);
        if (TASK_SIZE - len >= addr && addr >= mmap_min_addr &&
            (!vma || addr + len <= vma->vm_start))
            return addr;
    }

    info.flags = 0;
    info.length = len;
    info.low_limit = mm->mmap_base;
    info.high_limit = TASK_SIZE;
    info.align_mask = 0;
    return vm_unmapped_area(&info);
}
(4)内存用完后就要释放,为了避免碎片,肯定是要和现有的空闲内存合并的;由于空闲内存没有用红黑树组织,所以此步骤也不涉及红黑树的操作,具体的思路为:先检查释放区域之前的prve区域终止地址是否与释放区域起始地址重合,或释放区域的结束地址是否与其之后的next区域起始地址重合;接着再检查将要合并的区域是否有相同的标志。如果合并区域均映射了磁盘文件,则还要检查其映射文件是否相同,以及文件内的偏移量是否连续。思路并不复杂,代码如下:
/*
 * Given a mapping request (addr,end,vm_flags,file,pgoff), figure out
 * whether that can be merged with its predecessor or its successor.
 * Or both (it neatly fills a hole).
 *
 * In most cases - when called for mmap, brk or mremap - [addr,end) is
 * certain not to be mapped by the time vma_merge is called; but when
 * called for mprotect, it is certain to be already mapped (either at
 * an offset within prev, or at the start of next), and the flags of
 * this area are about to be changed to vm_flags - and the no-change
 * case has already been eliminated.
 *
 * The following mprotect cases have to be considered, where AAAA is
 * the area passed down from mprotect_fixup, never extending beyond one
 * vma, PPPPPP is the prev vma specified, and NNNNNN the next vma after:
 *
 *     AAAA             AAAA                AAAA          AAAA
 *    PPPPPPNNNNNN    PPPPPPNNNNNN    PPPPPPNNNNNN    PPPPNNNNXXXX
 *    cannot merge    might become    might become    might become
 *                    PPNNNNNNNNNN    PPPPPPPPPPNN    PPPPPPPPPPPP 6 or
 *    mmap, brk or    case 4 below    case 5 below    PPPPPPPPXXXX 7 or
 *    mremap move:                                    PPPPXXXXXXXX 8
 *        AAAA
 *    PPPP    NNNN    PPPPPPPPPPPP    PPPPPPPPNNNN    PPPPNNNNNNNN
 *    might become    case 1 below    case 2 below    case 3 below
 *
 * It is important for case 8 that the the vma NNNN overlapping the
 * region AAAA is never going to extended over XXXX. Instead XXXX must
 * be extended in region AAAA and NNNN must be removed. This way in
 * all cases where vma_merge succeeds, the moment vma_adjust drops the
 * rmap_locks, the properties of the merged vma will be already
 * correct for the whole merged range. Some of those properties like
 * vm_page_prot/vm_flags may be accessed by rmap_walks and they must
 * be correct for the whole merged range immediately after the
 * rmap_locks are released. Otherwise if XXXX would be removed and
 * NNNN would be extended over the XXXX range, remove_migration_ptes
 * or other rmap walkers (if working on addresses beyond the "end"
 * parameter) may establish ptes with the wrong permissions of NNNN
 * instead of the right permissions of XXXX.
 */
struct vm_area_struct *vma_merge(struct mm_struct *mm,
            struct vm_area_struct *prev, unsigned long addr,
            unsigned long end, unsigned long vm_flags,
            struct anon_vma *anon_vma, struct file *file,
            pgoff_t pgoff, struct mempolicy *policy,
            struct vm_userfaultfd_ctx vm_userfaultfd_ctx)
{
    pgoff_t pglen = (end - addr) >> PAGE_SHIFT;
    struct vm_area_struct *area, *next;
    int err;

    /*
     * We later require that vma->vm_flags == vm_flags,
     * so this tests vma->vm_flags & VM_SPECIAL, too.
     */
    if (vm_flags & VM_SPECIAL)
        return NULL;

    if (prev)
        next = prev->vm_next;
    else
        next = mm->mmap;
    area = next;
    if (area && area->vm_end == end)        /* cases 6, 7, 8 */
        next = next->vm_next;

    /* verify some invariant that must be enforced by the caller */
    VM_WARN_ON(prev && addr <= prev->vm_start);
    VM_WARN_ON(area && end > area->vm_end);
    VM_WARN_ON(addr >= end);

    /*
     * Can it merge with the predecessor?
     */
    if (prev && prev->vm_end == addr &&
            mpol_equal(vma_policy(prev), policy) &&
            can_vma_merge_after(prev, vm_flags,
                        anon_vma, file, pgoff,
                        vm_userfaultfd_ctx)) {
        /*
         * OK, it can.  Can we now merge in the successor as well?
         */
        if (next && end == next->vm_start &&
                mpol_equal(policy, vma_policy(next)) &&
                can_vma_merge_before(next, vm_flags,
                             anon_vma, file,
                             pgoff+pglen,
                             vm_userfaultfd_ctx) &&
                is_mergeable_anon_vma(prev->anon_vma,
                              next->anon_vma, NULL)) {
                            /* cases 1, 6 */
            err = __vma_adjust(prev, prev->vm_start,
                     next->vm_end, prev->vm_pgoff, NULL,
                     prev);
        } else                    /* cases 2, 5, 7 */
            err = __vma_adjust(prev, prev->vm_start,
                     end, prev->vm_pgoff, NULL, prev);
        if (err)
            return NULL;
        khugepaged_enter_vma_merge(prev, vm_flags);
        return prev;
    }

    /*
     * Can this new request be merged in front of next?
     */
    if (next && end == next->vm_start &&
            mpol_equal(policy, vma_policy(next)) &&
            can_vma_merge_before(next, vm_flags,
                         anon_vma, file, pgoff+pglen,
                         vm_userfaultfd_ctx)) {
        if (prev && addr < prev->vm_end)    /* case 4 */
            err = __vma_adjust(prev, prev->vm_start,
                     addr, prev->vm_pgoff, NULL, next);
        else {                    /* cases 3, 8 */
            err = __vma_adjust(area, addr, next->vm_end,
                     next->vm_pgoff - pglen, NULL, next);
            /*
             * In case 3 area is already equal to next and
             * this is a noop, but in case 8 "area" has
             * been removed and next was expanded over it.
             */
            area = next;
        }
        if (err)
            return NULL;
        khugepaged_enter_vma_merge(area, vm_flags);
        return area;
    }

    return NULL;
}
(5)既然释放内存,相应的vma肯定也要从红黑树删除的,这个功能在detach_vmas_to_be_unmapped中实现的:
/*
 * Create a list of vma's touched by the unmap, removing them from the mm's
 * vma list as we go..
   Remove the vma's, and unmap the actual pages

 */
static void
detach_vmas_to_be_unmapped(struct mm_struct *mm, struct vm_area_struct *vma,
    struct vm_area_struct *prev, unsigned long end)
{
    struct vm_area_struct **insertion_point;
    struct vm_area_struct *tail_vma = NULL;

    insertion_point = (prev ? &prev->vm_next : &mm->mmap);
    vma->vm_prev = NULL;
    do {
        vma_rb_erase(vma, &mm->mm_rb);//从红黑树删除vma
        mm->map_count--;
        tail_vma = vma;
        vma = vma->vm_next;
    } while (vma && vma->vm_start < end);
    *insertion_point = vma;
    if (vma) {
        vma->vm_prev = prev;
        vma_gap_update(vma);
    } else
        mm->highest_vm_end = prev ? prev->vm_end : 0;
    tail_vma->vm_next = NULL;

    /* Kill the cache */
    vmacache_invalidate(mm);
}
总结:
1、这里有虚拟内存和物理内存、进程内存和操作系统内存的映射图示,方便各位理解
2、用rb_node关键词搜索,我一共找到了3千多个:可见红黑树在linux内核使用的范围之广!
3、AVL树和红黑树很类似,但是AVL树的删除和插入需要多次旋转操作以及不断向根节点回溯,所以在大量删除和插入操作的情况下, AVL树的效率较低。红黑树是一种查找效率仅次于AVL树的不完全平衡二叉树,它摒弃了AVL要求的强平衡约束,能够以O(logn)的时间复杂度进行插入、删除操作;而且其插入和删除最多需要两次或者三次旋转即可保持树的平衡。虽然二者的算法复杂度相同,但在最坏情况下,红黑树提供了更加快速删除和插入一个节点的算法,显然红黑树的高效操作更适合Linux内核中大量VMA的添加、删除和查找!
参考:
1、https://stephenzhou.blog.csdn.net/article/details/89501437?spm=1001.2101.3001.6650.1&utm_medium=distribute.pc_relevant.none-task-blog-2%7Edefault%7ECTRLIST%7Edefault-1.pc_relevant_default&depth_1-utm_source=distribute.pc_relevant.none-task-blog-2%7Edefault%7ECTRLIST%7Edefault-1.pc_relevant_default&utm_relevant_index=2 虚拟内存VMA浅析
2、http://edsionte.com/techblog/archives/3564 虚拟内存操作
3、http://edsionte.com/techblog/archives/3586 虚拟内存操作
#393 内核模块 » linux源码解读(十五):红黑树在内核的应用——CFS调度器 » 2022-10-09 14:11:31
- batsom
- 回复: 0
1、在现代的操作系统中,进程调度是最核心的功能之一;linux 0.11的调度算法简单粗暴:遍历task_struct数组,找到时间片counter最大的进程执行;显然这种策略已经不适合越来越复杂的业务场景需求了,所以后来逐步增加了多种调度策略,目前最广为人知的调度策略有5种:cfs、idle、deadline、realtime、stop,并且这5种调度策略都是同时存在的,不排除后续增加新的调度策略,怎么才能更方便地统一管理存量和增量的调度策略了?从 2.6.23开始引入了sched_class,如下:
struct sched_class {
    const struct sched_class *next;
    /*
    1、全是成员函数:这里用函数指针来表达;
    2、调度的方式有很多种,比如cfs、rt、idle、deadline,每种方式的实现方法肯定不同,这里提供接口函数让不同的调度方式各自去实现(类似驱动的struct file_operations *ops结构体)
    */
    void (*enqueue_task) (struct rq *rq, struct task_struct *p, int flags);/*任务加入队列;cfs就是在红黑树插入节点*/
    void (*dequeue_task) (struct rq *rq, struct task_struct *p, int flags);/*任务移除队列;cfs就是在红黑树删除节点*/
    void (*yield_task) (struct rq *rq);/*让出任务*/
    bool (*yield_to_task) (struct rq *rq, struct task_struct *p, bool preempt);/*让出到任务*/

    void (*check_preempt_curr) (struct rq *rq, struct task_struct *p, int flags);

    /*
     * It is the responsibility of the pick_next_task() method that will
     * return the next task to call put_prev_task() on the @prev task or
     * something equivalent.
     *
     * May return RETRY_TASK when it finds a higher prio class has runnable
     * tasks.
     */
    struct task_struct * (*pick_next_task) (struct rq *rq,
                        struct task_struct *prev,
                        struct pin_cookie cookie);
    void (*put_prev_task) (struct rq *rq, struct task_struct *p);

#ifdef CONFIG_SMP
    int  (*select_task_rq)(struct task_struct *p, int task_cpu, int sd_flag, int flags);
    void (*migrate_task_rq)(struct task_struct *p);

    void (*task_woken) (struct rq *this_rq, struct task_struct *task);

    void (*set_cpus_allowed)(struct task_struct *p,
                 const struct cpumask *newmask);

    void (*rq_online)(struct rq *rq);
    void (*rq_offline)(struct rq *rq);
#endif

    void (*set_curr_task) (struct rq *rq);
    void (*task_tick) (struct rq *rq, struct task_struct *p, int queued);
    void (*task_fork) (struct task_struct *p);
    void (*task_dead) (struct task_struct *p);

    /*
     * The switched_from() call is allowed to drop rq->lock, therefore we
     * cannot assume the switched_from/switched_to pair is serliazed by
     * rq->lock. They are however serialized by p->pi_lock.
     */
    void (*switched_from) (struct rq *this_rq, struct task_struct *task);
    void (*switched_to) (struct rq *this_rq, struct task_struct *task);
    void (*prio_changed) (struct rq *this_rq, struct task_struct *task,
                 int oldprio);

    unsigned int (*get_rr_interval) (struct rq *rq,
                     struct task_struct *task);

    void (*update_curr) (struct rq *rq);

#define TASK_SET_GROUP  0
#define TASK_MOVE_GROUP    1

#ifdef CONFIG_FAIR_GROUP_SCHED
    void (*task_change_group) (struct task_struct *p, int type);
#endif
};
这个class把调度中涉及到的方法全部抽象出来定义成函数指针,不同的调度算法对于函数的实现肯定不一样,linux内核直接调用这些函数指针就能达到使用不同调度策略的目的了,是不是很巧妙了?和设备驱动的file_operations结构体思路是一样的(函数指针的接口分别由各个厂家的驱动实现,但是接口名称保持一致)!不同调度策略/实例的关系和代码文件如下:
2、介绍CFS之前,先总结一下linux调度的类型和背景:
(1)基于时间片轮询,又称O(n)调度:每次调度都需要遍历所有的task_struct,找到时间片最大的执行;如果进程很多,导致task_struct很长,每次光是遍历就很耗时,时间复杂度是O(n);n是task_struct的个数;除此以外,还有比较明显的缺陷:
SMP系统扩展不好,访问run queue需要加锁
实时进程不能立即调度
cpu可能空转
进程在多个cpu之间来回跳转,降低性能
(2)上面的调度很耗时,核心因素就是每次都要遍历所有的task_struct去寻找时间片最大的进程,时间复杂度被抬高到了O(n),并且也没有优先级的功能,这两点该怎么改进了?O(1)算法由此诞生,简单来说,先把所有的任务按照不同的优先级加入不同的队列,然后先调度优先级高的队列,由此专门诞生了prio_array结构体来支撑算法,如下:
#define MAX_USER_RT_PRIO    100
#define MAX_RT_PRIO         MAX_USER_RT_PRIO
#define MAX_PRIO            (MAX_RT_PRIO + 40)//140个优先级(0 ~ 139,数值越小优先级越高)

#define BITMAP_SIZE ((((MAX_PRIO+1+7)/8)+sizeof(long)-1)/sizeof(long))

struct prio_array {
    int nr_active;//所有优先级队列中的总任务数。
    unsigned long bitmap[BITMAP_SIZE];//每个位对应一个优先级的任务队列,用于记录哪个任务队列不为空,能通过 bitmap 够快速找到不为空的任务队列
    struct list_head queue[MAX_PRIO];//优先级队列数组,每个元素维护一个优先级队列,比如索引为0的元素维护着优先级为0的任务队列
};
图示如下:先扫描bitmap,找到不为空的队列去调度(比如这里的2、6号队列不为空);由于bitmap的大小是固定的,所以遍历的时间也是固定的,时间复杂度自然是O(1)了;因为数值越低、优先级越高,所以从bitmap的0开始遍历,找到第一个不为空的队列就可以停止遍历了,这里又节约了时间,所以整体的效率比简单粗暴的时间片轮询高多了!总结一下:O(1)调度算法的本质就是把大量的任务按照优先级分队列,从优先级高的队列开始执行,避免了时间片轮询那种“眉毛胡子一把抓”的混乱,是一种典型的空间换时间的思路!

相比时间片轮询,O(1)算法确实做了比较大的改进,但是自身也不是100%完美无瑕(否则就不会后后续其他的调度算法了),比如:
交互性较强的任务要再次运行,就需要等待当前等待队列中的所有任务都执行完成:比如进程需要用户输入时阻塞,但并不是用户输入后马上唤醒,而是同队列其他任务都运行完后才继续执行,可能导致交互不及时,产生卡顿的感觉,影响用户体验
不能保证在给定的时间间隔内,为每个任务分配的时间与其优先级是成正比的;这个问题是上面问题引申出来的:比如A进程优先级高,分配了20ms,B进程分配10ms,但是A被阻塞了,cpu转而执行B;A要等到B执行完成后才会继续,所以A优先级高完全没体现出来,名存实亡!
为了解决上面的问题,CFS诞生了!
3、(1)不管用哪种调度方式,首先要找到进程的task_struct;由于上层业务应用需求多种多样,操作系统肯定会不停的创建、运行和销毁进程,导致进程的状态时刻都在变化,进程的权重/优先级肯定也要不停地变化,这么多的关键因素都在改变,怎么高效、快速地管理这些不断变化的进程了?以往的调度策略用的最多的就是链表了,根据不同的进程状态、优先级等影响因素加入不同的队列,但是链表有个致命弱点:只能顺序遍历,导致增删改查效率极低。基于链表这种数据结构,又发明了红黑树,本质是把原来链表“平铺直叙”式的顺序排列改成了按照大小的树形排列,此时再增删改查的效率就要高很多了!那么问题又来了:既然红黑树需要按照节点某个值的大小排序,选哪个值比较适合了?linux开发人员选择的是vruntime!计算公式如下:
vruntime = vruntime + 实际运行时间(time process run) * 1024 / 进程权重(load weight of this process)
注意:vruntime是累加的!实际运行时间就是进程运行时暂用cpu的时间,权重该怎么计算了?这里有个映射表,根据nice值查找对应的weight!nice值类似于优先级,取值为下面所示的从15到-20,每次递减5;根据nice值找到weight后就可以带入公式计算vruntime了!
/*
 * Nice levels are multiplicative, with a gentle 10% change for every
 * nice level changed. I.e. when a CPU-bound task goes from nice 0 to
 * nice 1, it will get ~10% less CPU time than another CPU-bound task
 * that remained on nice 0.
 *
 * The "10% effect" is relative and cumulative: from _any_ nice level,
 * if you go up 1 level, it's -10% CPU usage, if you go down 1 level
 * it's +10% CPU usage. (to achieve that we use a multiplier of 1.25.
 * If a task goes up by ~10% and another task goes down by ~10% then
 * the relative distance between them is ~25%.)
 */
const int sched_prio_to_weight[40] = {
 /* -20 */     88761,     71755,     56483,     46273,     36291,
 /* -15 */     29154,     23254,     18705,     14949,     11916,
 /* -10 */      9548,      7620,      6100,      4904,      3906,
 /*  -5 */      3121,      2501,      1991,      1586,      1277,
 /*   0 */      1024,       820,       655,       526,       423,
 /*   5 */       335,       272,       215,       172,       137,
 /*  10 */       110,        87,        70,        56,        45,
 /*  15 */        36,        29,        23,        18,        15,
};
vruntime的值越小,说明占用cpu的时间就越少,或者说权重越大,这时就需要优先运行了!所以用红黑树是根据所有进程的vruntime来组织的,树最左下角的节点就是vruntime最小的节点,是需要最先执行的节点;随着进程的执行,或者说权重的调整,vruntime是不停在变化的,此时就需要动态调整红黑树了。由于红黑树本身的算法特点,动态调整肯定比链表快多了,这是CFS选择红黑树的根本原因!看到这里,CFS算法的特点之一就明显了:没有时间片的概念,而是根据实际的运行时间和虚拟运行时间来对任务进行排序,从而选择调度;
(2)算法原理介绍完,接着该看看linux内核是怎么实现的了!和其他模块一样,CFS的实现少不了结构体的支持,算法相关的核心结构体如下:
第一个肯定是task_struct了!新增了不同调度器的描述符,便于确定本进程使用了哪些调度策略!sched_entity就是构造红黑树的关键成员变量了!
struct task_struct {
    .......
        int prio, static_prio, normal_prio;
    unsigned int rt_priority;
    const struct sched_class *sched_class;/*调度策略的实例*/
    struct sched_entity se;/*cfs调度策略,包含了rb_node*/
    struct sched_rt_entity rt;/*real time调度策略*/
#ifdef CONFIG_CGROUP_SCHED
    struct task_group *sched_task_group;
#endif
    struct sched_dl_entity dl;/*deadline 调度*/
    .......
}
组成红黑树的关键结构体:有个run_node字段,从名字就能看出是正在运行的进程节点!
struct sched_entity {/*cfs调度策略*/
    struct load_weight    load;        /* for load-balancing */
    struct rb_node        run_node;   /*调度实体是由红黑树组织起来的*/
    struct list_head    group_node;
    unsigned int        on_rq;
    /*构造红黑树时,其实下面的每一项都可以用作节点的key;
    1、但是这里选vruntime作为key构造红黑树,换句话说用vruntime来排序,小的靠左,大的靠右
    2、如果不同进程的vruntime一样,可以加很小的数改成不一样的
    */
    u64            exec_start;
    u64            sum_exec_runtime;
    u64            vruntime;/*红黑树节点排序的变量*/
    u64            prev_sum_exec_runtime;

    u64            nr_migrations;

#ifdef CONFIG_SCHEDSTATS
    struct sched_statistics statistics;
#endif

#ifdef CONFIG_FAIR_GROUP_SCHED
    int            depth;
    struct sched_entity    *parent;
    /* rq on which this entity is (to be) queued: */
    struct cfs_rq        *cfs_rq;
    /* rq "owned" by this entity/group: */
    struct cfs_rq        *my_q;
#endif

#ifdef CONFIG_SMP
    /*
     * Per entity load average tracking.
     *
     * Put into separate cache line so it does not
     * collide with read-mostly values above.
     */
    struct sched_avg    avg ____cacheline_aligned_in_smp;
#endif
};
还有直接描述cfs正在runquene的结构体:包含红黑树的根节点、最左边的节点(也就是vruntime最小的节点)、当前正在使用的调度结构体;
/* CFS-related fields in a runqueue */
struct cfs_rq {
......
    struct rb_root tasks_timeline;/*红黑树的root根节点*/
    struct rb_node *rb_leftmost;/*红黑树最左边的节点,也就是vruntime最小的节点*/

    /*
     * 'curr' points to currently running entity on this cfs_rq.
     * It is set to NULL otherwise (i.e when none are currently running).
     */
    struct sched_entity *curr, *next, *last, *skip;
......

}
上面各种结构体种类繁多,不容易理清关系,看看下面的图就清晰了:
结构体准备好后,就可以通过各种api建树了!
(3)既然红黑树排序以vruntime为准,这个值肯定是要不断调整的,具体的更改函数在update_curr函数(kernel\sched\fair.c),如下:关键代码处加了中文注释
/*
 * Update the current task's runtime statistics.
 */
static void update_curr(struct cfs_rq *cfs_rq)
{
    struct sched_entity *curr = cfs_rq->curr;
    u64 now = rq_clock_task(rq_of(cfs_rq));
    u64 delta_exec;

    if (unlikely(!curr))
        return;
    /*计算进程已经执行的时间*/
    delta_exec = now - curr->exec_start;
    if (unlikely((s64)delta_exec <= 0))
        return;

    curr->exec_start = now;//更新开始执行的时间

    schedstat_set(curr->statistics.exec_max,
              max(delta_exec, curr->statistics.exec_max));

    curr->sum_exec_runtime += delta_exec;
    schedstat_add(cfs_rq->exec_clock, delta_exec);

    curr->vruntime += calc_delta_fair(delta_exec, curr);//更新vruntime
    update_min_vruntime(cfs_rq);

    if (entity_is_task(curr)) {
        struct task_struct *curtask = task_of(curr);

        trace_sched_stat_runtime(curtask, delta_exec, curr->vruntime);
        cpuacct_charge(curtask, delta_exec);
        account_group_exec_runtime(curtask, delta_exec);
    }

    account_cfs_rq_runtime(cfs_rq, delta_exec);
}
把节点加入红黑树:
/*
 * Enqueue an entity into the rb-tree:
 */
static void __enqueue_entity(struct cfs_rq *cfs_rq, struct sched_entity *se)
{
    struct rb_node **link = &cfs_rq->tasks_timeline.rb_node;/*红黑树根节点*/
    struct rb_node *parent = NULL;
    struct sched_entity *entry;
    int leftmost = 1;

    /*
     * Find the right place in the rbtree:
     */
    while (*link) {
        parent = *link;
        /*找到节点实例的首地址,就是container_of的宏定义*/
        entry = rb_entry(parent, struct sched_entity, run_node);
        /*
         * We dont care about collisions. Nodes with
         * the same key stay together.
         */
        if (entity_before(se, entry)) {
            link = &parent->rb_left;
        } else {
            link = &parent->rb_right;
            leftmost = 0;
        }
    }

    /*
     * Maintain a cache of leftmost tree entries (it is frequently
     * used):
     */
    if (leftmost)
        cfs_rq->rb_leftmost = &se->run_node;
    /*在红黑树中插入节点,即将node节点插入到parent节点的左树或者右树,整个过程会动态调整树结构保持平衡;*/
    rb_link_node(&se->run_node, parent, link);
    /*设置节点的颜色*/
    rb_insert_color(&se->run_node, &cfs_rq->tasks_timeline);
}
和上面的作用刚好相反:删除节点
static void __dequeue_entity(struct cfs_rq *cfs_rq, struct sched_entity *se)
{
    if (cfs_rq->rb_leftmost == &se->run_node) {
        struct rb_node *next_node;

        next_node = rb_next(&se->run_node);
        cfs_rq->rb_leftmost = next_node;
    }

    rb_erase(&se->run_node, &cfs_rq->tasks_timeline);
}
(4)红黑树建好后,最最最最重要的功能就是找出需要调度的进程了,如下:
/*
 * Pick the next process, keeping these things in mind, in this order:
 * 1) keep things fair between processes/task groups
 * 2) pick the "next" process, since someone really wants that to run
 * 3) pick the "last" process, for cache locality
 * 4) do not run the "skip" process, if something else is available
 */
static struct sched_entity *
pick_next_entity(struct cfs_rq *cfs_rq, struct sched_entity *curr)
{
    struct sched_entity *left = __pick_first_entity(cfs_rq);//树上最左边的节点
    struct sched_entity *se;

    /*
     * If curr is set we have to see if its left of the leftmost entity
     * still in the tree, provided there was anything in the tree at all.
       若 second 为空, 或者 curr 的 vruntime 更小
     */
    if (!left || (curr && entity_before(curr, left)))
        left = curr;

    se = left; /* ideally we run the leftmost entity */

    /*
     * Avoid running the skip buddy, if running something else can
     * be done without getting too unfair.
     */
    if (cfs_rq->skip == se) {
        struct sched_entity *second;

        if (se == curr) {
            second = __pick_first_entity(cfs_rq);/*返回最左边、也就是vruntime最小的节点*/
        } else {
            second = __pick_next_entity(se);/*找到比se节点大的第一个节点*/
            if (!second || (curr && entity_before(curr, second)))
                second = curr;
        }
        /*判断是否应该抢占当前进程*/
        if (second && wakeup_preempt_entity(second, left) < 1)
            se = second;
    }

    /*
     * Prefer last buddy, try to return the CPU to a preempted task.
     */
    if (cfs_rq->last && wakeup_preempt_entity(cfs_rq->last, left) < 1)
        se = cfs_rq->last;

    /*
     * Someone really wants this to run. If it's not unfair, run it.
     */
    if (cfs_rq->next && wakeup_preempt_entity(cfs_rq->next, left) < 1)
        se = cfs_rq->next;

    clear_buddies(cfs_rq, se);

    return se;
}
这里啰嗦几句:调度器有多个,都实现了pick_next_entity的方法!
总结:
1、链表这种“憨憨”类的数据结构,能少用就尽量少用;尽量用红黑树替代吧,增删改查的效率高多了!
2、既然用红黑树选择最小的vruntime节点运行,用小根堆是不是也能达到同样的效果了?
参考:
1、https://jishuin.proginn.com/p/763bfbd5f8d6 linux进程调度知识点
2、https://mp.weixin.qq.com/s?__biz=MzA3NzYzODg1OA==&mid=2648464309&idx=1&sn=9fc763d9233fbba6d40b69b1ef54aa8b&chksm=87660610b0118f060a4da0c64417e57e8cb35f4732043106fd1b1d9a3ad6134145e0e47f5a9b&scene=21#wechat_redirect O(1)调度算法
3、https://blog.csdn.net/longwang155069/article/details/104457109 linux O(1)调度器
4、http://www.wowotech.net/process_management/scheduler-history.html O(1)、O(n)和CFS调度器
5、https://zhuanlan.zhihu.com/p/372441187 操作系统调度算法CFS
#394 内核模块 » linux源码解读(十四):红黑树在内核的应用——红黑树原理和api解析 » 2022-10-09 13:00:18
- batsom
- 回复: 0
1、红黑树是一种非常重要的数据结构,有比较明显的两个特点:
插入、删除、查找的时间复杂度接近O(logN),N是节点个数,明显比链表快;是一种性能非常稳定的二叉树!
中序遍历的结果是从小到大排好序的
基于以上两个特点,红黑树比较适合的应用场景:
需要动态插入、删除、查找的场景,包括但不限于:
某些数据库的增删改查,比如select * from xxx where 这类条件检索
linux内核中进程通过红黑树组织管理,便于快速插入、删除、查找进程的task_struct
linux内存中内存的管理:分配和回收。用红黑树组织已经分配的内存块,当应用程序调用free释放内存的时候,可以根据内存地址在红黑树中快速找到目标内存块
hashmap中(key,value)增、删、改查的实现;java 8就采用了RBTree替代链表
Ext3文件系统,通过红黑树组织目录项
排好序的场景,比如:
linux定时器的实现:hrtimer以红黑树的形式组织,树的最左边的节点就是最快到期的定时
从上述的应用场景可以看出来红黑树是非常受欢迎的一种数据结构,接下来深入分析一些典型的场景,看看linux的内核具体是怎么使用红黑树的!
2、先来看看红黑树的定义,在include\linux\rbtree.h文件中:
struct rb_node {
    unsigned long  __rb_parent_color;
    struct rb_node *rb_right;
    struct rb_node *rb_left;
} __attribute__((aligned(sizeof(long))));
    /* The alignment might seem pointless, but allegedly CRIS needs it */
结构体非常简单,只有3个字段,凡是有一丁点开发经验的人员都会有疑问:红黑树有那么多应用场景,这个结构体居然一个应用场景的业务字段都没有,感觉就像个还没装修的毛坯房,这个该怎么用了?这恰恰是设计的精妙之处:红黑树在linux内核有大量的应用场景,如果把rb_node的定义加上了特定应用场景的业务字段,那这个结构体就只能在这个特定的场景下用了,完全没有了普适性,变成了场景紧耦合的;这样的结构体多了会增加后续代码维护的难度,所以rb_node结构体的定义就极简了,只保留了红黑树节点自身的3个属性:左孩子、右孩子、节点颜色(list_head结构体也是这个思路);这么简单、不带业务场景属性的结构体该怎么用了?先举个简单的例子,看懂后能更快地理解linux源码的原理。比如一个班级有50个学生,每个学生有id、name和score分数,现在要用红黑树组织所有的学生,先定义一个student的结构体:
struct Student{
    int id;
    char *name;
    int scroe
    struct rb_node s_rb;
};
前面3个都是业务字段,第4个是红黑树的字段(student和rb_node结构体看起来是两个分开的结构体,但经过编译器编译后会合并字段,最终就是一块连续的内存,有点类似c++的继承关系);linux提供了红黑树基本的增、删、改、查、左旋、右旋、设置颜色等操作,如下:
#define rb_parent(r)   ((struct rb_node *)((r)->rb_parent_color & ~3)) //低两位清0
#define rb_color(r)   ((r)->rb_parent_color & 1)                       //取最后一位
#define rb_is_red(r)   (!rb_color(r))                                  //最后一位为0?
#define rb_is_black(r) rb_color(r)                                     //最后一位为1?
#define rb_set_red(r)  do { (r)->rb_parent_color &= ~1; } while (0)    //最后一位置0
#define rb_set_black(r)  do { (r)->rb_parent_color |= 1; } while (0)   //最后一位置1

static inline void rb_set_parent(struct rb_node *rb, struct rb_node *p) //设置父亲
{
    rb->rb_parent_color = (rb->rb_parent_color & 3) | (unsigned long)p;
}
static inline void rb_set_color(struct rb_node *rb, int color)          //设置颜色
{
    rb->rb_parent_color = (rb->rb_parent_color & ~1) | color;
}
//左旋、右旋
void __rb_rotate_left(struct rb_node *node, struct rb_root *root);
void __rb_rotate_right(struct rb_node *node, struct rb_root *root);
//删除节点
void rb_erase(struct rb_node *, struct rb_root *);
void __rb_erase_color(struct rb_node *node, struct rb_node *parent, struct rb_root *root);
//替换节点
void rb_replace_node(struct rb_node *old, struct rb_node *new, struct rb_root *tree);//插入节点
  void rb_link_node(struct rb_node * node, struct rb_node * parent, struct rb_node ** rb_link);
//遍历红黑树
extern struct rb_node *rb_next(const struct rb_node *); //后继
extern struct rb_node *rb_prev(const struct rb_node *); //前驱
extern struct rb_node *rb_first(const struct rb_root *);//最小值
extern struct rb_node *rb_last(const struct rb_root *); //最大值
上面的操作接口传入的参数都是rb_node,怎么才能用于来操作用户自定义业务场景的红黑树了,就比如上面的student结构体?既然这些接口的传入参数都是rb_node,如果不改参数和函数实现,就只能按照别人的要求传入rb_node参数,自定义结构体的字段怎么才能“顺带”加入红黑树了?这个也简单,自己生成结构体,然后把结构体的rb_node参数传入即可,如下:
/*
 将对象加到红黑树上
 s_root            红黑树root节点
 ptr_stu        对象指针
 rb_link        对象节点所在的节点
 rb_parent        父节点
 */
void student_link_rb(struct rb_root *s_root, struct Student *ptr_stu,
        struct rb_node **rb_link, struct rb_node *rb_parent)
{
    rb_link_node(&ptr_stu->s_rb, rb_parent, rb_link);
    rb_insert_color(&ptr_stu->s_rb, s_root);
}

void add_student(struct rb_root *s_root, struct Student *stu, struct Student **stu_header)
{
    struct rb_node **rb_link, *rb_parent;
    // 插入红黑树
    student_link_rb(s_root, stu, rb_link, rb_parent);
}
假如以score分数作为构建红黑树的key,构建的树如下:每个student节点的rb_right和rb_left指针指向的都是rb_node的起始地址,也就是_rb_parent_color的值,但是score、name、id这些值其实才是业务上急需读写的,怎么得到这些字段的值了?
linux的开发人员早就想好了读取的方法:先得到student实例的开始地址,再通过偏移读字段不就行了么?如下:
#define container_of(ptr, type, member) ({                \
    const typeof( ((type *)0)->member ) *__mptr = (ptr);  \
    (type *)( (char *)__mptr - offsetof(type,member) );})
通过上面的宏定义就能得到student实例的首地址了,用法如下:调用container_of方法,传入rbnode的实例(确认student实例的位置)、student结构体和内部rb_node的位置(用以计算rb_node在结构体内部的偏移,然后反推student实例的首地址):得到student实例的首地址,接下来就可以愉快的直接使用id、name、score等字段了;
struct Student* find_by_id(struct rb_root *root, int id)
{
    struct Student *ptr_stu = NULL;
    struct rb_node *rbnode = root->rb_node;
    while (NULL != rbnode)
    {
//最核心的代码:三个参数分别时rb_node的实例,student结构体的定义和内部的rb_node字段位置
        struct Student *ptr_tmp = container_of(rbnode, struct Student, s_rb);
        if (id < ptr_tmp->id)
        {
            rbnode = rbnode->rb_left;
        }
        else if (id > ptr_tmp->id)
        {
            rbnode = rbnode->rb_right;
        }
        else
        {
            ptr_stu = ptr_tmp;
            break;
        }
    }
    return ptr_stu;
}
总结一下红黑树使用的大致流程:
开发人员根据业务场景需求定义结构体的字段,务必包含rb_node;
生成结构体的实例stu,调用rb_link_node添加节点构建红黑树。当然传入的参数是stu->s_rb
遍历查找的时候根据找s_rb实例、自定义结构体、rb_node在结构体的名称得到自定义结构体实例的首地址,然后就能愉快的读写业务字段了!
3、上述的案例够简单吧,linux内部各种复杂场景使用红黑树的原理和这个一毛一样,没有任何本质区别!理解了上述案例的原理,也就理解了linux内核使用红黑树的原理!接下来看看红黑树一些关机api实现的方法了:
(1)红黑树是排好序的,中序遍历的结果就是从小到大排列的;最左边就是整棵树的最小节点,所以一直向左就能找到第一个、也是最小的节点;
/*
 * This function returns the first node (in sort order) of the tree.
 */
struct rb_node *rb_first(const struct rb_root *root)
{
    struct rb_node    *n;

    n = root->rb_node;
    if (!n)
        return NULL;
    while (n->rb_left)
        n = n->rb_left;
    return n;
}
同理:一路向右能找到整棵树最大的节点
struct rb_node *rb_last(const struct rb_root *root)
{
    struct rb_node    *n;

    n = root->rb_node;
    if (!n)
        return NULL;
    while (n->rb_right)
        n = n->rb_right;
    return n;
}
(2)找到某个节点下一个节点:比如A节点数值是50,从A节点的右孩开始(右孩所有节点都比A大),往左找 as far as get null;也就是整个树中比A大的最小节点;这个功能可以用来做条件查询!
struct rb_node *rb_next(const struct rb_node *node)
{
    struct rb_node *parent;

    if (RB_EMPTY_NODE(node))
        return NULL;

    /*
     * If we have a right-hand child, go down and then left as far
     * as we can.
     */
    if (node->rb_right) {
        node = node->rb_right;
        while (node->rb_left)
            node=node->rb_left;
        return (struct rb_node *)node;
    }

    /*
     * No right-hand children. Everything down and left is smaller than us,
     * so any 'next' node must be in the general direction of our parent.
     * Go up the tree; any time the ancestor is a right-hand child of its
     * parent, keep going up. First time it's a left-hand child of its
     * parent, said parent is our 'next' node.
     */
    while ((parent = rb_parent(node)) && node == parent->rb_right)
        node = parent;

    return parent;
}
同理,找到整个树中比A小的最大节点:
struct rb_node *rb_prev(const struct rb_node *node)
{
    struct rb_node *parent;

    if (RB_EMPTY_NODE(node))
        return NULL;

    /*
     * If we have a left-hand child, go down and then right as far
     * as we can.
     */
    if (node->rb_left) {
        node = node->rb_left;
        while (node->rb_right)
            node=node->rb_right;
        return (struct rb_node *)node;
    }

    /*
     * No left-hand children. Go up till we find an ancestor which
     * is a right-hand child of its parent.
     */
    while ((parent = rb_parent(node)) && node == parent->rb_left)
        node = parent;

    return parent;
}
(3)替换一个节点:把周围的指针改向,然后改节点颜色
void rb_replace_node(struct rb_node *victim, struct rb_node *new,
             struct rb_root *root)
{
    struct rb_node *parent = rb_parent(victim);

    /* Set the surrounding nodes to point to the replacement */
    __rb_change_child(victim, new, parent, root);
    if (victim->rb_left)
        rb_set_parent(victim->rb_left, new);
    if (victim->rb_right)
        rb_set_parent(victim->rb_right, new);

    /* Copy the pointers/colour from the victim to the replacement */
    *new = *victim;
}
(4)插入一个节点:分不同情况左旋、右旋;
static __always_inline void
__rb_insert(struct rb_node *node, struct rb_root *root,
        void (*augment_rotate)(struct rb_node *old, struct rb_node *new))
{
    struct rb_node *parent = rb_red_parent(node), *gparent, *tmp;

    while (true) {
        /*
         * Loop invariant: node is red
         *
         * If there is a black parent, we are done.
         * Otherwise, take some corrective action as we don't
         * want a red root or two consecutive red nodes.
         */
        if (!parent) {
            rb_set_parent_color(node, NULL, RB_BLACK);
            break;
        } else if (rb_is_black(parent))
            break;

        gparent = rb_red_parent(parent);

        tmp = gparent->rb_right;
        if (parent != tmp) {    /* parent == gparent->rb_left */
            if (tmp && rb_is_red(tmp)) {
                /*
                 * Case 1 - color flips
                 *
                 *       G            g
                 *      / \          / \
                 *     p   u  -->   P   U
                 *    /            /
                 *   n            n
                 *
                 * However, since g's parent might be red, and
                 * 4) does not allow this, we need to recurse
                 * at g.
                 */
                rb_set_parent_color(tmp, gparent, RB_BLACK);
                rb_set_parent_color(parent, gparent, RB_BLACK);
                node = gparent;
                parent = rb_parent(node);
                rb_set_parent_color(node, parent, RB_RED);
                continue;
            }

            tmp = parent->rb_right;
            if (node == tmp) {
                /*
                 * Case 2 - left rotate at parent
                 *
                 *      G             G
                 *     / \           / \
                 *    p   U  -->    n   U
                 *     \           /
                 *      n         p
                 *
                 * This still leaves us in violation of 4), the
                 * continuation into Case 3 will fix that.
                 */
                tmp = node->rb_left;
                WRITE_ONCE(parent->rb_right, tmp);
                WRITE_ONCE(node->rb_left, parent);
                if (tmp)
                    rb_set_parent_color(tmp, parent,
                                RB_BLACK);
                rb_set_parent_color(parent, node, RB_RED);
                augment_rotate(parent, node);
                parent = node;
                tmp = node->rb_right;
            }

            /*
             * Case 3 - right rotate at gparent
             *
             *        G           P
             *       / \         / \
             *      p   U  -->  n   g
             *     /                 \
             *    n                   U
             */
            WRITE_ONCE(gparent->rb_left, tmp); /* == parent->rb_right */
            WRITE_ONCE(parent->rb_right, gparent);
            if (tmp)
                rb_set_parent_color(tmp, gparent, RB_BLACK);
            __rb_rotate_set_parents(gparent, parent, root, RB_RED);
            augment_rotate(gparent, parent);
            break;
        } else {
            tmp = gparent->rb_left;
            if (tmp && rb_is_red(tmp)) {
                /* Case 1 - color flips */
                rb_set_parent_color(tmp, gparent, RB_BLACK);
                rb_set_parent_color(parent, gparent, RB_BLACK);
                node = gparent;
                parent = rb_parent(node);
                rb_set_parent_color(node, parent, RB_RED);
                continue;
            }

            tmp = parent->rb_left;
            if (node == tmp) {
                /* Case 2 - right rotate at parent */
                tmp = node->rb_right;
                WRITE_ONCE(parent->rb_left, tmp);
                WRITE_ONCE(node->rb_right, parent);
                if (tmp)
                    rb_set_parent_color(tmp, parent,
                                RB_BLACK);
                rb_set_parent_color(parent, node, RB_RED);
                augment_rotate(parent, node);
                parent = node;
                tmp = node->rb_left;
            }

            /* Case 3 - left rotate at gparent */
            WRITE_ONCE(gparent->rb_right, tmp); /* == parent->rb_left */
            WRITE_ONCE(parent->rb_left, gparent);
            if (tmp)
                rb_set_parent_color(tmp, gparent, RB_BLACK);
            __rb_rotate_set_parents(gparent, parent, root, RB_RED);
            augment_rotate(gparent, parent);
            break;
        }
    }
}
rb_node最牛逼的地方:去掉了业务属性的字段,和业务场景松耦合,让rb_node结构体和对应的方法可以做到在不同的业务场景通用;同时配合container_of函数,又能通过rb_node实例地址快速反推出业务结构体实例的首地址,方便读写业务属性的字段,这种做法高!实在是高!
4、红黑树为什么这么牛?个人认为最核心的要点在于其动态的高度调整!换句话说:在增、删、改的过程中,为了避免红黑树退化成单向链表,红黑树会动态地调整树的高度,让树高不超过2lg(n+1);相比AVL 树,红黑树只需维护一个黑高度,效率高很多;这样一来,增删改查的时间复杂度就控制在了O(lgn)! 那么红黑树又是怎么控制树高度的了?就是红黑树那5条规则(这不是废话么?)!最核心的就是第4、5点!
(1)先看看第4点:任何相邻的节点都不能同时为红色,也就是说:红节点是被黑节点隔开的;随意选一条从根节点到叶子节点的路径,因为要满足这点,所以每存在一个红节点,至少对应了一个黑节点,即红色节点个数<=黑色节点个数;假如黑色节点数量是n,那么整棵树节点的数量<=2n;
(2)再看看第5点:每个节点,从该节点到达其可达叶子节点的所有路径,都包含相同数目的黑色节点;新加入的节点初始颜色是红色,如果其父节点也是红色,就需要挨个往上回溯更改每个父节点的颜色了!更改颜色后如果打破了第5点,就需要通过旋转重构红黑树,本质上是降低整棵树的高度,避免整棵树退化成链表,举个例子:初始红黑树如下:

增加8节点,节点初始是红色,是7节点的右子节点;因为7节点也是红色,所以要调整成黑色;但是这样一来,2->4->6->7就有3个黑节点了,这时需要继续往上回溯6、4、2节点,分别更改这3个节点的颜色,导致根节点2成了红色,同时5和6都是红色,这两个节点都不符合规定;此时再左旋4节点,让4来做根节点,降低了树的高度,后续再增删改查时还是能保持时间复杂度是O(n)!

参考:
1、https://www.bilibili.com/video/BV135411h7wJ?p=1 红黑树介绍
2、https://cloud.tencent.com/developer/article/1922776 数据结构 红黑树
3、https://blog.csdn.net/weixin_46381158/article/details/117999284 红黑树基本用法
4、https://rbtree.phpisfuture.com/ 红黑树在线演示
5、https://segmentfault.com/a/1190000023101310 红黑树前世今生
#395 内核模块 » linux源码解读(十三):内核驱动module加载kprobe&字节跳动Elkied简要分析 » 2022-10-09 12:47:58
- batsom
- 回复: 0
要想在计算机里干点事,权限肯定是越高越好的。正常情况下,cpu硬件层面保证了运行在0环的操作系统和运行在3环的用户app互相隔离,3环app要想进入0环执行代码只能通过中断或系统调用的形式,执行最多代码的应该就是硬件的驱动了,常见的屏幕打印、磁盘读写、网卡/wifi收发数据都要执行硬件驱动。因为需要被保护(防止被恶意篡改),同时也需要在多个3环进程间互斥,所以驱动都是被操作系统加载到0环的,天然拥有和操作系统其他内核代码一样的权限,因此很多需要高权限运行的功能都是以驱动的形式落地的。这里先以window为例:
windows早期防护措施不够,杀毒或逆向外挂等软件都喜欢hook SSDT来监控3环的应用程序;SSDT被hook多了容易导致蓝屏,严重影响用户体验;微软直接怒了,搞了驱动签名来严控操作系统对驱动的加载(还有pathguard监控内核代码,一旦发现被更改,直接蓝屏);同时如果发现厂家还在通过驱动恶意hook SSDT,直接吊销签名执照,不再给驱动签名;但是部分厂家从正常的业务角度考虑确实需要hook SSDT咋办了? 比如杀毒软件、驱动保护等业务确实需要监控系统调用,如果一刀切不让hook了,怎么保证windows系统和3环应用的安全了?微软也没赶尽杀绝,提供了回调注册的接口ObRegisterCallbacks,让厂家注册自己的回调函数。每当系统调用被执行时,就调用用户注册的回调函数执行,由此达到和hook一样的效果!
1、回到linux,毕竟也是和windows齐名的os,也是基于x86硬件架构的os,原理和windows是一样的:驱动是以模块(module)的形式加载到内核0环的,代码和操作系统内核其他代码拥有同样的权限,自然也能读写内核其他代码,这就让通过驱动hook内核代码的方式水到渠成了!那么linux面临了和早期windows一样的问题:如果放任开发人员通过驱动随意hook系统调用,可能造成的恶果:(1)不同的hook程序可能会“互相踩踏”,导致hook失效,甚至错误修改内核代码;(2)hook的代码如果没能完整地还原被破坏的机器码,或则跳转回来的地址填写出错,都会导致内核执行出错。为了避免开发人员hook内核带来的出错,linux和windows一样提供了完整的内核驱动代码hook机制:kprobe,它可以在任意的位置放置探测点(就连函数内部的某条指令处也可以),它提供了探测点的调用前、调用后和内存访问出错3种回调方式,分别是pre_handler、post_handler和fault_handler,其中pre_handler函数将在被探测指令被执行前回调,post_handler会在被探测指令执行完毕后回调(注意不是被探测函数),fault_handler会在内存访问出错时被调用;主要优势特点:
允许在同一个被探测位置注册多个kprobe,避免多个第三方程序同时hook同一段内核代码时发生“互相踩踏”,做到“有序hook”;
除了kernel/kprobes.c和arch/*/kernel/kprobes.c程序中用于实现kprobes自身的函数,外加do_page_fault和notifier_call_chain外,其他内核函数都能hook;do_page_fault和notifier_call_chain被调用太频繁,hook会降低操作系统的运行效率;并且这两个都是在中断的handler代码,需要尽快执行完毕;而且hook的业务意义也不大,所以没必要hook了!
同一个hook点的回调只会被执行一次,比如hook printk后在回调函数中再调用printk,回调函数只执行一次,避免无限嵌套递归,导致栈资源耗尽;
kprobes的注册和注销过程中不会使用mutex锁和动态的申请内存,避免占用mutex阻塞其他线程,或sleep让出cpu,导致回调长时间执行,严重影响原函数的效率;
2、kprobe工作hook流程总结如下:
当用户注册一个探测点后,kprobe首先备份被探测点的对应指令,然后将原始指令的入口点替换为断点指令,该指令是CPU架构相关的,如i386和x86_64是int3,arm是设置一个未定义指令(目前的x86_64架构支持一种跳转优化方案Jump Optimization,内核需开启CONFIG_OPTPROBES选项,该种方案使用跳转指令来代替断点指令);
当CPU流程执行到探测点的断点指令时(把原机器码用int 3替代),就触发了一个trap,在trap处理流程中会保存当前CPU的寄存器信息并调用对应的trap处理函数,该处理函数会设置kprobe的调用状态并调用用户注册的pre_handler回调函数,kprobe会向该函数传递注册的struct kprobe结构地址以及保存的CPU寄存器信息;
随后kprobe单步执行前面所拷贝的被探测指令,具体执行方式各个架构不尽相同,arm会在异常处理流程中使用模拟函数执行,而x86_64架构则会设置单步调试flag并回到异常触发前的流程中执行;
在单步执行完成后,kprobe执行用户注册的post_handler回调函数;
最后,执行流程回到被探测指令之后的正常流程继续执行。
和其他内核功能类似,kprobe功能的实现也是由结构体+函数构成了(这里顺便多说几句:C语言没有对象的语法,所以类的继承采用了结构体包含结构体的形式;也没有成员函数的语法,只能采用结构体包含指针函数的形式实现),结构体字段如下:
struct kprobe {
    struct hlist_node hlist://被用于kprobe全局hash,索引值为被探测点的地址;
    struct list_head list://用于链接同一被探测点的不同探测kprobe;
    kprobe_opcode_t *addr://被探测点的地址;
    const char *symbol_name://被探测函数的名字;
    unsigned int offset://被探测点在函数内部的偏移,用于探测函数内部的指令,如果该值为0表示函数的入口;
    kprobe_pre_handler_t pre_handler://在被探测点指令执行之前调用的回调函数;
    kprobe_post_handler_t post_handler://在被探测指令执行之后调用的回调函数;
    kprobe_fault_handler_t fault_handler://在执行pre_handler、post_handler或单步执行被探测指令时出现内存异常则会调用该回调函数;
    kprobe_break_handler_t break_handler://在执行某一kprobe过程中触发了断点指令后会调用该函数,用于实现jprobe;
    kprobe_opcode_t opcode://保存的被探测点原始指令;
    struct arch_specific_insn ainsn://被复制的被探测点的原始指令,用于单步执行,架构强相关(可能包含指令模拟函数);
    u32 flags://状态标记。
}
最关键的字段:addr、symbol_name、offset、handler、opcode等;这里居然还有list,明显是用来连接其他hook点的!相关配套初始化、使用、卸载探测点的函数如下:
int register_kprobe(struct kprobe *kp)      //向内核注册kprobe探测点
void unregister_kprobe(struct kprobe *kp)   //卸载kprobe探测点
int register_kprobes(struct kprobe **kps, int num)     //注册探测函数向量,包含多个探测点
void unregister_kprobes(struct kprobe **kps, int num)  //卸载探测函数向量,包含多个探测点
int disable_kprobe(struct kprobe *kp)       //临时暂停指定探测点的探测
int enable_kprobe(struct kprobe *kp)        //恢复指定探测点的探测
3、由于需要hook内核代码,权限也必须是0环的,所以也要被加载到内核。windows下的api是driver_entry和driver_exit,linux类似,用的api是module_init和moud_exit;这里以字节跳动的Elkied工具为例,在driver\LKM\src\init.c文件中,加载驱动的module的代码如下:
static int __init do_kprobe_initcalls(void)
{
    int ret = 0;
    struct kprobe_initcall const *const *initcall_p;

    for (initcall_p = __start_kprobe_initcall;
         initcall_p < __stop_kprobe_initcall; initcall_p++) {
        struct kprobe_initcall const *initcall = *initcall_p;

        if (initcall->init) {
            ret = initcall->init();
            if (ret < 0)
                goto exit;
        }
    }

    return 0;
exit:
    while (--initcall_p >= __start_kprobe_initcall) {
        struct kprobe_initcall const *initcall = *initcall_p;

        if (initcall->exit)
            initcall->exit();
    }

    return ret;
}

static void do_kprobe_exitcalls(void)
{
    struct kprobe_initcall const *const *initcall_p =
            __stop_kprobe_initcall;

    while (--initcall_p >= __start_kprobe_initcall) {
        struct kprobe_initcall const *initcall = *initcall_p;

        if (initcall->exit)
            initcall->exit();
    }
}

static int __init kprobes_init(void)
{
    int ret;
    ret = do_kprobe_initcalls();
    if (ret < 0)
        return ret;

    return ret;
}

static void __exit kprobes_exit(void)
{
    do_kprobe_exitcalls();
}

module_init(kprobes_init);
module_exit(kprobes_exit);
上面的代码只看到了通过驱动加载和初始化kprobe,但是具体hook了哪些系统调用了还不清楚,继续看driver\LKM\src\smith_hook.c代码就能发现端倪了:重要的系统调用都被hook了,https://github.com/bytedance/Elkeid/blob/main/driver/README-zh_CN.md 这里也有hook的系统调用列举;
struct kretprobe execve_kretprobe = {
        .kp.symbol_name = P_GET_SYSCALL_NAME(execve),
        .entry_handler = execve_entry_handler,
        .data_size = sizeof(struct execve_data),
        .handler = execve_handler,
};
struct kprobe call_usermodehelper_exec_kprobe = {
        .symbol_name = "call_usermodehelper_exec",
        .pre_handler = call_usermodehelper_exec_pre_handler,
};

struct kprobe rename_kprobe = {
        .symbol_name = P_GET_SYSCALL_NAME(rename),
        .pre_handler = rename_pre_handler,
};

struct kprobe renameat_kprobe = {
        .symbol_name = P_GET_SYSCALL_NAME(renameat),
        .pre_handler = renameat_pre_handler,
};

#if LINUX_VERSION_CODE >= KERNEL_VERSION(3,15,0)
struct kprobe renameat2_kprobe = {
        .symbol_name = P_GET_SYSCALL_NAME(renameat2),
        .pre_handler = renameat_pre_handler,
};
#endif

struct kprobe link_kprobe = {
        .symbol_name = P_GET_SYSCALL_NAME(link),
        .pre_handler = link_pre_handler,
};

struct kprobe linkat_kprobe = {
        .symbol_name = P_GET_SYSCALL_NAME(linkat),
        .pre_handler = linkat_pre_handler,
};

struct kprobe ptrace_kprobe = {
        .symbol_name = P_GET_SYSCALL_NAME(ptrace),
        .pre_handler = ptrace_pre_handler,
};

struct kretprobe udp_recvmsg_kretprobe = {
        .kp.symbol_name = "udp_recvmsg",
        .data_size = sizeof(struct udp_recvmsg_data),
        .handler = udp_recvmsg_handler,
        .entry_handler = udp_recvmsg_entry_handler,
};

#if IS_ENABLED(CONFIG_IPV6)
struct kretprobe udpv6_recvmsg_kretprobe = {
        .kp.symbol_name = "udpv6_recvmsg",
        .data_size = sizeof(struct udp_recvmsg_data),
        .handler = udp_recvmsg_handler,
        .entry_handler = udpv6_recvmsg_entry_handler,
};

struct kretprobe ip6_datagram_connect_kretprobe = {
        .kp.symbol_name = "ip6_datagram_connect",
        .data_size = sizeof(struct connect_data),
        .handler = connect_handler,
        .entry_handler = ip6_datagram_connect_entry_handler,
};

struct kretprobe tcp_v6_connect_kretprobe = {
        .kp.symbol_name = "tcp_v6_connect",
        .data_size = sizeof(struct connect_data),
        .handler = connect_handler,
        .entry_handler = tcp_v6_connect_entry_handler,
};
#endif

struct kretprobe ip4_datagram_connect_kretprobe = {
        .kp.symbol_name = "ip4_datagram_connect",
        .data_size = sizeof(struct connect_data),
        .handler = connect_handler,
        .entry_handler = ip4_datagram_connect_entry_handler,
};

struct kretprobe tcp_v4_connect_kretprobe = {
        .kp.symbol_name = "tcp_v4_connect",
        .data_size = sizeof(struct connect_data),
        .handler = connect_handler,
        .entry_handler = tcp_v4_connect_entry_handler,
};

struct kretprobe connect_syscall_kretprobe = {
        .kp.symbol_name = P_GET_SYSCALL_NAME(connect),
        .data_size = sizeof(struct connect_syscall_data),
        .handler = connect_syscall_handler,
        .entry_handler = connect_syscall_entry_handler,
};

struct kretprobe accept_kretprobe = {
        .kp.symbol_name = P_GET_SYSCALL_NAME(accept),
        .data_size = sizeof(struct accept_data),
        .handler = accept_handler,
        .entry_handler = accept_entry_handler,
};

struct kretprobe accept4_kretprobe = {
        .kp.symbol_name = P_GET_SYSCALL_NAME(accept4),
        .data_size = sizeof(struct accept_data),
        .handler = accept_handler,
        .entry_handler = accept4_entry_handler,
};

struct kprobe do_init_module_kprobe = {
        .symbol_name = "do_init_module",
        .pre_handler = do_init_module_pre_handler,
};

struct kretprobe update_cred_kretprobe = {
        .kp.symbol_name = "commit_creds",
        .data_size = sizeof(struct update_cred_data),
        .handler = update_cred_handler,
        .entry_handler = update_cred_entry_handler,
};

struct kprobe security_inode_create_kprobe = {
        .symbol_name = "security_inode_create",
        .pre_handler = security_inode_create_pre_handler,
};

struct kretprobe bind_kretprobe = {
        .kp.symbol_name = P_GET_SYSCALL_NAME(bind),
        .data_size = sizeof(struct bind_data),
        .handler = bind_handler,
        .entry_handler = bind_entry_handler,
};

struct kprobe mprotect_kprobe = {
        .symbol_name = "security_file_mprotect",
        .pre_handler = mprotect_pre_handler,
};

struct kprobe setsid_kprobe = {
        .symbol_name = P_GET_SYSCALL_NAME(setsid),
        .pre_handler = setsid_pre_handler,
};

#if LINUX_VERSION_CODE >= KERNEL_VERSION(3, 17, 0)
struct kprobe memfd_create_kprobe = {
        .symbol_name = P_GET_SYSCALL_NAME(memfd_create),
        .pre_handler = memfd_create_kprobe_pre_handler,
};
#endif

struct kprobe prctl_kprobe = {
        .symbol_name = P_GET_SYSCALL_NAME(prctl),
        .pre_handler = prctl_pre_handler,
};

struct kprobe open_kprobe = {
        .symbol_name = P_GET_SYSCALL_NAME(open),
        .pre_handler = open_pre_handler,
};

struct kprobe kill_kprobe = {
        .symbol_name = P_GET_SYSCALL_NAME(kill),
        .pre_handler = kill_pre_handler,
};

struct kprobe tkill_kprobe = {
        .symbol_name = P_GET_SYSCALL_NAME(tkill),
        .pre_handler = tkill_pre_handler,
};

struct kprobe nanosleep_kprobe = {
        .symbol_name = P_GET_SYSCALL_NAME(nanosleep),
        .pre_handler = nanosleep_pre_handler,
};

struct kprobe exit_kprobe = {
        .symbol_name = P_GET_SYSCALL_NAME(exit),
        .pre_handler = exit_pre_handler,
};

struct kprobe exit_group_kprobe = {
        .symbol_name = P_GET_SYSCALL_NAME(exit_group),
        .pre_handler = exit_group_pre_handler,
};

struct kprobe security_path_rmdir_kprobe = {
        .symbol_name = "security_path_rmdir",
        .pre_handler = security_path_rmdir_pre_handler,
};

struct kprobe security_path_unlink_kprobe = {
        .symbol_name = "security_path_unlink",
        .pre_handler = security_path_unlink_pre_handler,
};
这里就看的很清楚了,下面找几个重点函数的回调分析;
(1)execve_handler:execve可以执行指定位置的文件,hook execve后可以监控操作系统运行的所有文件,属于大杀器级别的hook,整个操作系统在干啥看得一清二楚,特别适合监控病毒、木马的运行!
int execve_handler(struct kretprobe_instance *ri, struct pt_regs *regs)
{
int sa_family = -1;
int dport = 0, sport = 0;
__be32 dip4;
__be32 sip4;
pid_t socket_pid = -1;
char *pname = DEFAULT_RET_STR;
char *tmp_stdin = DEFAULT_RET_STR;
char *tmp_stdout = DEFAULT_RET_STR;
char *buffer = NULL;
char *pname_buf = NULL;
char *pid_tree = NULL;
char *socket_pname = "-1";
char *socket_pname_buf = NULL;
char *tty_name = "-1";
char *exe_path = DEFAULT_RET_STR;
char *pgid_exe_path = "-1";
char *stdin_buf = NULL;
char *stdout_buf = NULL;
struct in6_addr dip6;
struct in6_addr sip6;
struct file *file;
struct execve_data *data;
struct tty_struct *tty;
data = (struct execve_data *)ri->data;
buffer = kzalloc(PATH_MAX, GFP_ATOMIC);
/*当前进程所执行文件的路径*/
exe_path = smith_get_exe_file(buffer, PATH_MAX);
tty = get_current_tty();//得到当前终端
if(tty && strlen(tty->name) > 0)
tty_name = tty->name;
//exe filter check and argv filter check
if (execve_exe_check(exe_path) || execve_argv_check(data->argv))
goto out;
/*得到当前进程的socket,从这里也可以看出是不是中了木马的反弹webshell*/
get_process_socket(&sip4, &sip6, &sport, &dip4, &dip6, &dport,
&socket_pname, &socket_pname_buf, &socket_pid,
&sa_family);
//if socket exist,get pid tree
if (sa_family == AF_INET6 || sa_family == AF_INET)
pid_tree = smith_get_pid_tree(PID_TREE_LIMIT);
else
pid_tree = smith_get_pid_tree(PID_TREE_LIMIT_LOW);
// get stdin
file = fget_raw(0);
if (file) {
stdin_buf = kzalloc(256, GFP_ATOMIC);
tmp_stdin = smith_d_path(&(file->f_path), stdin_buf, 256);
fput(file);
}
//get stdout
file = fget_raw(1);
if (file) {
stdout_buf = kzalloc(256, GFP_ATOMIC);
tmp_stdout = smith_d_path(&(file->f_path), stdout_buf, 256);
fput(file);
}
pname_buf = kzalloc(PATH_MAX, GFP_ATOMIC);
pname = smith_d_path(¤t->fs->pwd, pname_buf, PATH_MAX);
/*打印收集到的各种数据*/
if (sa_family == AF_INET) {
execve_print(pname,
exe_path, pgid_exe_path, data->argv,
tmp_stdin, tmp_stdout,
dip4, dport, sip4, sport,
pid_tree, tty_name, socket_pid, socket_pname,
data->ssh_connection, data->ld_preload,
regs_return_value(regs));
}
#if IS_ENABLED(CONFIG_IPV6)
else if (sa_family == AF_INET6) {
execve6_print(pname,
exe_path, pgid_exe_path, data->argv,
tmp_stdin, tmp_stdout,
&dip6, dport, &sip6, sport,
pid_tree, tty_name, socket_pid, socket_pname,
data->ssh_connection, data->ld_preload,
regs_return_value(regs));
}
#endif
else {
execve_nosocket_print(pname,
exe_path, pgid_exe_path, data->argv,
tmp_stdin, tmp_stdout,
pid_tree, tty_name,
data->ssh_connection, data->ld_preload,
regs_return_value(regs));
}
out:
if (pname_buf)
kfree(pname_buf);
if (stdin_buf)
kfree(stdin_buf);
if (stdout_buf)
kfree(stdout_buf);
if (buffer)
kfree(buffer);
if (data->free_argv)
kfree(data->argv);
if (pid_tree)
kfree(pid_tree);
if (data->free_ld_preload)
kfree(data->ld_preload);
if (data->free_ssh_connection)
kfree(data->ssh_connection);
if(tty)
tty_kref_put(tty);
return 0;
}(2)mprotect_pre_handler:hook了security_file_mprotect的回调函数,这个函数可能不出名,她是在do_mprotect_pkey中被调用的,整个mprotect的调用链如下:
SYSCALL_DEFINE3(mprotect, .., start, .., len, .., prot)
    -> do_mprotect_pkey(start, len, prot, pkey=-1)
        -> mprotect_fixup(vma, .., start, end, newflags)
            -> change_protection(vma, start, end, newprot, cp_flags)
                -> change_protection_range(vma, addr, end, newprot, cp_flags)
                    -> change_p4d_range(vma, pgd, add, end, newprot, cp_flags)
                        -> change_pmd_range(vma, pud, addr, end, newprot, cp_flags)
                            -> change_pte_range(vma, pmd, addr, end, newprot, cp_flags)
从底层的change_pte_rang、change_pmd_range、change_p4d_range可以看出,mprotect函数最终改变的是页属性,这个也可以用来做反调试的:把关键的代码地址改为可读可执行,但是不可写,就没法下断点调试了;正常情况下,代码也只会被读,然后执行。如果被改写,肯定不是正常情况,所以可以hook这个链条上的方法来监控关键代码是否被调试了。如果页面不可写,强行更改数据会报SIGSEGV错,用ida调试x音的时候没少遇到这种弹窗吧?不过从公开的资料看,Elkeid貌似并没用在x音客户端的防护,只是在字节内部的生产环境,监控的是服务器操作系统的运行;回调函数代码如下:
int mprotect_pre_handler(struct kprobe *p, struct pt_regs *regs)
{
    int target_pid = -1;
    unsigned long prot;

    char *file_path = "-1";
    char *file_buf = NULL;
    char *vm_file_path = "-1";
    char *vm_file_buff = NULL;
    char *exe_path = "-1";
    char *abs_buf = NULL;
    char *pid_tree = NULL;

    struct vm_area_struct *vma;

    //only get PROT_EXEC mprotect info
    //The memory can be used to store instructions which can then be executed. On most architectures,
    //this flag implies that the memory can be read (as if PROT_READ had been specified).
    prot = (unsigned long)p_regs_get_arg2(regs);
    if (prot & PROT_EXEC) {
        abs_buf = kzalloc(PATH_MAX, GFP_ATOMIC);
        exe_path = smith_get_exe_file(abs_buf, PATH_MAX);//当前进程对应文件的路径

        vma = (struct vm_area_struct *)p_regs_get_arg1(regs);
        if (IS_ERR_OR_NULL(vma)) {
            mprotect_print(exe_path, prot, "-1", -1, "-1", "-1");
        } else {
            rcu_read_lock();
            if (!IS_ERR_OR_NULL(vma->vm_mm)) {
                if (!IS_ERR_OR_NULL(&vma->vm_mm->exe_file)) {
                    if (get_file_rcu(vma->vm_mm->exe_file)) {
                        file_buf = kzalloc(PATH_MAX, GFP_ATOMIC);
                        file_path = smith_d_path(&vma->vm_mm->exe_file->f_path, file_buf, PATH_MAX);
                        fput(vma->vm_mm->exe_file);
                    }
                }
#ifdef CONFIG_MEMCG
                target_pid = vma->vm_mm->owner->pid;
#endif
            }

            if (!IS_ERR_OR_NULL(vma->vm_file)) {
                if (get_file_rcu(vma->vm_file)) {
                    vm_file_buff =
                            kzalloc(PATH_MAX, GFP_ATOMIC);
                    vm_file_path = smith_d_path(&vma->vm_file->f_path, vm_file_buff, PATH_MAX);
                    fput(vma->vm_file);
                }
            }
            rcu_read_unlock();
            /*被修改内存属性的pid树,从这里可以看到关键进程是不是在被调试等*/
            pid_tree = smith_get_pid_tree(PID_TREE_LIMIT);
            mprotect_print(exe_path, prot, file_path, target_pid, vm_file_path, pid_tree);
        }

        if (pid_tree)
            kfree(pid_tree);

        if (file_buf)
            kfree(file_buf);

        if (abs_buf)
            kfree(abs_buf);

        if (vm_file_buff)
            kfree(vm_file_buff);
    }
    return 0;
}
(3)ptrace:调试全靠它了,frida和ida这俩卧龙凤雏用的都是这个。要想监控自己的进程是不是被调试了,必须监控ptrace了!回调代码如下:
int ptrace_pre_handler(struct kprobe *p, struct pt_regs *regs)
{
    long request;
    request = (long)p_get_arg1(regs);

    //only get PTRACE_POKETEXT/PTRACE_POKEDATA ptrace
    //Read a word at the address addr in the tracee's memory,
    //returning the word as the result of the ptrace() call.  Linux
    //does not have separate text and data address spaces, so these  linux居然没区分代码和数据空间
    //two requests are currently equivalent.  (data is ignored; but
    //see NOTES.)
    /*PTRACE_PEEKTEXT或PTRACE_PEEKDATA:从addr参数指示的地址开始读取一个WORD的长度的数据并通过返回值传递回来*/
    if (request == PTRACE_POKETEXT || request == PTRACE_POKEDATA) {
        long pid;
        void *addr;
        char *exe_path = DEFAULT_RET_STR;
        char *buffer = NULL;
        char *pid_tree = NULL;

        pid = (long)p_get_arg2(regs);
        addr = (void *)p_get_arg3(regs);

        if (IS_ERR_OR_NULL(addr))
            return 0;

        buffer = kzalloc(PATH_MAX, GFP_ATOMIC);
        /*得到当前文件路径*/
        exe_path = smith_get_exe_file(buffer, PATH_MAX);
        /*得到当前进程的进程树*/
        pid_tree = smith_get_pid_tree(PID_TREE_LIMIT);
        /*打印结果*/
        ptrace_print(request, pid, addr, "-1", exe_path, pid_tree);

        if(buffer)
            kfree(buffer);

        if(pid_tree)
            kfree(pid_tree);
    }

    return 0;
}
不过和ida有点不同,frida使用ptrace attach到进程之后,往进程中注入一个frida-agent-32.so模块,此模块是frida和frida-server通信的重要模块,所以frida不会一直占用ptrace,注入模块完成后便detach,所以ptrace回调函数收集到的数据可能不会太多!
目前所有的handler仅仅是收集进程名称、进程id树、文件路径、文件名或其他相关信息,貌似并未才取任何反制措施。也难怪,这个是用在后台服务端的,不是客户端,没必要才取exit或其他反制措施.....
4、大家平时用frida hook native代码的时候,有onEnter和onLeave两个分支,分别是进入native函数和离开native函数时挂钩,前者一般用来查看或修改函数的参数,后者一般用来查看和修改函数返回值,其实在linux底层已经提供了相应的方式来达到同样的目的:jprobe和kretprobe,并且这两个都是基于kprobe实现的!
参考:
1、https://cloud.tencent.com/developer/article/1874723?from=15425%20%20%20L Linux内核调试技术——kprobe使用与实现
2、https://yaotingting.net/2021/05/09/mprotect-analysis/ Linux/mprotect源码分析
3、https://github.com/bytedance/Elkeid/blob/main/driver/README-zh_CN.md About Elkeid(AgentSmith-HIDS) Driver
4、https://zhuanlan.zhihu.com/p/347313289 systemtap介绍
#396 进程模块 » linux源码解读(十二):系统调用(strace命令0和中断&字节跳动HIDS简要分析 » 2022-10-09 12:42:21
- batsom
- 回复: 0
中断是整个计算机体系最核心的功能之一,关于中断硬件原理可以参考文章末尾的链接1(https://www.cnblogs.com/theseventhson/p/13068709.html),这里不再赘述;中断常见的种类如下:
硬件中断:键盘、鼠标、网卡等输入
软件中断:int 3、int 0xe(page fault)
自定义中断
信号中断(kill -signum),比如kill -9 pid杀死进程
系统异常和错误->利于排错
1、(1)本人刚开始学习的时候,看到很多资料把中断、异常、陷阱放在一起介绍,很容易混淆这3个概念,这里详细列举一下各个概念之间的关系如下:
异步中断:都是由硬件产生的,比如键盘、鼠标、网卡等输入,导致硬件中断的事件是不可预测的(cpu也不可能知道用户啥时候敲键盘、移动鼠标,也不可能提前知道网卡什么时候接收到数据);
同步中断:都是可预见的指令流产生的
fault:最常见的是page fault缺页异常;异常产生后可以重新执行产生异常的指令;逆向时用这个特性可以通过更改目标内存属性产生的page fault异常达到定位关键代码的目的;
trap:
软中断:最常见的就是int 3了,常用于调试器单步调试;trap产生后会执行下一条指令,所以调试器调试时插入int 3才能达到单步调试的目的;
系统调用:3环app要调用内核的api,比如读写文件、通过wifi收发数据、在屏幕打印日志等,需要进入0环执行;linux早期采用int 0x80做系统调用(早期的windows比如xp系统是通过int 0x2e进入内核的);后来x86架构的cpu硬件支持syscall、sysenter这种专门的系统调用(也就是从3环进入0环)指令;由于syscall/sysenter这种cpu原生支持的系统调用指令没有特权级别检查的处理,也没有压栈的操作,所以执行速度比 INT n/IRET 快了不少;如下:时间快了接近1倍!
abort:比如除0
(2)上述所有的操作,统称为中断!再说直白一点,中断的本质就是被打断!举个例子:cpu正在执行A进程的代码,突然用户敲了一下键盘,或者移动了鼠标,这时候就要马上接受用户的输入,然后采取相应的措施处理用户的输入;
接受用户输入的功能已经在硬件上实现了,接下来操作系统需要做的就是实现中断响应的方法了,俗称handler!
中断的种类有很多(linux有256种中断),这么多中断种类,为了方便管理,各自都是有自己的编号的!每个编号自然也会有对应的响应handler(官方叫做中断处理routine);这么多的handler,执行的时候怎么才能快速找到了?
cpu硬件层面有个IDTR寄存器,存放了IDT表的基址;IDT表本质上就是中断号和中断处理handler的映射;cpu硬件层面会根据中断号找到中断处理handler的入口地址,然后跳转到handler执行代码;有些病毒木马会hook键盘输入的handler,借此记录用户输入的所有字符来盗取账号!
早期windows系统下部分杀毒软件为了确保内核或进程安全,也会通过驱动的方式hook一些系统调用SSDT来确保能及时发现恶意程序是否在作恶,比如hook openprocess来监控有没有恶意程序打开自己的进程注入代码(tp保护也是这个原理);
2、操作系统关于中断的开发,最核心的部分就是填充IDT了,本质就是先写好不同中断号的handler,再把handler函数的入口地址填写到正确的IDT表项(当然格式要符合中断描述符的要求)!接下来看看linux 4.9版本是怎样一步一步填充IDT和使用中断的!
(1)填充IDT,也就是中断初始化,在arch\x86\kernel\traps.c种的trap_init函数中:
void __init trap_init(void)
{
    int i;

#ifdef CONFIG_EISA
    void __iomem *p = early_ioremap(0x0FFFD9, 4);

    if (readl(p) == 'E' + ('I'<<8) + ('S'<<16) + ('A'<<24))
        EISA_bus = 1;
    early_iounmap(p, 4);
#endif

    set_intr_gate(X86_TRAP_DE, divide_error);
    set_intr_gate_ist(X86_TRAP_NMI, &nmi, NMI_STACK);
    /* int4 can be called from all */
    set_system_intr_gate(X86_TRAP_OF, &overflow);
    set_intr_gate(X86_TRAP_BR, bounds);
    set_intr_gate(X86_TRAP_UD, invalid_op);
    set_intr_gate(X86_TRAP_NM, device_not_available);
#ifdef CONFIG_X86_32
    set_task_gate(X86_TRAP_DF, GDT_ENTRY_DOUBLEFAULT_TSS);
#else
    set_intr_gate_ist(X86_TRAP_DF, &double_fault, DOUBLEFAULT_STACK);
#endif
    set_intr_gate(X86_TRAP_OLD_MF, coprocessor_segment_overrun);
    set_intr_gate(X86_TRAP_TS, invalid_TSS);
    set_intr_gate(X86_TRAP_NP, segment_not_present);
    set_intr_gate(X86_TRAP_SS, stack_segment);
    set_intr_gate(X86_TRAP_GP, general_protection);
    set_intr_gate(X86_TRAP_SPURIOUS, spurious_interrupt_bug);
    set_intr_gate(X86_TRAP_MF, coprocessor_error);
    set_intr_gate(X86_TRAP_AC, alignment_check);
#ifdef CONFIG_X86_MCE
    set_intr_gate_ist(X86_TRAP_MC, &machine_check, MCE_STACK);
#endif
    set_intr_gate(X86_TRAP_XF, simd_coprocessor_error);

    /* Reserve all the builtin and the syscall vector:
    将前32个中断号都设置为已使用状态
     */
    for (i = 0; i < FIRST_EXTERNAL_VECTOR; i++)
        set_bit(i, used_vectors);
    //设置0x80系统调用的系统中断门
#ifdef CONFIG_IA32_EMULATION
    set_system_intr_gate(IA32_SYSCALL_VECTOR, entry_INT80_compat);
    set_bit(IA32_SYSCALL_VECTOR, used_vectors);
#endif

#ifdef CONFIG_X86_32
    set_system_intr_gate(IA32_SYSCALL_VECTOR, entry_INT80_32);
    set_bit(IA32_SYSCALL_VECTOR, used_vectors);
#endif

    /*
     * Set the IDT descriptor to a fixed read-only location, so that the
     * "sidt" instruction will not leak the location of the kernel, and
     * to defend the IDT against arbitrary memory write vulnerabilities.
     * It will be reloaded in cpu_init() */
    __set_fixmap(FIX_RO_IDT, __pa_symbol(idt_table), PAGE_KERNEL_RO);
    idt_descr.address = fix_to_virt(FIX_RO_IDT);

    /*
     * Should be a barrier for any external CPU state:
     执行CPU的初始化,对于中断而言,在 cpu_init() 中主要是将 idt_descr 放入idtr寄存器中
     */
    cpu_init();

    /*
     * X86_TRAP_DB and X86_TRAP_BP have been set
     * in early_trap_init(). However, ITS works only after
     * cpu_init() loads TSS. See comments in early_trap_init().
     */
    set_intr_gate_ist(X86_TRAP_DB, &debug, DEBUG_STACK);
    /* int3 can be called from all */
    set_system_intr_gate_ist(X86_TRAP_BP, &int3, DEBUG_STACK);

    x86_init.irqs.trap_init();

#ifdef CONFIG_X86_64
    memcpy(&debug_idt_table, &idt_table, IDT_ENTRIES * 16);
    set_nmi_gate(X86_TRAP_DB, &debug);
    set_nmi_gate(X86_TRAP_BP, &int3);
#endif
}
used_vectors变量是一个bitmap,它用于记录中断向量表中哪些中断已经被系统注册和使用,哪些未被注册使用;
(2)trap_init()已经完成了异常和陷阱的初始化。对于linux而言,中断号0~19是专门用于陷阱和故障使用的,20~31一般是intel用于保留的;而外部IRQ线使用的中断为32~255(代码中32号中断被用作汇编指令异常中断)。所以,在trap_init()代码中,专门对0~19号中断的门描述符进行了初始化,最后将新的中断向量表起始地址放入idtr寄存器中;相应的handler定义和实现在arch\x86\kernel\traps.c中,举个大家都熟悉的int 3为例,实现如下:
/* May run on IST stack. */
dotraplinkage void notrace do_int3(struct pt_regs *regs, long error_code)
{
#ifdef CONFIG_DYNAMIC_FTRACE
    /*
     * ftrace must be first, everything else may cause a recursive crash.
     * See note by declaration of modifying_ftrace_code in ftrace.c
     */
    if (unlikely(atomic_read(&modifying_ftrace_code)) &&
        ftrace_int3_handler(regs))
        return;
#endif
    if (poke_int3_handler(regs))
        return;

    ist_enter(regs);
    RCU_LOCKDEP_WARN(!rcu_is_watching(), "entry code didn't wake RCU");
#ifdef CONFIG_KGDB_LOW_LEVEL_TRAP
    if (kgdb_ll_trap(DIE_INT3, "int3", regs, error_code, X86_TRAP_BP,
                SIGTRAP) == NOTIFY_STOP)
        goto exit;
#endif /* CONFIG_KGDB_LOW_LEVEL_TRAP */

#ifdef CONFIG_KPROBES
    if (kprobe_int3_handler(regs))
        goto exit;
#endif

    if (notify_die(DIE_INT3, "int3", regs, error_code, X86_TRAP_BP,
            SIGTRAP) == NOTIFY_STOP)
        goto exit;

    /*
     * Let others (NMI) know that the debug stack is in use
     * as we may switch to the interrupt stack.
     */
    debug_stack_usage_inc();
    preempt_disable();
    cond_local_irq_enable(regs);
    do_trap(X86_TRAP_BP, SIGTRAP, "int3", regs, error_code, NULL);//核心代码
    cond_local_irq_disable(regs);
    preempt_enable_no_resched();
    debug_stack_usage_dec();
exit:
    ist_exit(regs);
}
(3)部分中断比如网卡接受到数据后,通过中断通知cpu来读取;如果数据量很大,cpu读取和处理数据的时候一直关闭中断,可能导致其他中断被延迟甚至忽略(大家肯定都遇到过电脑“卡死”的情况:敲击键盘、移动鼠标都没反应,很有可能是cpu还在处理旧中断,来不及响应新的中断);为了在处理上一个中断的同时避免耽误下一个中断,linux把中断分成了上中断和下中断两部分(类似windows的DPC机制)。上部分代码优先级高,但是代码量较少,耗时不多;下半段执行优先级低但是耗时的代码;上半段执行时依然关闭中断,下半段就可以开中断了;此过程称之为softtirq,图示如下: 
arch\x86\entry\entry_64.S中的调用代码:
/* Call softirq on interrupt stack. Interrupts are off. */
ENTRY(do_softirq_own_stack)
    pushq    %rbp
    mov    %rsp, %rbp
    incl    PER_CPU_VAR(irq_count)
    cmove    PER_CPU_VAR(irq_stack_ptr), %rsp
    push    %rbp                /* frame pointer backlink */
    call    __do_softirq
    leaveq
    decl    PER_CPU_VAR(irq_count)
    ret
END(do_softirq_own_stack)
实际使用时,linux提供了workqueue的机制和接口(create、destroy、insert等)供用户调用;
(4)站在上层3环业务应用的角度,各行业不同的业务都有自己的需求,可能需要自定义大量的中断处理程序,每个处理程序对应不同的中断号用于区分。但是管理中断的硬件设备的引脚是有限的;加上软件中断号也不超过256个中断,万一业务需要的中断号超过256个后该怎么办了? 这个个hashtable实现的原理一摸一样了,以java的hashtable为了:用户刚开始创建hashtable时,会分配一个固定大小的数组作为索引,查询数组上元素的时间复杂度是O(1);如果有多个key的hash结果都一样了,就用链表来存放(key,value),由此解决hash冲突;其实在中断号的管理和hashtable完全一样,一旦中断号重复,同样可以通过链表的方式记录不同中断号、业务所对应的handler,图示如下:
由此依赖,理论上用户使用的中断号数量就没有任何限制了(只要内存容量支持),所以也能自由地让用户自己注册中断服务了(让用户直接操作IDT也危险),妈妈再也不用担心中断号不够用?!调用的接口如上图所示:request_irq(),如下:
int request_irq(unsigned int irq, irq_handler_t handler, unsigned long irqflags, const char *devname, void *dev_id)
unsigned int irq:为要注册中断服务函数的中断号,比如外部中断0就是16,定义在mach/irqs.h
irq_handler_t handler:为要注册的中断服务函数,就是(irq_desc+ irq )->action->handler
unsigned long irqflags: 触发中断的参数,比如边沿触发, 定义在linux/interrupt.h。
const char *devname:中断程序的名字,使用cat /proc/interrupt 可以查看中断程序名字
void *dev_id:传入中断处理程序的参数,注册共享中断时不能为NULL,因为卸载时需要这个做参数,避免卸载其它中断服务函数
(5)有些时候异步中断产生的速度远超cpu处理中断的速度,导致中断无法被及时响应,这时外部的中断就只能被忽略不理会了?万一重要的中断被漏掉了怎么办了?还是举用户键盘输入的例子:当电脑变得卡顿的时候,只要没死机,用户还是可以在键盘输入的,只不过暂时在频幕上看不到输入;过一段时间后用户的输入就会出现在频幕上了,这是怎么做到的了?
做服务器后台上层应用开发的时候,同样会遇到生产者和消费者速度不匹配的时候,最常见的解决办法就是加消息队列来缓冲了,目前市面上最流行的消息缓冲队列非kafka莫属了;底层中断场景遇到这种问题同样可以用类似的思路解决:加个消息队列缓冲,队列的名字就叫kfifo(猜测全称是kernel first in first out)!为了循环利用和节约空间,kfifo采用了环形队列!实际使用时,linux也提供了kfifo_alloc、kfifo_free、kfifo_in、kfifo_out等接口供用户直接调用!
总结对比:为了不漏掉异步中断,linux在两方面做了改进(本质上是使用了两个队列记录信息):
执行中断handler时分成了上、下;两部分;上半部代码很少,可以关闭中断,一般执行很紧急的业务;下半部代码集较多、处理时间较长,可以开中断;用户实际使用时,可以调用work_queue相关接口把下半部任务加入队列
响应异步中断时,为了不漏掉中断请求,也可以增加kfifo队列!
3、系统调用的核心意义:
为什么要用系统调用了?
每个3环app都需要底层的硬件交互,最常见的诸如在屏幕输出字符、读写磁盘的文件、通过网卡收发数据等;和硬件交互,肯定要调用硬件自身的驱动,但是硬件的种类非常多,如果每个app都单独调用硬件的驱动,会导致app开发的成本高昂!此时linux VFS的作用就凸显了: VFS统一对接种类繁多的硬件驱动,起到了类似各种“中台”的作用;上层app仅需调用linux提供的api,底层不同硬件的驱动由linux操作系统去适配(这里就是VFS啦),app不需要自己挨个调用每个硬件的驱动了,极大降低的开发的难度和成本!这里再发一次之前VFS的图示:

同样的硬件只有1个,多个进程或线程都要使用硬件,比如多个进程/线程都要读写磁盘、都要从网卡收发数据,肯定有个先后顺序,这时也需要操作系统来协调;
linux提供的VFS解决了app适配不同硬件的老问题,但是新问题也来了:为了保护VFS和硬件的驱动不被app恶意篡改,VFS和驱动都在0环内核;但是app在3环啊,EIP直接从3环去取0环的指令是会出错的(如果cpu硬件层面不报错,内核代码就毫无安全性可言了,早期的DOS操作系统就是这样的,很容易被ap篡改代码或数据搞崩!),所以cpu硬件层面诞生了软中断:通过int+中断号的形式让EIP顺利进入内核执行代码;而且3环的app只需要执行“int+中断号”即可,完全看不见具体的VFS或驱动代码是怎么写的,极大的简化了app调用api的方法,也保护了VFS或驱动的代码安全(EIP从3环进入0环后,只能按照硬件厂家事先写好的驱动代码执行,没法干其他任何事情了),一箭双雕!
因为int要检查特权级别,还要出栈入栈保存上下文,比较耗时,cpu在硬件层面诞生了专门的系统调用指令:syscall/sysenter,但是核心功能和int是一样的!
4、 系统调用在逆向/安全防护的应用:以字节跳动HIDS为例
早期在windows下无论是杀毒软件,还是逆向破解的程序,都喜欢hook SSDT来监控3环的app在干啥,比如hook openProcess就知道3环有没有app在调试自己;在linux平台上原理类似,也可以通过hook 系统调用来做防护,拿字节跳动的HIDS举例(末尾参考5、6两个链接):
(1)mprotect 函数挂钩:函数本是用来设置物理内存页的rwx属性的,利用这个功能可以用来调试和反调试
调试: 先把关键的物理页设置为不可写,一旦有代码试图写该页就会产生page fault异常,由此可以定位关键的代码,这就是传说中的(硬件)内存读写断点,一般用来定来定位关键的加密字段生成代码,也可以用来注入自己的恶意代码;
反调试:把物理内存页面设置为不可写,调试的时候由于需要插入int 3,遇到这种不可写的内存是会报错;大家用ida调试时经常遇到各种signal弹窗告警有一部分就是内存属性不可写导致的!
(2)open函数挂钩:函数本来是用来打开文件、获取文件句柄的,利用这个可以用来:
检测自己的so是否被第三方调用:loadlibrary函数底层最终会调用linux系统提供的open函数打开so,然后才能加载so到内存执行代码
(3)prctl函数挂钩:函数原本是用来设置进程属性的,利用这个可以用来:
逆向调试
设置PR_SET_PTRACER属性用来把代码注入到目标进程,frida底层貌似用的就是ptrace注入代码;
改进程/线程的名字躲避安全防护的检测
安全防护
检测自己的进程/线程名字是否被更改;
检测自己的进程/线程是否被设置PR_SET_PTRACER或PR_SET_MM属性
(4)ptrace函数挂钩:这可能是逆向最有用的系统调用了,frida底层貌似就用了这个函数;HIDS hook这个函数记录了关键信息有:
POKETEXT/POKEDATA
进程ID
内存地址
拷贝的数据
执行程序
进程树
这样就很容易检测自己的进程是不是正在被调试了!
还有很多重要的系统调用如execve、init_module等都被hook了,这里不再赘述!
5、其实linux系统有现成的strace工具可以查看进程都触发了哪些系统调用,以打开文件为例,命令很简单:cat 1.txt;为了看清楚cat命令做了哪些系统调用,可以用strace来查看,完整的命令是:“strace cat 1.txt”,结果如下:
└─# strace cat 1.txt
execve("/usr/bin/cat", ["cat", "1.txt"], 0x7ffd36672918 /* 51 vars */) = 0
brk(NULL)                               = 0x55cbf772d000
access("/etc/ld.so.preload", R_OK)      = -1 ENOENT (No such file or directory)
openat(AT_FDCWD, "/etc/ld.so.cache", O_RDONLY|O_CLOEXEC) = 3
fstat(3, {st_mode=S_IFREG|0644, st_size=94692, ...}) = 0
mmap(NULL, 94692, PROT_READ, MAP_PRIVATE, 3, 0) = 0x7fc9c4d5e000
close(3)                                = 0
openat(AT_FDCWD, "/lib/x86_64-linux-gnu/libc.so.6", O_RDONLY|O_CLOEXEC) = 3
read(3, "\177ELF\2\1\1\3\0\0\0\0\0\0\0\0\3\0>\0\1\0\0\0@n\2\0\0\0\0\0"..., 832) = 832
fstat(3, {st_mode=S_IFREG|0755, st_size=1839792, ...}) = 0
mmap(NULL, 8192, PROT_READ|PROT_WRITE, MAP_PRIVATE|MAP_ANONYMOUS, -1, 0) = 0x7fc9c4d5c000
mmap(NULL, 1852680, PROT_READ, MAP_PRIVATE|MAP_DENYWRITE, 3, 0) = 0x7fc9c4b97000
mprotect(0x7fc9c4bbc000, 1662976, PROT_NONE) = 0
mmap(0x7fc9c4bbc000, 1355776, PROT_READ|PROT_EXEC, MAP_PRIVATE|MAP_FIXED|MAP_DENYWRITE, 3, 0x25000) = 0x7fc9c4bbc000
mmap(0x7fc9c4d07000, 303104, PROT_READ, MAP_PRIVATE|MAP_FIXED|MAP_DENYWRITE, 3, 0x170000) = 0x7fc9c4d07000
mmap(0x7fc9c4d52000, 24576, PROT_READ|PROT_WRITE, MAP_PRIVATE|MAP_FIXED|MAP_DENYWRITE, 3, 0x1ba000) = 0x7fc9c4d52000
mmap(0x7fc9c4d58000, 13576, PROT_READ|PROT_WRITE, MAP_PRIVATE|MAP_FIXED|MAP_ANONYMOUS, -1, 0) = 0x7fc9c4d58000
close(3)                                = 0
arch_prctl(ARCH_SET_FS, 0x7fc9c4d5d580) = 0
mprotect(0x7fc9c4d52000, 12288, PROT_READ) = 0
mprotect(0x55cbf6e3e000, 4096, PROT_READ) = 0
mprotect(0x7fc9c4da0000, 4096, PROT_READ) = 0
munmap(0x7fc9c4d5e000, 94692)           = 0
brk(NULL)                               = 0x55cbf772d000
brk(0x55cbf774e000)                     = 0x55cbf774e000
openat(AT_FDCWD, "/usr/lib/locale/locale-archive", O_RDONLY|O_CLOEXEC) = 3
fstat(3, {st_mode=S_IFREG|0644, st_size=3041456, ...}) = 0
mmap(NULL, 3041456, PROT_READ, MAP_PRIVATE, 3, 0) = 0x7fc9c48b0000
close(3)                                = 0
fstat(1, {st_mode=S_IFCHR|0600, st_rdev=makedev(0x88, 0), ...}) = 0
openat(AT_FDCWD, "1.txt", O_RDONLY)     = 3
fstat(3, {st_mode=S_IFREG|0644, st_size=5, ...}) = 0
fadvise64(3, 0, 0, POSIX_FADV_SEQUENTIAL) = 0
mmap(NULL, 139264, PROT_READ|PROT_WRITE, MAP_PRIVATE|MAP_ANONYMOUS, -1, 0) = 0x7fc9c488e000
read(3, "11111", 131072)                = 5
write(1, "11111", 511111)                    = 5
read(3, "", 131072)                     = 0
munmap(0x7fc9c488e000, 139264)          = 0
close(3)                                = 0
close(1)                                = 0
close(2)                                = 0
exit_group(0)                           = ?
+++ exited with 0 +++
从上面的系统调用来看,一个简单的打开文件,尽然使用了这么多的系统调用,常见的execve、mmap、open、read、write、cloes等都用上了!每次系统调用从3环进出0环时都要保存上下文,效率很低,建议少用系统调用!
参考:
1、https://www.cnblogs.com/theseventhson/p/13068709.html 实模式中断原理
2、https://www.cnblogs.com/jiading/p/12606978.html linux中断和系统调用解析
3、https://www.cnblogs.com/LittleHann/p/4111692.html?utm_source=tuicool&utm_medium=referral Linux Systemcall Int0x80方式、Sysenter/Sysexit Difference Comparation
4、https://bbs.pediy.com/thread-226254.htm syscall/sysenter具体过程
5、https://mp.weixin.qq.com/s/rm_hXHb_YBWQqmifgAqfaw 最后防线:字节跳动HIDS分析
6、https://github.com/EBWi11/AgentSmith-HIDS https://github.com/bytedance/Elkeid/blo … E-zh_CN.md
7、https://blog.csdn.net/hunter___/article/details/83063131 prctl()函数详解
8、https://www.jianshu.com/p/b1f9d6911c90 ptrace使用介绍
9、https://www.cnblogs.com/tolimit/p/4415348.html linux中断源码分析-初始化
10、https://www.cnblogs.com/vedic/p/11069249.html linux workqueue讲解
11、https://blog.csdn.net/MyArrow/article/details/8090504 workqueue接口函数
#397 进程模块 » linux源码解读(十一):多进程/线程的互斥和同步&JVM同步原理 » 2022-10-09 12:32:26
- batsom
- 回复: 0
为了提高cpu的使用率,硬件层面的cpu和软件层面的操作系统都支持多进程/多线程同时运行,这就必然涉及到同一个资源的互斥/有序访问,保证结果在逻辑上正确;由此诞生了原子变量、自旋锁、读写锁、顺序锁、互斥体、信号量等互斥和同步的手段!这么多的方式、手段,很容易混淆,所以这里做了这6种互斥/同步方式要点的总结和对比,如下:

详细的代码解读可以参考末尾的链接,都比较详细,这里不再赘述!从这些结构体的定义可以看出,在C语言层面并没有太大的区别,都是靠着某个变量(再直白一点就是某个内存)的取值来决定是否继续进入临界区执行;如果当前无法进入临界区,要么一直霸占着cpu自旋空转,要么主动sleep把cpu让出给其他进程,然后加入等待队列待唤醒; 这里最基本的两种数据结构就是原子变量和自旋锁了,C层面的结构体如上图所示。然而所有的代码都会经过编译器变成汇编代码,不同硬件平台在汇编层面又是怎么实现这些基本的功能了?
1、先看看windows+x86平台是怎么实现自旋锁的,最精妙的就是红框框这句了:lock bts dword ptr [ecx],0; 这句代码加了lock前缀,保证了当前cpu对[ecx]这块内存的独占;在这行代码没执行完前,其他cpu是无法读写[ecx]这块内存的,这很关键,保证了代码执行的原子性(能完整执行而不被打断)!正式分析前,先解释一下bts dword ptr [ecx],0的功能:
把[ecx]的第0位赋给标志位寄存器的CF位
把[ecx]的第0位设置置1
由于加了lock前缀,上述两个功能在cpu硬件层面会保证100%执行完成! 在执行bts代码时:
(1)如果[ecx]是0,说明锁还没被进程/线程获取,还是空闲状态,当前进程/线程是可以获取锁,然后继续进入临界区执行的。那么获取锁和继续进入临界区着两个功能该怎么用代码实现了?
获取锁:锁的本质就是一段内存,这里是[ecx],所以需要把[ecx]置1,这个功能bts指令执行完后就能实现
继续进入临界区:此时CF=0,会导致下面的jb语句不执行,而后就是retn 4返回了,标明获取锁的方法已经执行完毕,调用该方法的进程/线程可以继续往下执行了,这里取名A;
(2)如果A还在临界区执行,此时B也调用这个获取锁的方法,B该怎么执行了?因为A还在临界区,所以此时[ecx]还是1,锁还在A手上;B执行bts语句的结果:
把[ecx]的第0位赋值给CF;由于此时[ecx]=1,所以CF=1
把[ecx]置1,这里没变
bts执行完毕后继续下一条jb代码:由于CF=1,jb跳转的条件满足,立即跳转到0x469a12处执行;
test和jz代码检查[ecx]的值,如果还是1,也就是锁还被占用,就不执行jz跳转,继续往下执行pause和jmp 0x469a12,周而复始地检查[ecx]的值,也就是锁是否被释放了;自旋锁的阻塞和空转就是这样实现的!
如果A执行完毕退出临界区,也释放了锁,让[ecx]=1;B执行tes时发现了[ecx]=1,会通过jz跳回0x469a08处获取执行bts语句获取锁,然后退出该函数进入临界区
从上述流程可以看出:spinlock没有队列机制,等待锁的进程不一定是先到先得;如果有多个进程都在等锁,就看谁运气好,先执行jz 0x469a08者就能先跳回去执行bts得到锁!
以前需要执行多行代码才能实现的功能,现在一行代码就完成了,从而避免了被打断的可能,保证了功能执行的原子性!

(3)上述spinlock是windows的实现,linux在x86平台是怎么实现的了?如下:核心还是使用lock前缀让decb执行时其他cpu不能访问lock->slock这块内存,保证decb执行的原子性!这里的空转和阻塞是通过rep;nop来实现的,据说效率比pause要高!
typedef struct {
                unsigned int slock;
        } raw_spinlock_t;#define __RAW_SPIN_LOCK_UNLOCKED { 1 }
static inline void __raw_spin_lock(raw_spinlock_t *lock)
       {
                asm volatile("\n1:\t"
                        LOCK_PREFIX " ; decb %0\n\t"
                // lock->slock减1
                        "jns 3f\n"
                //如果不为负.跳转到3f.3f后面没有任何指令,即为退出
                        "2:\t"
                        "rep;nop\n\t"
                //重复执行nop.nop是x86的小延迟函数
                        "cmpb $0,%0\n\t"
                        "jle 2b\n\t"
                //如果lock->slock不大于0,跳转到标号2,即继续重复执行nop
                        "jmp 1b\n"
                //如果lock->slock大于0,跳转到标号1,重新判断锁的slock成员
                        "3:\n\t"
                        : "+m" (lock->slock) : : "memory");
      }
相比之下,解锁就简单多了:直接把lock->slock置1,这里也不需要lock指令了;知道原因么? 解锁指令是临界区的最后一行代码,说明同一时间只能有一个进程/线程执行该代码,这种情况还有必要加lock么?这点也引申出了spinlock的另一个特性:
A进程加锁,也只能由A进程解锁;如果A进程在执行临界区时意外退出,这锁就解不了了!
static inline void __raw_spin_unlock(raw_spinlock_t *lock)
        {
                asm volatile("movb $1,%0" : "+m" (lock->slock) :: "memory");
        }
2、再来看看arm v6及以上硬件平台是怎么实现spinlock的,如下:
#if __LINUX_ARM_ARCH__ < 6
        #error SMP not supported on pre-ARMv6 CPUs //ARMv6后,才有多核ARM处理器
        #endif
        ……
        static inline void __raw_spin_lock(raw_spinlock_t *lock)
        {
                unsigned long tmp;
                __asm__ __volatile__(
        "1: ldrex        %0, [%1]\n"
        //取lock->lock放在 tmp里,并且设置&lock->lock这个内存地址为独占访问
        "        teq %0, #0\n"
        //测试lock_lock是否为0,影响标志位z
        #ifdef CONFIG_CPU_32v6K
        "        wfene\n"
        #endif
        "        strexeq %0, %2, [%1]\n"
        //如果lock_lock是0,并且是独占访问这个内存,就向lock->lock里写入1,并向tmp返回0,同时清除独占标记
        "        teqeq %0, #0\n"
        //如果lock_lock是0,并且strexeq返回了0,表示加锁成功,返回
        " bne 1b"
        //如果上面的条件(1:lock->lock里不为0,2:strexeq失败)有一个符合,就在原地打转
                : "=&r" (tmp) //%0:输出放在tmp里,可以是任意寄存器
                : "r" (&lock->lock), "r" (1)
        //%1:取&lock->lock放在任意寄存器,%2:任意寄存器放入1
                : "cc"); //状态寄存器可能会改变
                smp_mb();
        }
核心的指令就是ldrex和strexeq了;ldr和str指令很常见,就是从内存加载数据到寄存器,然后从寄存器输出到内存;两条指令分别加ex(就是exclusive独占),可以让总线监控LDREX和STREX指令之间有无其它CPU和DMA来存取过这个地址,若有的话STREX指令的第一个寄存器里设置为1(动作失败); 若没有,指令的第一个寄存器里设置为0(动作成功);个人觉得和x86的lock指令没有本质区别,都是通过独占某块内存然后设置为1达到加锁的目的!
解锁的原理和x86一样,直接用str设置为1就行了,都不需要再独占了,代码如下:
static inline void __raw_spin_unlock(raw_spinlock_t *lock)
        {
                smp_mb();
                __asm__ __volatile__(
        "         str %1, [%0]\n" // 向lock->lock里写0,解锁
        #ifdef CONFIG_CPU_32v6K
        "         mcr p15, 0, %1, c7, c10, 4\n"
        "         sev"
        #endif
                :
                : "r" (&lock->lock), "r" (0) //%0取&lock->lock放在任意寄存器,%1:任意寄存器放入0
                : "cc");
        }
atomic的实现方式类似,这里不再赘述!最后总结如下:
不管是锁、互斥体还是信号量,都是通过独占某块内存、然后置1的方式加锁的
如果加锁成功,进入临界区执行
如果加锁失败,要么sleep让出cpu,自己加入wait队列,直到被唤醒;要么自旋原地等待,同时继续尝试加锁,直到成功加锁为止;
临界区执行完毕后在不独占内存的情况下解锁
3、上述都是C语言和汇编层面实现的互斥和同步,那么cpu硬件层面的lock或ldrex+strex又是怎么实现的了?
早期的cpu直接锁总线,也就是cpu1独占某块内存的时候其他cpu是没法继续使用总线的,这么一来其他cpu都只能等了,效率很低
近些年cpu采用了缓存一致性协议在多个cpu之间同步内存的数据,最出名的应该是intel的MESI协议了!
4、这里扩展一下,介绍另一个大家耳熟能详的软件产品:JVM;JVM里面有两个关键词:synchronized和volatile,著名的DCL代码如下:
public class Singleton {
    private volatile static Singleton uniqueSingleton;

    private Singleton() {
    }

    public Singleton getInstance() {
        if (null == uniqueSingleton) {
            synchronized (Singleton.class) {
                if (null == uniqueSingleton) {
                    uniqueSingleton = new Singleton();
                }
            }
        }
        return uniqueSingleton;
    }
}
这两者在底层cpu汇编层面又是怎么实现的了?以x86架构的cpu为例:
(1)先来看看volatile:底层用的还是lock实现的!
JVM底层汇编代码如下:
inline jint     Atomic::add    (jint     add_value, volatile jint*     dest) {
  jint addend = add_value;
  int mp = os::is_MP();
  __asm__ volatile (  LOCK_IF_MP(%3) "xaddl %0,(%2)"
                    : "=r" (addend)
                    : "0" (addend), "r" (dest), "r" (mp)
                    : "cc", "memory");
  return addend + add_value;
}
(2)这里顺便介绍一下atomic:不用syncronized也能实现变量在多线程之间同步,其底层原理用的还是lock关键字,不过由于涉及到临界区,还用了cmpxchg,连起来就是lock cmpxchg,在https://github.com/JetBrains/jdk8u_hotspot/blob/master/src/os_cpu/linux_x86/vm/atomic_linux_x86.inline.hpp 这里有完整的实现代码,如下:
inline jint     Atomic::cmpxchg    (jint     exchange_value, volatile jint*     dest, jint     compare_value) {
  int mp = os::is_MP();
  __asm__ volatile (LOCK_IF_MP(%4) "cmpxchgl %1,(%3)"
                    : "=a" (exchange_value)
                    : "r" (exchange_value), "a" (compare_value), "r" (dest), "r" (mp)
                    : "cc", "memory");
  return exchange_value;
}
上面两段C代码在内联汇编前面都加上了volatile,并且还特意用不同的颜色标记了,说明还是个关键词,难道java层的volatile是依赖C语言层的volatile实现的?注意:volatile关键词的作用很多,比如:
编译器层面
不要自作聪明优化指令,比如合并、甚至删除某些代码或指令,典型的如嵌入式的存储器映射的硬件寄存器;
不要打乱原作者代码的顺序
操作系统层面:需要共享的变量加上前缀
中断handler中修改的供其它程序检测的变量;
多线程执行时,强制某些共享的变量需要从内存读取数据,而不是用cpu自己的缓存,避免读到脏数据;
cpu层面
汇编指令加lock锁定内存区域;
通过缓存一致性协议在不同的cpu核之间同步内存的值,典型的如intel的mesi协议;
(3)大家有没有注意到上面的synchronized (Singleton.class),用的是一个class;既然所有互斥/同步都是通过读写某个特定的内存达到目的的,这里又是通过怎么读写class对象的内存达到目的的了?
java和c++的类对象实例在内存的布局有些许不同:c++类实例有虚函数表指针,而java对象的实例是没有的,取而代之的是markword和类型执行;markword有64bit,类型指针可能是32bit,也能是64bit,布局如下:

同步方便最核心的字段就是markword了,其包含如下:利用的就是最低2bit的锁标志位来标识当前对象锁状态的:
(4)延展一下,对象实例结构详细说明如下: 
对象头相当于整个对象的“元数据meta data”,是对整个对象的详细说明。我个人觉得最核心的是实例数据instance data,这里包含了所有的类成员变量(类似C语言的struct结构体,人为聚集了所需的所有字段),包括继承了父类的成员变量!从上述分配策略看,相同宽度的字段总是被分配到一起。在满足这个前提条件的情况下,在父类中定义的变量会出现在子类之前;这里啰嗦几句: 类最核心的是成员变量,类中所有的方法都是用来读、写这些成员变量的!
(5)jvm synchronized实现历史:
早期jvm遇到synchronized直接调用操作系统提供的api切换线程。由于产生了线程切换,并且从用户态进入内核态,需要保存上下文context,开销非常高,导致效率低
后期搞了个“偏向锁”:第一个synchronized(obj)的线程会在obj的head记录标记一下,对外官宣这个obj已经被占用了。如果此时有其他线程竞争同一个obj的锁,该线程会开始自旋;如果自旋10次后还没等到obj的锁释放,jvm会再次调用操作系统的接口让该线程进入wait队列等待,避免自旋空转浪费cpu。所以这种方式的本质就是:竞争的线程先自旋CAS等待,如果10次后还是得不到锁,就进入调用os的接口切换线程,进入wait队列放弃cpu,避免浪费cpu时间片!
总结一下:
如果加锁的代码少、执行时间短,并且并发的线程数量少(避免大量线程都在自旋浪费cpu),适合自旋
如果加锁代码多、执行时间长,并且并发线程多,为了避免部分线程被“饿死”,建议直接调用os的接口做线程切换,进入wait队列放弃cpu
参考:
1、https://blog.51cto.com/u_15127625/2731250 linux竞争并发
2、https://blog.csdn.net/u012603457/article/details/52895537 linux源码自旋锁的实现
3、https://zhuanlan.zhihu.com/p/364044713 linux读写锁
4、https://zhuanlan.zhihu.com/p/364044850 linux顺序锁
5、https://blog.csdn.net/zhoutaopower/article/details/86611798 linux内核同步-顺序锁
6、https://zhuanlan.zhihu.com/p/363982620 linux原子操作
7、https://zhuanlan.zhihu.com/p/364130923 linux 互斥体
8、https://www.cnblogs.com/crybaby/p/13061627.html linux同步原语-信号量
9、https://codeantenna.com/a/F2a5C0tK3a Linux中Spinlock在ARM及X86平台上的实现
10、https://www.cnblogs.com/yc_sunniwell/archive/2010/07/14/1777432.html c/c++中volatile关键词详解
#398 内存管理模块 » linux源码解读(十):内存管理——内存分配和释放关键函数分析&ZGC垃圾回收 » 2022-10-09 12:22:07
- batsom
- 回复: 0
上文介绍了buddy和slab内存管理的思路,本文看看这些算法的关键代码都是怎么写的,这里用的是4.9版本的源码;重新把这个图贴出来,方便后续理解代码!
1、如上图所示,slab算法的入口就是kmem_cache结构体了,和其他重要结构体管理的方式类似,这里也统一采用数组的形式管理所有的kmem_cache结构体,所以也会根据用户输入的参数从数组里面找到合适的kmem_cache结构体,如下:
/*
 * Conversion table for small slabs sizes / 8 to the index in the
 * kmalloc array. This is necessary for slabs < 192 since we have non power
 * of two cache sizes there. The size of larger slabs can be determined using
 * fls.
 * 通过size_index_elem求出8的倍数后,继续查找kmem_cache的index;
 * 从这里可以直观看到用户申请不同size内存对应的kmem_cache的index
 */
static s8 size_index[24] = {
    3,    /* 8 */
    4,    /* 16 */
    5,    /* 24 */
    5,    /* 32 */
    6,    /* 40 */
    6,    /* 48 */
    6,    /* 56 */
    6,    /* 64 */
    1,    /* 72 */
    1,    /* 80 */
    1,    /* 88 */
    1,    /* 96 */
    7,    /* 104 */
    7,    /* 112 */
    7,    /* 120 */
    7,    /* 128 */
    2,    /* 136 */
    2,    /* 144 */
    2,    /* 152 */
    2,    /* 160 */
    2,    /* 168 */
    2,    /* 176 */
    2,    /* 184 */
    2    /* 192 */
};
/*
8字节对齐,也就是8的多少倍?
*/
static inline int size_index_elem(size_t bytes)
{
    return (bytes - 1) / 8;
}

/*
 * Find the kmem_cache structure that serves a given size of
 * allocation
 */
struct kmem_cache *kmalloc_slab(size_t size, gfp_t flags)
{
    int index;

    if (unlikely(size > KMALLOC_MAX_SIZE)) {
        WARN_ON_ONCE(!(flags & __GFP_NOWARN));
        return NULL;
    }
    /*如果用户申请的size小于192byte*/
    if (size <= 192) {
        if (!size)
            return ZERO_SIZE_PTR;

        index = size_index[size_index_elem(size)];
    } else
    /*如果用户申请的size大于192byte*/
        index = fls(size - 1);

#ifdef CONFIG_ZONE_DMA
    if (unlikely((flags & GFP_DMA)))
        return kmalloc_dma_caches[index];

#endif
    return kmalloc_caches[index];
}
上面的size_index数组看起来可能还有些抽象,这里有个更直接的映射表:object的size和kmem_cache的index、名字之间的映射关系,比如用户申请96byte的内存,那么这个kmem_cache的index就是1,和size_index数组刚好吻合;
/*
 * kmalloc_info[] is to make slub_debug=,kmalloc-xx option work at boot time.
 * kmalloc_index() supports up to 2^26=64MB, so the final entry of the table is
 * kmalloc-67108864.
 */
static struct {
    const char *name;
    unsigned long size;
} const kmalloc_info[] __initconst = {
    {NULL,                      0},        {"kmalloc-96",             96},
    {"kmalloc-192",           192},        {"kmalloc-8",               8},
    {"kmalloc-16",             16},        {"kmalloc-32",             32},
    {"kmalloc-64",             64},        {"kmalloc-128",           128},
    {"kmalloc-256",           256},        {"kmalloc-512",           512},
    {"kmalloc-1024",         1024},        {"kmalloc-2048",         2048},
    {"kmalloc-4096",         4096},        {"kmalloc-8192",         8192},
    {"kmalloc-16384",       16384},        {"kmalloc-32768",       32768},
    {"kmalloc-65536",       65536},        {"kmalloc-131072",     131072},
    {"kmalloc-262144",     262144},        {"kmalloc-524288",     524288},
    {"kmalloc-1048576",   1048576},        {"kmalloc-2097152",   2097152},
    {"kmalloc-4194304",   4194304},        {"kmalloc-8388608",   8388608},
    {"kmalloc-16777216", 16777216},        {"kmalloc-33554432", 33554432},
    {"kmalloc-67108864", 67108864}
};
最关键的就是index的计算方法了;小于192byte直接查表,大于192byte调用fls,find last bit set函数查找index,代码如下:
/*
 * fls = Find Last Set in word
 * @result: [1-32]
 * fls(1) = 1, fls(0x80000000) = 32, fls(0) = 0
 */
static inline __attribute__ ((const)) int fls(unsigned long x)
{
    if (__builtin_constant_p(x))
           return constant_fls(x);

    return 32 - clz(x);
}

/*
 * Count the number of zeros, starting from MSB
 * Helper for fls( ) friends
 * This is a pure count, so (1-32) or (0-31) doesn't apply
 * It could be 0 to 32, based on num of 0's in there
 * clz(0x8000_0000) = 0, clz(0xFFFF_FFFF)=0, clz(0) = 32, clz(1) = 31
 */
static inline __attribute__ ((const)) int clz(unsigned int x)
{
    unsigned int res;

    __asm__ __volatile__(
    "    norm.f  %0, %1        \n"
    "    mov.n   %0, 0        \n"
    "    add.p   %0, %0, 1    \n"
    : "=r"(res)
    : "r"(x)
    : "cc");

    return res;
}
核心作用是返回输入参数的最高有效bit位(从低位往左数最后的有效bit位)的序号,该序号与常规0起始序号不同,它是1起始的(当没有有效位时返回0);
要点:
kmem_cachess数组最多13个元素,也就是说最多有13种不同size的object;
如果用户申请的size小于192byte,直接查size_index数组就可以找到kmem_cache的index
如果用户申请的size大于192byte,返回输入参数的最高有效bit位(从低位往左数最后的有效bit位)的序号
2、kmem_cache得到后,下一步就是找到slab了,linux是这样干的:
static __always_inline void *
slab_alloc(struct kmem_cache *cachep, gfp_t flags, unsigned long caller)
{
    unsigned long save_flags;
    void *objp;

    flags &= gfp_allowed_mask;
    cachep = slab_pre_alloc_hook(cachep, flags);
    if (unlikely(!cachep))
        return NULL;

    cache_alloc_debugcheck_before(cachep, flags);
    /*保存flag寄存器的状态,然后关中断,避免被中断切换进程*/
    local_irq_save(save_flags);
    /*得到了返回值*/
    objp = __do_cache_alloc(cachep, flags);
    /*重新打开中断*/
    local_irq_restore(save_flags);
    objp = cache_alloc_debugcheck_after(cachep, flags, objp, caller);
    prefetchw(objp);

    if (unlikely(flags & __GFP_ZERO) && objp)
        memset(objp, 0, cachep->object_size);

    slab_post_alloc_hook(cachep, flags, 1, &objp);
    return objp;
}
函数的返回值objp是调用_do_cache_alloc返回的,重点继续分析这个函数(其他函数都是陪衬┭┮﹏┭┮);经过一系列的调用链,最终来到了这里:返回值是objp,来自两个地方:先检查cpu的缓存(也就是array_cache数组),如果还有就从缓存数组分配;如果没有就继续调用cache_alloc_refill从 3 个 slabs_(free/partial/full)中寻找可用的object,并将其填充到 array_cache 中;
static inline void *____cache_alloc(struct kmem_cache *cachep, gfp_t flags)
{
    void *objp;
    struct array_cache *ac;

    check_irq_off();
    /*先看array_cache缓存是不是还有*/
    ac = cpu_cache_get(cachep);
    if (likely(ac->avail)) {
        ac->touched = 1;
        objp = ac->entry[--ac->avail];

        STATS_INC_ALLOCHIT(cachep);
        goto out;
    }

    STATS_INC_ALLOCMISS(cachep);
    /*array_cache缓存没了再重新寻找可用的object*/
    objp = cache_alloc_refill(cachep, flags);
    /*
     * the 'ac' may be updated by cache_alloc_refill(),
     * and kmemleak_erase() requires its correct value.
     */
    ac = cpu_cache_get(cachep);

out:
    /*
     * To avoid a false negative, if an object that is in one of the
     * per-CPU caches is leaked, we need to make sure kmemleak doesn't
     * treat the array pointers as a reference to the object.
     */
    if (objp)
        kmemleak_erase(&ac->entry[ac->avail]);
    return objp;
}
和objp相关的两个函数都操作了arry_cache,这究竟是个啥结构体了?如下:
/*
 * struct array_cache
 *
 * Purpose:
 * - LIFO ordering, to hand out cache-warm objects from _alloc
 * - reduce the number of linked list operations
 * - reduce spinlock operations
 *
 * The limit is stored in the per-cpu structure to reduce the data cache
 * footprint.
 * 给每个cpu设置的对象缓存池
 */
struct array_cache {
    unsigned int avail;/*缓存池中可用的object数量*/
    unsigned int limit;/*最大object数量*/
    unsigned int batchcount;/*要从 slab_list 转移进本地高速缓存对象的数量,或从本地高速缓存中转移出去的 obj 数量*/
    unsigned int touched;/*从缓存池移除对象时设置为1,否则设置为0*/
    void *entry[];    /* 保存释放的object实例指针
             * Must have this definition in here for the proper
             * alignment of array_cache. Also simplifies accessing
             * the entries.
             */
};
这个结构体带来的好处:
提高cpu L1/L2/L3 cache的命中率:当此CPU上释放object后,如果再次申请一个相同大小的object时,原object很可能还在这个CPU的 L1/L2/L3 cache中,所以为每个CPU维护一个这样的链表,当需要新的object时,会优先尝试从当前CPU的本地CPU空闲object链表获取相应大小的object,此时很有可能命中cpu的L1/L2/L3 cache,提升分配效率;
减少锁的竞争:假设多个CPU同时申请同样大小的object,为了互相同步,需要暂时多个cpu之间暂时互斥,导致分配效率降低;有个array_cache后,申请object时会先从cpu自己的array_cache查找,减少了cpu之间互斥的概率,提升分配效率;
结构体的字段确定后,就要填充了,在cache_alloc_refill函数种完成,代码如下:
static void *cache_alloc_refill(struct kmem_cache *cachep, gfp_t flags)
{
    int batchcount;
    struct kmem_cache_node *n;
    struct array_cache *ac, *shared;
    int node;
    void *list = NULL;
    struct page *page;
    /*确保中断已经关闭*/
    check_irq_off();
    node = numa_mem_id();

    ac = cpu_cache_get(cachep);
    batchcount = ac->batchcount;
    if (!ac->touched && batchcount > BATCHREFILL_LIMIT) {
        /*
         * If there was little recent activity on this cache, then
         * perform only a partial refill.  Otherwise we could generate
         * refill bouncing.
         */
        batchcount = BATCHREFILL_LIMIT;
    }
    n = get_node(cachep, node);

    BUG_ON(ac->avail > 0 || !n);
    shared = READ_ONCE(n->shared);
    if (!n->free_objects && (!shared || !shared->avail))
        goto direct_grow;

    spin_lock(&n->list_lock);
    shared = READ_ONCE(n->shared);

    /* See if we can refill from the shared array */
    //从全局共享空闲对象中转移空闲对象到本地 CPU 空闲对象链表上
    if (shared && transfer_objects(ac, shared, batchcount)) {
        shared->touched = 1;
        goto alloc_done;
    }

    while (batchcount > 0) {
        /* Get slab alloc is to come from. */
        page = get_first_slab(n, false);//从 slab 中获取空闲 slab
        if (!page)
            goto must_grow;

        check_spinlock_acquired(cachep);
        /*从free slab中获取空闲object,转移到本地CPU空闲object链表上*/
        batchcount = alloc_block(cachep, ac, page, batchcount);
        fixup_slab_list(cachep, n, page, &list);
    }

must_grow:
    n->free_objects -= ac->avail;
alloc_done:
    spin_unlock(&n->list_lock);
    fixup_objfreelist_debug(cachep, &list);

direct_grow:
    if (unlikely(!ac->avail)) {
        /* Check if we can use obj in pfmemalloc slab */
        if (sk_memalloc_socks()) {
            void *obj = cache_alloc_pfmemalloc(cachep, n, flags);

            if (obj)
                return obj;
        }
        /*当slab中都没有空闲object时,就从buddy系统中获取内存*/
        page = cache_grow_begin(cachep, gfp_exact_node(flags), node);

        /*
         * cache_grow_begin() can reenable interrupts,
         * then ac could change.
         */
        ac = cpu_cache_get(cachep);
        if (!ac->avail && page)
            alloc_block(cachep, ac, page, batchcount);
        cache_grow_end(cachep, page);

        if (!ac->avail)
            return NULL;
    }
    ac->touched = 1;

    return ac->entry[--ac->avail];
}
整个array_cache填充过程总结如下:
首先会从本地 CPU 空闲object链表中尝试获取一个object用于分配:如果失败,则检查所有CPU共享的空闲object链表链表中是否存在,并且空闲链表中是否存在空闲object,若有就转移 batchcount 个空闲object到本地 CPU空闲object链表中;
如果上述失败,就尝试从 SLAB中分配;这时如果还失败,kmem_cache会尝试从页框分配器中获取一组连续的页框建立一个新的SLAB,然后从新的SLAB中获取一个对象。
相应的object释放流程(没在cache_alloc_refill):
首先会先将object释放到本地CPU空闲object链表中,如果本地CPU空闲object链表中对象过多,kmem_cache 会将本地CPU空闲object链表中的batchcount个对象移动到所有CPU共享的空闲object链表链表中
如果所有CPU共享的空闲object链表链表的object也太多了,kmem_cache也会把所有CPU共享的空闲object链表链表中 batchcount 个数的object移回它们自己所属的SLAB中,
这时如果SLAB中空闲对象太多,kmem_cache会整理出一些空闲的SLAB,将这些SLAB所占用的页框释放回页框分配器中。
cache_alloc_refill中比较关键的函数:从slab_partial和slab_free队列找空闲的object:
static struct page *get_first_slab(struct kmem_cache_node *n, bool pfmemalloc)
{
    struct page *page;

    page = list_first_entry_or_null(&n->slabs_partial,
            struct page, lru);
    if (!page) {
        n->free_touched = 1;
        page = list_first_entry_or_null(&n->slabs_free,
                struct page, lru);
    }

    if (sk_memalloc_socks())
        return get_valid_first_slab(n, page, pfmemalloc);

    return page;
}
最后就是_kmalloc函数了:
static __always_inline void *kmalloc(size_t size, gfp_t flags)
{
    if (__builtin_constant_p(size)) {
        if (size > KMALLOC_MAX_CACHE_SIZE)
            return kmalloc_large(size, flags);
#ifndef CONFIG_SLOB
        if (!(flags & GFP_DMA)) {
            int index = kmalloc_index(size);

            if (!index)
                return ZERO_SIZE_PTR;

            return kmem_cache_alloc_trace(kmalloc_caches[index],
                    flags, size);
        }
#endif
    }
    return __kmalloc(size, flags);
}
_kmalloc继续调用_do_kmalloc函数,核心调用的正式上面分析的kmalloc_slab函数和slab_alloc函数!
/**
 * __do_kmalloc - allocate memory
 * @size: how many bytes of memory are required.
 * @flags: the type of memory to allocate (see kmalloc).
 * @caller: function caller for debug tracking of the caller
 */
static __always_inline void *__do_kmalloc(size_t size, gfp_t flags,
                      unsigned long caller)
{
    struct kmem_cache *cachep;
    void *ret;
    /*根据用户参数找到高速缓存块*/
    cachep = kmalloc_slab(size, flags);
    if (unlikely(ZERO_OR_NULL_PTR(cachep)))
        return cachep;
    /*根据kmem_cache结构体和用户参数找到object,并返回地址*/
    ret = slab_alloc(cachep, flags, caller);

    kasan_kmalloc(cachep, ret, size, flags);
    trace_kmalloc(caller, ret,
              size, cachep->size, flags);

    return ret;
}
总结:
对于用户来说,需要用内存时直接调用malloc就行了,但是操作系统找空闲内存区域的时候可谓是大费周折(甚至还要关闭中断,避免分配的过程被打断;同时加锁,和其他cpu核之间互斥保持同步),这是malloc函数效率低的根本原因;如果客观条件允许,调用malloc函数后申请的内存建议反复使用(但是可能带来部分安全问题,这里需要平衡两者的权衡利弊),不要频繁地malloc和free!
slab机制比buddy复杂,各种概念伴随着层出不穷的结构体,但是万变不离其宗:(1)将内存进一步分割成更小的块,从8byte起步,尽可能避免碎片 (2)不同size的内存块分开管理,提高分配和回收合并的效率; 以上所有的结构体都是围绕着这两点目的展开的,比如缓存array_cache、多级链式查找等!
多级链式建立和维护的时候比较复杂,比如下图的从kmem_cache_node→partital中分配object,最多需要经历4次链式跳转查询object,为啥不直接用bitmap管理,而是要搞得这么复杂了?注意观察:每次链式跳转查询都有不同的结构体承载,每个结构体都有自己特定的字段属性,由此达到分层解耦的目的!
https://img2020.cnblogs.com/blog/2052730/202112/2052730-20211221095658911-877821572.png内存操作函数概览:
https://img2020.cnblogs.com/blog/2052730/202112/2052730-20211221162242031-658490447.png栈和堆的区别
写过代码的人都知道,代码运行的时候数据主要存储在两块人为划分的区域:栈和堆;栈一般用来存参数、返回地址、局部变量;堆用来存new出来的对象实例、全局变量、静态变量等;碎片化问题主要集中在堆区域,重来没听过栈内存有碎片化问题的,这是为啥了?
栈是通过sp指针管理的,sp减少或增加,意味着栈增加或减少,一般是函数调用前和函数调用完毕移动sp;栈内部存放的函数frame的大小就是函数参数、返回地址、局部变量的大小总和;编译器在编译阶段就能够精准计算函数frame的大小,所以函数调用前和调用后移动sp的距离也是能提前精准计算的,所以sp移动时给函数frame分配的空间也是精准的,这就是栈上没有碎片的根本原因!相比之下堆就不一样了: 堆要承担给用户app存放对象实例、全局变量、静态变量的重任,全局变量和静态变量还好,编译时就能确定大小,但是对象实例就不行了,这个完全依赖于运行时的情况确定,尤其时代码各种分支比较多的情况,所以堆内存的使用是没法提前预判的;为了增加内存分配的灵活性,就诞生了各种内存分配、GC的算法!
3、尽管linux操作系统采取了buddy和slab等算法,但还是无法完全避免内存碎片;并且由于c/c++自生的限制,没有jvm这种自动垃圾回收的机制,导致了malloc或new出来的内存需要程序员人工手动释放;一旦忘记释放,就会一直占用着内存,直到程序运行结束,操作系统全部回收整个程序的内存才会释放。如果某些应用程序因为业务需要无法停止(比如服务器上跑的应用),必须一直运行,那么这块“被遗忘”的内存会一直被占用,可用内存会越来越少,最终可能导致内存严重不够,整个应用崩盘重来(这也是服务端开发java越来越流行的原因之一)!目前业界公认垃圾回收算法最牛的就属ZGC和shenandoah了,这里简单介绍一下ZGC算法的过程和牛逼之处!
(1)jvm也会把内存按照不同大小分块(官方给的称呼是分页,但是个cpu硬件对内存的分页不同),jvm分页的大小如下:
小页面2MB,用于存储小于256KB的对象
中页面32MB,用于存储256KN~4MB的对象
大页面大小不固定,用于存储大于4MB的对象
(2)要回收垃圾,就要正确地识别垃圾,避免误伤正常的对象,ZGC是这样做的:找到GC root(线程栈变量、static变量、常量池、jni指针等),挨个查找这些对象内部的fileds,看看有没有引用其他的变量,由此找到直接的对象引用;

这个阶段称之为“初始标记”。为了确保标记的准确性,需要暂停所有线程的工作,官方称之为stop the world,简称STW;由于不需要像传统的GC算法那样扫描堆区域,所以再大的内存都不怕。从实测的数据看,此阶段耗时小于1ms;找到直接引用的对象后(比如下面的A对象),会把GC root指针的M0位置1,标明A对象正在经历GC流程!

(3)经过初始标记,找到了GC root直连的对象,很明显此刻并不能回收,因为还有很多对象可能并不是CG root节点直接引用的,比如B、C节点(有可能是A节点用了链表、数组、new Object等方式生成了B、C节点);为了提高效率,需要多个GC线程同时来标记所有的间接引用对象,此阶段称为“并发标记”;此阶段并不需要STW,所以并不影响业务线程的正常运行,时间长也不影响!B、C找到后,A->B和B->C引用指针的M0位同样标绿;此阶段有点像是多叉树或图的遍历!
这一步并发标记方法称为“三色标记”法;整个阶段由于没有STW,并且是多个GC线程和业务线程一起协作,可能出现漏标的情况:GC1线程没有标记C节点,以为C是垃圾,要回收C节点的内存;但是GC2线程还未完成,此时业务线程执行了B.c=null,把B->C的引用去掉,CG2线程执行后也会人为C节点没有引用;实际上由于业务线程执行了A.c=C,导致C节点被A引用,本身并不是垃圾,明显被误伤了!

为了避免C被误伤,jvm执行到A.c的时候需要把C先记录在remember set;为下一步的再标记做准备!使用的算法或技术叫snapshot at the begining,简称SATB,也就是在开始的时候拍快照,把代码中的引用关系保存下来,用作后续备查!
(4)上一步的并发标记由于没有STW,存在对象漏标的情况,可能导致正常引用的节点被当成垃圾回收;为了避免误伤,采用了remembor set的方式,一旦遇到A.c这种情况马上记录到set,然后通过set找到还在正常被使用的对象标记;为了精准标记、避免误伤,此阶段需要STW,让业务线程先暂停;由于只处理漏标的对象,实际测试看耗时小于1ms;此阶段称为再标记
(5)并发转移准备:经过前面3个阶段找到了垃圾,现在要着手准备删除垃圾、回收内存了;ZGC采用了copying算法:找到相同大小、还未使用过的页面,然后把正常引用的对象复制到新页面,旧页面存放的数据全部擦除,思路就是这么简单粗暴;此阶段没有STW,不影响正常的业务线程;

(6)初始转移:
由于需要移动对象,并且这些对象还有GC root的直接引用(没有引用的对象就是垃圾了,还需要转移么?),此阶段肯定要STW,耗时小于1ms(大部分是垃圾,需要转移的很少;并且此阶段只移动和GC root直连的对象,间接连接的对象此阶段部考虑)
把A复制到新页面,更改GC root的指针指向,同时更改颜色指针为蓝色,表示remapped移动阶段结束!
(7)并发转移
B和C转移到新页面,但是B和C的引用怎么转移了?在旧页面维护了转发表Forward table(和GC root不直连的对象都会在转发表),类似hashtable,把实例的新旧地址做了对应
此阶段没有STW的,如果有线程正在需要读B和C怎么办了?此时就需要读屏障了:等B和C搬迁到新地址后再读(通过转发表找到),这个有点类似自旋,汇编层面通过jmp slow_path实现;额外开销约4%;那么问题又来了:业务线程怎么知道B和C线程有没有搬迁到新地址了?还是通过对象引用指针的着色确定的;如果4个bit都是0,说明改引用是good color,对象可以直接读写;如果4bit中有任何bit是1,就是bad color,说明正处于GC流程,这种对象是不能马上使用的!
(8)还剩最后一步了:B和C复制到新页面后,原有的引用关系还没恢复了,这个问题什么时候解决了?这就要等到下一次GC启动后的第二阶段:对象重定位阶段进行!这个阶段A->B和B->C的指针都是绿色的,表示上次GC遗留下来没有更新的指针!最终的结果如下:A、B和C在新页面建立引用关系,指针改成红色!
B和C这种间接引用,为啥要放到第二次GC才做了?为啥不第一次就完结了?因为这种可达性分析没必要做两次,可以直接复用第一次的forward table!所以也不需要STW业务线程!
最后通过实测,每个阶段耗时如下:需要STW的是初始标记、再标记和初始转移阶段,3个阶段加起来耗时约0.7ms,这效率杠杠滴!
参考:
1、https://cloud.tencent.com/developer/article/1622989 slab分配一个object的流程分析
2、https://www.dingmos.com/index.php/archives/23/ slab分配器
3、https://www.bilibili.com/video/BV1cb4y117Vg?p=6&spm_id_from=pageDriver ZGC垃圾回收过程
#399 内存管理模块 » linux源码解读(九):内存管理——buddy和slab » 2022-10-09 12:11:07
- batsom
- 回复: 0
cpu硬件管理内存是以页(4KB)为最小颗粒度的,因为页描述符设置内存属性就是按照页为单位设置的!这个颗粒度是非常大的,用户如果只要几十Byte的内存也分配4KB的话,再多的内存也会很快被败光,同时带来了内存碎片化的问题,所以迫切需要小颗粒度的内存分配方式!buddy和slab孕育而生!
1、先看看buddy内存管理方式;linux早期版本(比如0.11)管理的方式比较简单粗暴,直接用bitmap的思路标记物理页是否被使用,这样做带来最直接的问题:内存碎片化!举例如下:
比如标黄的是已经分配的物理页(由于是操作系统负责分配物理页,首次是可以按照顺序从低地址到高地址依次不留空隙地分配),没标注的是剩余的物理页。随着时间的推移,部分进程运行完毕后释放了物理页,可能变成了如下情况:进程释放了3个物理页,但这3个物理页还是分开的,并未连接起来;带来的问题:
如果有进程需要4个连续的物理页,要么继续等,要么从其他内存地址开始寻找.......
bitmap也不能直观的快速寻址连续空闲的内存,每次都要从头开始遍历查找,效率也低......
这里说个题外话:应用程序调用malloc分配内存的时候,操作系统会通过各种算法在空闲的内存找一块大小满足应用程序需求的内存,这是比较耗时的,所以站在提高效率的角度,建议一次性调用malloc申请足够的内存,然后反复使用;不过这样做的也带来了安全问题:逆向时如果用CE找到了这块内存,就可以继续定位关键的数据生成代码了!
为了避免出现页级别的内存碎片,Linux内核中引入了伙伴系统算法(Buddy system):把所有的空闲页框分组为11个块链表,每个块链表分别包含大小为1,2,4,8,16,32,64,128,256,512和1024个连续页框的页框块。最大可以申请1024个连续页框,对应4MB大小的连续内存,每个页框块的第一个页框的物理地址是该块大小的整数倍,如下:

假设要申请一个256个页框的块,先从256个页框的链表中查找空闲块。如果没有,就去512个页框的链表中找,找到了则将页框块分为2个256个页框的块,一个分配给应用,另外一个移到256个页框的链表中。如果512个页框的链表中仍没有空闲块,继续向1024个页框的链表查找,如果仍然没有,则返回错误。页框块在释放时,会主动将两个连续的页框块合并为一个较大的页框块;和linux早期简单粗暴的bitmap管理方式对比,buddy算法明显是利用了链表结构管理物理页,不停地对页框做拆开合并拆开合并的动作,算法牛逼之处在于运用了世界上任何正整数都可以由2^n的和组成的原理,让任何物理页数量的分配都能够满足(只要空闲的物理页面足够)!
为了实现buddy算法,需要的几个结构体:list_head是双向循环链表,该链表包含每个空闲页框块(2^k)的起始页框的page。指向链表中相邻元素的指针存放在page的lru字段中(lru在页非空闲时用于其它目的),nr_free表示空闲块的个数;
struct free_area {
    struct list_head    free_list;
    unsigned long        nr_free;
};
zone结构体中 struct free_area free_area[MAX_ORDER]; free_area数组就快速用来定位链表起点;数组的第K个元素就是2^k个页框链表的起始点;
/**
 * 内存管理区描述符
 */
struct zone {
    /* Fields commonly accessed by the page allocator */
    /**
     * 管理区中空闲页的数目
     */
    unsigned long        free_pages;
    /**
     * Pages_min-管理区中保留页的数目
     * Page_low-回收页框使用的下界。同时也被管理区分配器为作为阈值使用。
     * pages_high-回收页框使用的上界,同时也被管理区分配器作为阈值使用。
     */
    unsigned long        pages_min, pages_low, pages_high;
    /*
     * We don't know if the memory that we're going to allocate will be freeable
     * or/and it will be released eventually, so to avoid totally wasting several
     * GB of ram we must reserve some of the lower zone memory (otherwise we risk
     * to run OOM on the lower zones despite there's tons of freeable ram
     * on the higher zones). This array is recalculated at runtime if the
     * sysctl_lowmem_reserve_ratio sysctl changes.
     */
    /**
     * 为内存不足保留的页框,分别为各种内存域指定了若干页
     * 用于一些无论如何都不能失败的关键性内存分配
     */
    unsigned long        lowmem_reserve[MAX_NR_ZONES];
    /**
     * 用于实现单一页框的特殊高速缓存。
     * 每内存管理区对每CPU都有一个。包含热高速缓存和冷高速缓存。
     * 内核使用这些列表来保存可用于满足实现的“新鲜”页。
     * 有些页帧很可能在CPU高速缓存中,因此可以快速访问,称之为热。
     * 未缓存的页帧称之为冷的。
     */
    struct per_cpu_pageset    pageset[NR_CPUS];

    /*
     * free areas of different sizes
     */
    /**
     * 保护该描述符的自旋锁
     */
    spinlock_t        lock;
    /**
     * 标识出管理区中的空闲页框块。
     * 包含11个元素,被伙伴系统使用。分别对应大小的1,2,4,8,16,32,128,256,512,1024连续空闲块的链表。
     * 第k个元素标识所有大小为2^k的空闲块。free_list字段指向双向循环链表的头。
     * free_list是free_area的内部结构,是个双向环回链表节点。
     */
    struct free_area    free_area[MAX_ORDER];

    /*
     * 为了cache line对齐加的pad
     */
    ZONE_PADDING(_pad1_)

    /* Fields commonly accessed by the page reclaim scanner */
    /**
     * 活动以及非活动链表使用的自旋锁。
     */
    spinlock_t        lru_lock;
    /**
     * 管理区中的活动页链表
     */
    struct list_head    active_list;
    /**
     * 管理区中的非活动页链表。
     */
    struct list_head    inactive_list;
    /**
     * 回收内存时需要扫描的活动页数。
     */
    unsigned long        nr_scan_active;
    /**
     * 回收内存时需要扫描的非活动页数目
     */
    unsigned long        nr_scan_inactive;
    /**
     * 管理区的活动链表上的页数目。
     */
    unsigned long        nr_active;
    /**
     * 管理区的非活动链表上的页数目。
     */
    unsigned long        nr_inactive;
    /**
     * 管理区内回收页框时使用的计数器。
     */
    unsigned long        pages_scanned;       /* since last reclaim */
    /**
     * 在管理区中填满不可回收页时此标志被置位
     */
    int            all_unreclaimable; /* All pages pinned */

    /*
     * prev_priority holds the scanning priority for this zone.  It is
     * defined as the scanning priority at which we achieved our reclaim
     * target at the previous try_to_free_pages() or balance_pgdat()
     * invokation.
     *
     * We use prev_priority as a measure of how much stress page reclaim is
     * under - it drives the swappiness decision: whether to unmap mapped
     * pages.
     *
     * temp_priority is used to remember the scanning priority at which
     * this zone was successfully refilled to free_pages == pages_high.
     *
     * Access to both these fields is quite racy even on uniprocessor.  But
     * it is expected to average out OK.
     */
    /**
     * 临时管理区的优先级。
     */
    int temp_priority;
    /**
     * 管理区优先级,范围在12和0之间。
     */
    int prev_priority;


    ZONE_PADDING(_pad2_)
    /* Rarely used or read-mostly fields */

    /*
     * wait_table        -- the array holding the hash table
     * wait_table_size    -- the size of the hash table array
     * wait_table_bits    -- wait_table_size == (1 << wait_table_bits)
     *
     * The purpose of all these is to keep track of the people
     * waiting for a page to become available and make them
     * runnable again when possible. The trouble is that this
     * consumes a lot of space, especially when so few things
     * wait on pages at a given time. So instead of using
     * per-page waitqueues, we use a waitqueue hash table.
     *
     * The bucket discipline is to sleep on the same queue when
     * colliding and wake all in that wait queue when removing.
     * When something wakes, it must check to be sure its page is
     * truly available, a la thundering herd. The cost of a
     * collision is great, but given the expected load of the
     * table, they should be so rare as to be outweighed by the
     * benefits from the saved space.
     *
     * __wait_on_page_locked() and unlock_page() in mm/filemap.c, are the
     * primary users of these fields, and in mm/page_alloc.c
     * free_area_init_core() performs the initialization of them.
     */
    /**
     * 进程等待队列的散列表。这些进程正在等待管理区中的某页。
     */
    wait_queue_head_t    * wait_table;
    /**
     * 等待队列散列表的大小。
     */
    unsigned long        wait_table_size;
    /**
     * 等待队列散列表数组的大小。值为2^order
     */
    unsigned long        wait_table_bits;

    /*
     * Discontig memory support fields.
     */
    /**
     * 内存节点。
     */
    struct pglist_data    *zone_pgdat;
    /**
     * 指向管理区的第一个页描述符的指针。这个指针是数组mem_map的一个元素。
     */
    struct page        *zone_mem_map;
    /* zone_start_pfn == zone_start_paddr >> PAGE_SHIFT */
    /**
     * 管理区的第一个页框的下标。
     */
    unsigned long        zone_start_pfn;

    /**
     * 以页为单位的管理区的总大小,包含空洞。
     */
    unsigned long        spanned_pages;    /* total size, including holes */
    /**
     * 以页为单位的管理区的总大小,不包含空洞。
     */
    unsigned long        present_pages;    /* amount of memory (excluding holes) */

    /*
     * rarely used fields:
     */
    /**
     * 指针指向管理区的传统名称:DMA、NORMAL、HighMem
     */
    char            *name;
} ____cacheline_maxaligned_in_smp;
本质上讲,buddy算法相对于原始的bitmap,优势在于:
按照不同页框个数2^n重新组织了内存,便于快速查找用户所需大小的内存块(free_area数组的寻址时间复杂度是O(1))
不停的分配、重组页框,在一定程度上减少了页框碎片
2、buddy算法解决了页框颗粒度的碎片,但用户日常使用一般申请的内存大都是几十、顶多几百byte,直接分配4KB太大了,需要进一步把4KB的页框内存细分,以满足更小颗粒度的需求,slab算法由此诞生!其解决了如下3个问题:
解决buddy按照页的颗粒度分配小内存的碎片问题
缓存部分常用的数据结构(包括但不限于inode、dir_entry、task_struct等),减少操作系统分配、回收对象时调整内存的时间开销
通过着色更好地利用cpu硬件的高速缓存cache,允许不同缓存中的对象占用相同的缓存行,从而提高缓存的利用率并获得更好的性能
整个slab机制可以用下面的图来概括:

图从左往右看:
内存会存储多个叫做kmem_cache的结构体实例,实例之间通过链表的形式连接!
每个kmem_cache包含3个不同的slab队列,分别是free、partial、full,分别表示空间、部分使用和完全使用的slab队列
每个slab又包含一个或多个page(一般情况是一个),这里就和buddy系统关联起来了
每个slab包含多个object对象,但是不同slab包含对象的大小是不一样的,比如上图的第一个kmem_cache所包含object对象大小是32byte,第二个kmem_cache所包含object对象大小是128byte,最后一个是32KB;
为了实现slab机制,相应的结构体是少不了的,linux用的是kmem_cache结构体来承载和聚合各种信息的,如下:重要的属性都用中文注释了,比如object的大小、每个slab占用的页面数量、slab结构体数组等;
/*
 * Definitions unique to the original Linux SLAB allocator.
   slab描述符
 */

struct kmem_cache {
    struct array_cache __percpu *cpu_cache;/*本地cpu缓存池*/

/* 1) Cache tunables. Protected by slab_mutex */
    unsigned int batchcount;
    unsigned int limit;
    unsigned int shared;

    unsigned int size;
    struct reciprocal_value reciprocal_buffer_size;
/* 2) touched by every alloc & free from the backend */

    unsigned int flags;        /* constant flags */
    unsigned int num;        /* # of objs per slab:每个slab中object的数量 */

/* 3) cache_grow/shrink */
    /* order of pgs per slab (2^n) :每个slab占用的页面数量*/
    unsigned int gfporder;

    /* force GFP flags, e.g. GFP_DMA */
    gfp_t allocflags;

    size_t colour;            /* cache colouring range:一个slab中不同cache line的数量 */
    unsigned int colour_off;    /* colour offset */
    struct kmem_cache *freelist_cache;/*打造单向链表*/
    unsigned int freelist_size;

    /* constructor func */
    void (*ctor)(void *obj);

/* 4) cache creation/removal */
    const char *name;/*slab描述符名字*/
    struct list_head list;
    int refcount;
    int object_size;/*onject对象的大小,每个kmem_cache可以个性化设置的*/
    int align;/*对齐长度*/

/* 5) statistics */
#ifdef CONFIG_DEBUG_SLAB
    unsigned long num_active;
    unsigned long num_allocations;
    unsigned long high_mark;
    unsigned long grown;
    unsigned long reaped;
    unsigned long errors;
    unsigned long max_freeable;
    unsigned long node_allocs;
    unsigned long node_frees;
    unsigned long node_overflow;
    atomic_t allochit;
    atomic_t allocmiss;
    atomic_t freehit;
    atomic_t freemiss;
#ifdef CONFIG_DEBUG_SLAB_LEAK
    atomic_t store_user_clean;
#endif

    /*
     * If debugging is enabled, then the allocator can add additional
     * fields and/or padding to every object. size contains the total
     * object size including these internal fields, the following two
     * variables contain the offset to the user object and its size.
     */
    int obj_offset;
#endif /* CONFIG_DEBUG_SLAB */

#ifdef CONFIG_MEMCG
    struct memcg_cache_params memcg_params;
#endif
#ifdef CONFIG_KASAN
    struct kasan_cache kasan_info;
#endif

#ifdef CONFIG_SLAB_FREELIST_RANDOM
    unsigned int *random_seq;
#endif
    /*slab链表*/
    struct kmem_cache_node *node[MAX_NUMNODES];
};
上面的图不是有3组slab链表么?都是在kmem_cache_node结构体中定义的,如下:前面3个slab_partial、slab_full、slab_free就是了!
#ifndef CONFIG_SLOB
/*
 * The slab lists for all objects.
 */
struct kmem_cache_node {
    spinlock_t list_lock;

#ifdef CONFIG_SLAB
    struct list_head slabs_partial;    /* partial list first, better asm code */
    struct list_head slabs_full;
    struct list_head slabs_free;
    unsigned long num_slabs;
    unsigned long free_objects;
    unsigned int free_limit;
    unsigned int colour_next;    /* Per-node cache coloring */
    struct array_cache *shared;    /* shared per node */
    struct alien_cache **alien;    /* on other nodes */
    unsigned long next_reap;    /* updated without locking */
    int free_touched;        /* updated without locking */
#endif

#ifdef CONFIG_SLUB
    unsigned long nr_partial;
    struct list_head partial;
#ifdef CONFIG_SLUB_DEBUG
    atomic_long_t nr_slabs;
    atomic_long_t total_objects;
    struct list_head full;
#endif
#endif

};
总的来说:
slab机制把4KB的内存进一步切小到16byte、32byte、64byte、128byte......等不同大小的object,满足小内存的使用的需求,由此诞生了kmem_cache结构体,里面又包含了slab结构体;所以说整个算法最核心的思路就是把4KB的页内存进一步切小成object,然后又用kmem_cache和slab来关系object;
kmem_cache结构体有多个实例,每个实例中包含的object大小都不同,这个思路和buddy算法的free_area数组没有任何本质区别,只是实例之间通过链表的形式连接了
某个kmem_cache结构体中,由于包含了多个同样大小的object,为了便于管理object,又进一步细分出了3个队列:slab_full、slab_partial、slab_free,每个队列都包含了多个slab;每个slab又包含多个object!所以kmem_cache、slab、objectz这3者是1对多对多的关系!
内存管理总结:
目标:
1)避免碎片
2)快速申请和释放
解决方法:
1)按层级分区块。分区块管理,互相不污染。例如arena、chunk、run、region不同层级。这里说的污染是指碎片化
2)分配时拆分和释放时合并。
3)充分使用各种缓冲技术,提高性能。
4)使用各种高效的数据结构及其算法,包括多级bitmap、链表、二叉树、红黑树、匹配堆,等等。
5)减少管理数据meta data百分比。
6)内存划分为各个池。使用池的概念,池中对象大小都相同。不同的池,对象大小可以不同。
7)充分利用cpu的cache的优化。
8)其他机制,例如减少锁的访问,局部锁代替全局锁,从而减少竞争出现的次数。
参考:
1、https://r00tk1ts.github.io/2017/10/20/Linux%E5%86%85%E5%AD%98%E7%AE%A1%E7%90%86-%E9%A1%B5%E6%A1%86%E7%AE%A1%E7%90%86/ Linux内核学习——内存管理之页框管理
2、https://zhuanlan.zhihu.com/p/36140017 linux内存管理算法buddy和slab
3、 https://www.bilibili.com/video/BV1wk4y1y7gL/ 页框和伙伴算法以及slab机制
4、https://www.dingmos.com/index.php/archives/23/ slab分配器
5、https://www.bilibili.com/video/BV1My4y1e7gF?from=search&seid=15617570158469619634&spm_id_from=333.337.0.0 内存管理思想
#400 进程模块 » linux源码解读(一):进程的创建、调度和销毁 » 2022-10-09 11:44:32
- batsom
- 回复: 0
不论是做正向开发,还是逆向破解,操作系统、编译原理、数据结构和算法、计算机组成原理、计算机网络、密码学等都是非常核心和关键的课程。为了便于理解操作系统原理,这里从linux 0.11开始解读重要和核心的代码!简单理解:操作系统=计算机组成原理+数据结构和算法!
用户从开机上电开始,cpu会先用bios读取初始化代码,这一系列的初始化流程请详见本人之前撰写的x86系列教程,这里不再赘述;先看一下代码的整体结构,从文件名就能很容易猜出来各个模块分别是干啥的:硬件启动、文件系统、头文件、整个初始化、内核、库函数、内存管理、工具等;
linux代码大部分是C写的,所以入口也不免俗,也是用main开始的,具体就是init/main.c文件的main函数,主要干了这么几件事:设置根文件和驱动、设置内存、初始化idt表、打开中断、切换到用户模式;从这里可以看出:前面这些代码执行的时候是屏蔽了中断的,所以在这个阶段,用户移动鼠标、敲击键盘什么的都是没用的!这些准备工作都做完后,终于生成了“永世不灭”的0号进程:从linus的注释看,只要没有其他任务运行了就运行0号进程;pause函数也只是查看是否有其他可以运行的任务。如果有就跳转过去运行,如果没有继续在这里死循环!
注意:这里面有个buffer_memory_end字段,标识了内核缓冲区;一般情况下:cpu往块设备写数据,会先写入这里的缓存,缓存到一定数量后统一写入设备,能提升一些效率;比如本人之前用ida去trace x音时,log文件并不是实时更新的;要等trace借结束后才会统一写入磁盘的log文件!
//main函数 linux引导成功后就从这里开始运行
void main(void)        /* This really IS void, no error here. */
{            /* The startup routine assumes (well, ...) this */
/*
 * Interrupts are still disabled. Do necessary setups, then
 * enable them
 */
//前面这里做的所有事情都是在对内存进行拷贝
     ROOT_DEV = ORIG_ROOT_DEV;//设置操作系统的根文件
     drive_info = DRIVE_INFO;//设置操作系统驱动参数
     //解析setup.s代码后获取系统内存参数
    memory_end = (1<<20) + (EXT_MEM_K<<10);
    //取整4k的内存大小
    memory_end &= 0xfffff000;
    if (memory_end > 16*1024*1024)//控制操作系统的最大内存为16M
        memory_end = 16*1024*1024;
    if (memory_end > 12*1024*1024)
        buffer_memory_end = 4*1024*1024;//设置高速缓冲区的大小,跟块设备有关,跟设备交互的时候,充当缓冲区,写入到块设备中的数据先放在缓冲区里,只有执行sync时才真正写入;这也是为什么要区分块设备驱动和字符设备驱动;块设备写入需要缓冲区,字符设备不需要是直接写入的
    else if (memory_end > 6*1024*1024)
        buffer_memory_end = 2*1024*1024;
    else
        buffer_memory_end = 1*1024*1024;
    main_memory_start = buffer_memory_end;
#ifdef RAMDISK
    main_memory_start += rd_init(main_memory_start, RAMDISK*1024);
#endif
//内存控制器初始化
    mem_init(main_memory_start,memory_end);
    //异常函数初始化,主要是初始化idt表
    trap_init();
    //块设备驱动初始化
    blk_dev_init();
    //字符型设备出动初始化
    chr_dev_init();
    //控制台设备初始化
    tty_init();
    //加载定时器驱动
    time_init();
    //进程间调度初始化
    sched_init();
    //缓冲区初始化
    buffer_init(buffer_memory_end);
    //硬盘初始化
    hd_init();
    //软盘初始化
    floppy_init();
    sti();
    //从内核态切换到用户态,上面的初始化都是在内核态运行的
    //内核态无法被抢占,不能在进程间进行切换,运行不会被干扰
    move_to_user_mode();
    if (!fork()) {    //创建0号进程 fork函数就是用来创建进程的函数    /* we count on this going ok */
        //0号进程是所有进程的父进程
        init();
    }
/*
 *   NOTE!!   For any other task 'pause()' would mean we have to get a
 * signal to awaken, but task 0 is the sole exception (see 'schedule()')
 * as task 0 gets activated at every idle moment (when no other tasks
 * can run). For task0 'pause()' just means we go check if some other
 * task can run, and if not we return here.
 */
//0号进程永远不会结束,他会在没有其他进程调用的时候调用,只会执行for(;;) pause();
    for(;;) pause();
}
1、main中有个非常核心的函数:fork;linux中所有的进程创建都通过fork函数;这个函数本质上是个系统调用,实现代码在system_call.s中,如下:
_sys_fork://fork的系统调用
    call _find_empty_process//调用这个函数
    testl %eax,%eax
    js 1f
    push %gs
    pushl %esi
    pushl %edi
    pushl %ebp
    pushl %eax
    call _copy_process//
    addl $20,%esp
1:    ret
整个fork的执行过程并不复杂:先是找空进程,再复制进程,这两个函数到底是怎么做的了?在kernel/fork.c中有他们的实现过程,先来看看find_empty_process: 这个版本的NR_TASKS=64,也就是说最多支持64个进程“同时”运行(直观感觉这算个漏洞啊,如果别有用心的人想办法短时间内恶意把进程数提升到64个,是不是就没法运行新的程序了?间接达到DOS的效果)!整个代码很简单:直接遍历64个task_struct结构体,看看哪个结构体还是null的,说明这个结构体还未初始化,没被使用,直接返回这个task结构体在数组的index。这个index也被用来作为进程的编号,也就是pid!
int find_empty_process(void)
{
    int i;

    repeat:
        if ((++last_pid)<0) last_pid=1;
        for(i=0 ; i<NR_TASKS ; i++)
            if (task[i] && task[i]->pid == last_pid) goto repeat;
    for(i=1 ; i<NR_TASKS ; i++)
        if (!task[i])//直到找到一个空的task结构体
            return i;
    return -EAGAIN;//达到64的最大值后,返回错误码
}
一旦找到空的进程(实际上是还没使用的task结构体,就是所谓的进程槽),继续执行copy_process,这里又拷贝了啥了?
新建一个task结构体,并分配内存
根据上一步得到的pid,把task结构体保存在这个index
用传入的参数初始化task结构体(主要是context寄存器)
设置子进程的ldt,并复制父进程的数据段(注意:不复制代码段,否则没必要生成子进程了)
父进程打开过的文件,子进程继承该属性
在gdt中设置该子进程的tss和ldt
子进程设置成运行态
总结:函数名称叫copy_process,实际上只是拷贝了父进程的数据段,继承了父进程打开文件的数量,其他都是“个性化”设置的,所以linus当初为啥要取名为copy_process了?这里很不解!
// 对内存拷贝
// 主要作用就是把代码段数据段等栈上的数据拷贝一份
int copy_mem(int nr,struct task_struct * p)
{
    unsigned long old_data_base,new_data_base,data_limit;
    unsigned long old_code_base,new_code_base,code_limit;

    code_limit=get_limit(0x0f);
    data_limit=get_limit(0x17);
    old_code_base = get_base(current->ldt[1]);
    old_data_base = get_base(current->ldt[2]);
    if (old_data_base != old_code_base)
        panic("We don't support separate I&D");
    if (data_limit < code_limit)
        panic("Bad data_limit");
    //数据段和代码段的base地址是一样的
    new_data_base = new_code_base = nr * 0x4000000;
    //设置新进程代码入口地址
    p->start_code = new_code_base;
    //设置新进程的idt
    set_base(p->ldt[1],new_code_base);
    set_base(p->ldt[2],new_data_base);
    //新进程直接简单粗暴地复制了父进程的数据,但是代码并未复用
    if (copy_page_tables(old_data_base,new_data_base,data_limit)) {
        free_page_tables(new_data_base,data_limit);
        return -ENOMEM;
    }
    return 0;
}

/*
 *  Ok, this is the main fork-routine. It copies the system process
 * information (task[nr]) and sets up the necessary registers. It
 * also copies the data segment in it's entirety.
 */
// 所谓进程创建就是对0号进程或者当前进程的复制
// 就是结构体的复制 把task[0]对应的task_struct 复制一份
//除此之外还要对栈堆拷贝 当进程做创建的时候要复制原有的栈堆
// nr就是刚刚找到的空槽的pid
int copy_process(int nr,long ebp,long edi,long esi,long gs,long none,
        long ebx,long ecx,long edx,
        long fs,long es,long ds,
        long eip,long cs,long eflags,long esp,long ss)
{
    struct task_struct *p;
    int i;
    struct file *f;
    //其实就是malloc分配内存
    p = (struct task_struct *) get_free_page();//在内存分配一个空白页,让指针指向它
    if (!p)
        return -EAGAIN;//如果分配失败就是返回错误
    task[nr] = p;//把这个指针放入进程的链表当中
    *p = *current;//把当前进程赋给p,也就是拷贝一份    /* NOTE! this doesn't copy the supervisor stack */
    //后面全是对这个结构体进行赋值相当于初始化赋值
    p->state = TASK_UNINTERRUPTIBLE;
    p->pid = last_pid;
    p->father = current->pid;
    p->counter = p->priority;
    p->signal = 0;
    p->alarm = 0;
    p->leader = 0;        /* process leadership doesn't inherit */
    p->utime = p->stime = 0;
    p->cutime = p->cstime = 0;
    p->start_time = jiffies;//当前的时间
    p->tss.back_link = 0;
    p->tss.esp0 = PAGE_SIZE + (long) p;
    p->tss.ss0 = 0x10;
    p->tss.eip = eip;
    p->tss.eflags = eflags;
    p->tss.eax = 0;//把寄存器的参数添加进来
    p->tss.ecx = ecx;
    p->tss.edx = edx;
    p->tss.ebx = ebx;
    p->tss.esp = esp;
    p->tss.ebp = ebp;
    p->tss.esi = esi;
    p->tss.edi = edi;
    p->tss.es = es & 0xffff;
    p->tss.cs = cs & 0xffff;
    p->tss.ss = ss & 0xffff;
    p->tss.ds = ds & 0xffff;
    p->tss.fs = fs & 0xffff;
    p->tss.gs = gs & 0xffff;
    p->tss.ldt = _LDT(nr);
    p->tss.trace_bitmap = 0x80000000;
    if (last_task_used_math == current)//如果使用了就设置协处理器
        __asm__("clts ; fnsave %0"::"m" (p->tss.i387));
    if (copy_mem(nr,p)) {//老进程向新进程代码段和数据段进行拷贝
        task[nr] = NULL;//如果失败了
        free_page((long) p);//就释放当前页
        return -EAGAIN;
    }
    for (i=0; i<NR_OPEN;i++)//
        if (f=p->filp[i])//父进程打开过文件
            f->f_count++;//就会打开文件的计数+1,说明会继承这个属性
    if (current->pwd)//跟上面一样
        current->pwd->i_count++;
    if (current->root)
        current->root->i_count++;
    if (current->executable)
        current->executable->i_count++;
    //设置GDT表的tss和ldt
    set_tss_desc(gdt+(nr<<1)+FIRST_TSS_ENTRY,&(p->tss));
    set_ldt_desc(gdt+(nr<<1)+FIRST_LDT_ENTRY,&(p->ldt));
    p->state = TASK_RUNNING;//把状态设定为运行状态    /* do this last, just in case */
    return last_pid;//返回新创建进程的id号
}
fork执行结束后,如果是0号进程(也就是父进程)成功创建,会继续执行init函数:这个函数内部的代码也很特别,不知道大家有没有注意到:里面有个while(1)循环,而且没有break打断,也就是说这里面的代码会一直执行,直到被中断/系统调用等方式打断;等中断/系统调用执行万后又会遇到这里继续执行!作者本意因该是父进程只负责创建子进程,创建好的子进程来执行/bin/sh,周而复始一直循环执行!所以问题又来了:为什么要不停的生成子进程去执行/bin/sh了?sh是用来接受用户输入并执行的程序,为了让用户随时随地可以输入指令,这里只好不停地生成进程执行/bin/sh了!
void init(void)
{
    int pid,i;
    //设置了驱动信息
    setup((void *) &drive_info);
    //打开标准输入控制台 句柄为0, 方便进程交互
    (void) open("/dev/tty0",O_RDWR,0);
    (void) dup(0);//打开标准输入控制台 这里是复制句柄的意思
    (void) dup(0);//打开标准错误控制台
    printf("%d buffers = %d bytes buffer space\n\r",NR_BUFFERS,
        NR_BUFFERS*BLOCK_SIZE);
    printf("Free mem: %d bytes\n\r",memory_end-main_memory_start);
    if (!(pid=fork())) {//这里创建1号进程
        close(0);//关闭了0号进程的标准输入输出
        if (open("/etc/rc",O_RDONLY,0))//如果1号进程创建成功打开/etc/rc这里面保存的大部分是系统配置文件 开机的时候要什么提示信息全部写在这个里面
            _exit(1);
        execve("/bin/sh",argv_rc,envp_rc);//运行shell程序
        _exit(2);
    }
    if (pid>0)//如果这个不是0号进程
        while (pid != wait(&i))//就等待父进程退出,等待期间啥也不干
            /* nothing */;
    while (1) {
        if ((pid=fork())<0) {//再创建新进程:如果创建失败
            printf("Fork failed in init\r\n");
            continue;
        }
        //如果创建成功
        if (!pid) {//这段代码是在子进程执行的
            close(0);close(1);close(2);//关闭上面那几个输入输出错误的句柄
            setsid();//重新设置id
            (void) open("/dev/tty0",O_RDWR,0);
            (void) dup(0);
            (void) dup(0);//重新打开
            _exit(execve("/bin/sh",argv,envp));//这里不是上面的argv_rc和envp_rc了是因为怕上面那种创建失败,换了一种环境变量来创建,过程和上面是一样的其实
        }
        //这段代码是在父进程执行的:如果还在父进程,那么等待子进程结束退出,并重新开始循环
        while (1)
            if (pid == wait(&i))
                break;
        printf("\n\rchild %d died with code %04x\n\r",pid,i);
        sync();
    }
    _exit(0);    /* NOTE! _exit, not exit() */
}
进程相关重要的结构体: task_struct:描述了task的方方面面,比如时间片、优先级、信号、pid、运行时间、ldt、tss等,每个进程都会生成一个task结构体来存储该进程的所有属性!
//task即进程的意思,这个结构体把进程能用到的所有信息进行了封装
struct task_struct {
/* these are hardcoded - don't touch */
    long state;    //程序运行的状态/* -1 unrunnable, 0 runnable, >0 stopped */
    long counter; //时间片
    //counter的计算不是单纯的累加,需要下面这个优先级这个参数参与
    long priority;//优先级
    long signal;//信号
    struct sigaction sigaction[32];//信号位图
    long blocked;//阻塞状态    /* bitmap of masked signals */
/* various fields */
    int exit_code;//退出码
    unsigned long start_code,end_code,end_data,brk,start_stack;
    long pid,father,pgrp,session,leader;
    unsigned short uid,euid,suid;
    unsigned short gid,egid,sgid;
    long alarm;//警告
    long utime,stime,cutime,cstime,start_time;//运行时间
    //utime是用户态运行时间 cutime是内核态运行时间
    unsigned short used_math;
/* file system info */
    int tty;    //是否打开了控制台    /* -1 if no tty, so it must be signed */
    unsigned short umask;
    struct m_inode * pwd;
    struct m_inode * root;
    struct m_inode * executable;
    unsigned long close_on_exec;
    struct file * filp[NR_OPEN];//打开了多少个文件
/* ldt for this task 0 - zero 1 - cs 2 - ds&ss */
    struct desc_struct ldt[3];//ldt包括两个东西,一个是数据段(全局变量静态变量等),另一个是代码段,不过这里面存的都是指针
/* tss for this task */
    struct tss_struct tss;//进程运行过程中CPU需要知道的进程状态标志(段属性、位属性等)
};
只要拿到task数组,就等于得到了所有的task结构体,也就掌控了所有的进程;我们平时用的ps命令、用调试器查看所有进程疑似就是这样得到进程列表的!用数组管理task结构体属于早期方法,这种方法的缺点也很明显:由于数组定长,这里只能“同时”运行64个进程,所以后来windows改成了双向链表:进程和线程之间都是通过双向链表连接的,遍历也是通过双向链表,这样对于进程或线程的数量就没有限制了(只要内存足够大)!
2、进程创建好后就需要调度了,核心代码在sched.c的schedule函数中,如下:
如果时间到点了,设置进程的sigalrm信号;如果进程处于可中断休眠状态,那么把该进程设置为可运行状态;
接着找到时间片最大的进程;如果没找到,就根据优先级重新计算进程的时间片,公式很简单:counter = counter/2 + priority
最后切换到目标进程执行
 // 时间片分配
void schedule(void)
{
    int i,next,c;
    struct task_struct ** p;//双重指针,指向task结构体数组

/* check alarm, wake up any interruptible tasks that have got a signal */

    for(p = &LAST_TASK ; p > &FIRST_TASK ; --p)//通过task结构体数组从后往前遍历每个task
        if (*p) {//在哪个jiffies发生警告?
            if ((*p)->alarm && (*p)->alarm < jiffies) {//alarm存在,并且已经到点
                    (*p)->signal |= (1<<(SIGALRM-1));//新增一个警告信号量
                    (*p)->alarm = 0;//警告清空
                }
                //如果该进程为可中断睡眠状态 则如果该进程有非屏蔽信号出现就将该进程的状态设置为running
            if (((*p)->signal //有singal
                    & ~(_BLOCKABLE & (*p)->blocked)) && //并且非阻塞
                        (*p)->state==TASK_INTERRUPTIBLE) //并且状态是可中断的
                (*p)->state=TASK_RUNNING;
        }

/* this is the scheduler proper: */
    // 以下思路,循环task列表 根据counter大小决定进程切换
    while (1) {
        c = -1;
        next = 0;
        i = NR_TASKS;
        p = &task[NR_TASKS];//从最后一个任务开始循环
        while (--i) {
            if (!*--p)//task结构体是空,继续循环
                continue;
            //task结构体不为空,说明有进程
            if ((*p)->state == TASK_RUNNING && (*p)->counter > c)//找出c最大的task
                c = (*p)->counter, next = i;
        }
        if (c) break;//如果c找到了,就终结循环;如果为0,说明所有进程的时间片都用光了
        //如果没有找到最大时间片的进程,就根据优先级进行时间片的重新分配
        for(p = &LAST_TASK ; p > &FIRST_TASK ; --p)
            if (*p)//这里很关键,在低版本内核中,是进行优先级时间片轮转分配,这里搞清楚了优先级和时间片的关系
            //counter = counter/2 + priority
                (*p)->counter = ((*p)->counter >> 1) +
                        (*p)->priority;
    }
    //切换到下一个进程 这个功能使用宏定义完成的
    switch_to(next);
}
任务切换前面的代码容易理解,最后一个switch_to的代码如下:首先声明了一个_tmp的结构,这个结构里面包括两个long型,32位机里面long占32位,声明这个结构主要与ljmp这个长跳指令有关(任务跳转就是通过ljmp指令实现的),这个指令有两个参数,一个参数是段选择符,另一个是偏移地址,所以这个_tmp就是保存这两个参数。再比较任务n是不是当前任务,如果不是则跳转到标号1,否则交互ecx和current的内容,交换后的结果为ecx指向当前进程,current指向要切换过去的新进程;最后执行长跳,%0代表输出输入寄存器列表中使用的第一个寄存器,即"m"(*&__tmp.a),这个寄存器保存了*&__tmp.a,而_tmp.a存放的是32位偏移,_tmp.b存放的是新任务的tss段选择符,长跳到段选择符会造成任务切换;
/*
 *    switch_to(n) should switch tasks to task nr n, first
 * checking that n isn't the current task, in which case it does nothing.
 * This also clears the TS-flag if the task we switched to has used
 * tha math co-processor latest.
 */
// 进程切换是用汇编宏定义实现的
//1. 将需要切换的进程赋值给当前进程的指针
//2. 将进程的上下文(TSS和当前堆栈中的信息)切换
#define switch_to(n) {\
struct {long a,b;} __tmp; \
__asm__("cmpl %%ecx,_current\n\t" \
    "je 1f\n\t" \
    "movw %%dx,%1\n\t" \
    "xchgl %%ecx,_current\n\t" \
    "ljmp %0\n\t" \
    "cmpl %%ecx,_last_task_used_math\n\t" \
    "jne 1f\n\t" \
    "clts\n" \
    "1:" \
    ::"m" (*&__tmp.a),"m" (*&__tmp.b), \
    "d" (_TSS(n)),"c" ((long) task[n])); \
}
这里的切换是通过TSS实现的,这也是x86硬件提供的切换方式,图示如下:
3、进程(为了便于辨识,这里叫A进程)通过schedule开始执行后,不太可能一直运行,中途可能需要等待,比如等待需要某些资源,这时就需要主动把cpu让出去,让其他task执行,避免自己“占着茅坑不拉屎”,这时就需要让进程sleep了,0.11版本的linux是这么干的: 最核心的就是把task结构体中的state改成TASK_UNINTERRUPTIBLE后重新调用schedule函数运行其他任务;由于本任务的状态已经不是TASK_RUNNING了,所以schedule函数不会跳转到当前task执行!注意:调用schedule函数后,如果有时间片高的进程B,会通过ljmp跳转到B进程执行,所以A进程的schedule此时时不返回的,导致下面的if(tmp)代码是不执行的!直到其他某个进程比如C进程调用wake_up函数,把A进程的状态改成runable,C进程再调用schedule函数,A进程才可能继续执行后续的if(tmp)代码!
// 把当前任务置为不可中断的等待状态,并让睡眠队列指针指向当前任务。
// 只有明确的唤醒时才会返回。该函数提供了进程与中断处理程序之间的同步机制。函数参数P是等待
// 任务队列头指针。指针是含有一个变量地址的变量。这里参数p使用了指针的指针形式'**p',这是因为
// C函数参数只能传值,没有直接的方式让被调用函数改变调用该函数程序中变量的值。但是指针'*p'
// 指向的目标(这里是任务结构)会改变,因此为了能修改调用该函数程序中原来就是指针的变量的值,
// 就需要传递指针'*p'的指针,即'**p'.
void sleep_on(struct task_struct **p)
{
    struct task_struct *tmp;

    // 若指针无效,则退出。(指针所指向的对象可以是NULL,但指针本身不应该为0).另外,如果
    // 当前任务是任务0,则死机。因为任务0的运行不依赖自己的状态,所以内核代码把任务0置为
    // 睡眠状态毫无意义。
    if (!p)
        return;
    if (current == &(init_task.task))
        panic("task[0] trying to sleep");
    // 让tmp指向已经在等待队列上的任务(如果有的话),例如inode->i_wait.并且将睡眠队列头的
    // 等等指针指向当前任务。这样就把当前任务插入到了*p的等待队列中。然后将当前任务置为
    // 不可中断的等待状态,并执行重新调度。
    tmp = *p;
    *p = current;
    current->state = TASK_UNINTERRUPTIBLE;
    schedule();
    // 只有当这个等待任务被唤醒时,调度程序才又返回到这里,表示本进程已被明确的唤醒(就
    // 续态)。既然大家都在等待同样的资源,那么在资源可用时,就有必要唤醒所有等待该该资源
    // 的进程。该函数嵌套调用,也会嵌套唤醒所有等待该资源的进程。这里嵌套调用是指一个
    // 进程调用了sleep_on()后就会在该函数中被切换掉,控制权呗转移到其他进程中。此时若有
    // 进程也需要使用同一资源,那么也会使用同一个等待队列头指针作为参数调用sleep_on()函数,
    // 并且也会陷入该函数而不会返回。只有当内核某处代码以队列头指针作为参数wake_up了队列,
    // 那么当系统切换去执行头指针所指的进程A时,该进程才会继续执行下面的代码,把队列后一个
    // 进程B置位就绪状态(唤醒)。而当轮到B进程执行时,它也才可能继续执行下面的代码。若它
    // 后面还有等待的进程C,那它也会把C唤醒等。在这前面还应该添加一行:*p = tmp.
    if (tmp)                    // 若在其前还有存在的等待的任务,则也将其置为就绪状态(唤醒).
        tmp->state=0;
}
上述整个过程图示如下:
唤醒进程的代码也很简单,如下:核心也是把task的state改成0,也就是runable!注意:这里把*p=NULL是为啥了? 唤醒进程后,进程终于可以从sleep_on函数中的schedule()下一行代码开始运行,此时会通过tmp->state=0把状态改成runable,所以如果这个进程下次再被sleep时,wake_up这里不需要再设置状态了!
void wake_up(struct task_struct **p)
{
    if (p && *p) {
        (**p).state=0;
        *p=NULL;
    }
}
4、进程的代码运行完毕,用户也拿到了想要的结果,进程就可以销毁了;销毁进程的入口在kernel/exit.c/do_exit()函数里,流程也不复杂:
释放ldt占用的内存
如果是某个进程的父进程,更子进程的新父进程为1号进程
关闭文件
关闭终端、清空协处理器
给父进程发signal
重新调度
int do_exit(long code)
{
    int i;
    //释放内存页
    free_page_tables(get_base(current->ldt[1]),get_limit(0x0f));
    free_page_tables(get_base(current->ldt[2]),get_limit(0x17));
    //current->pid就是当前需要关闭的进程
    for (i=0 ; i<NR_TASKS ; i++)
        if (task[i] && task[i]->father == current->pid) {//如果当前进程是某个进程的父进程
            task[i]->father = 1;//就让1号进程作为新的父进程
            if (task[i]->state == TASK_ZOMBIE)//如果是僵死状态
                /* assumption task[1] is always init */
                (void) send_sig(SIGCHLD, task[1], 1);//给父进程发送SIGCHLD
        }
    for (i=0 ; i<NR_OPEN ; i++)//每个进程能打开的最大文件数NR_OPEN=20
        if (current->filp[i])
            sys_close(i);//关闭文件
    iput(current->pwd);
    current->pwd=NULL;
    iput(current->root);
    current->root=NULL;
    iput(current->executable);
    current->executable=NULL;
    if (current->leader && current->tty >= 0)
        tty_table[current->tty].pgrp = 0;//清空终端
    if (last_task_used_math == current)
        last_task_used_math = NULL;//清空协处理器
    if (current->leader)
        kill_session();//清空session
    current->state = TASK_ZOMBIE;//设为僵死状态
    current->exit_code = code;
    tell_father(current->father);
    schedule();
    return (-1);    /* just to suppress warnings */
}
在执行do_exit方法的时候,间接调用了一些重要的函数,如下:
(1)release函数:释放task结构体本身占用的内存,并重新调度
void release(struct task_struct * p)
{
    int i;

    if (!p)
        return;
    for (i=1 ; i<NR_TASKS ; i++)//在task[]中进行遍历
        if (task[i]==p) {
            task[i]=NULL;
            free_page((long)p);//释放内存页
            schedule();//重新进行进程调度
            return;
        }
    panic("trying to release non-existent task");
}
(2)给指定的进程发送信号,本质就是通过task结构体给对方进程的signal字段增加一个值!为了确保安全,给对方发信号需要具备以下三个条件之一:
权限不为0
euid确实是当前进程的
系统超级用户
static inline int send_sig(long sig,struct task_struct * p,int priv)
{
    if (!p || sig<1 || sig>32)
        return -EINVAL;
    if (priv //要么权限不为0
        || (current->euid==p->euid) //要么euid相等(当前进程使用者)
            || suser()) //要么是超级用户才能给另一个进程发信号,这里可以确保安全,避免接收到恶意信号
        p->signal |= (1<<(sig-1));
    else
        return -EPERM;
    return 0;
}
(3)关闭进程间对话的session:居然也是给task结构体的signal字段增加一个值!
//关闭session
static void kill_session(void)
{
    struct task_struct **p = NR_TASKS + task;//指向最后一个task结构体
    while (--p > &FIRST_TASK) {//从最后一个开始扫描(不包括0进程)
        if (*p && (*p)->session == current->session)//确认确实是当前会话
            (*p)->signal |= 1<<(SIGHUP-1);
    }
}
(4)通知被销毁进程的父进程:通过遍历task结构体数组找到父进程的task结构体,然后增加signal字段的sigchld值!(本人调试x音的时候ida经常会收到这个消息,只要点击确认x音就直接退出)
static void tell_father(int pid)
{
    int i;
    if (pid)
        for (i=0;i<NR_TASKS;i++) {
            if (!task[i])
                continue;
            if (task[i]->pid != pid)
                continue;
            task[i]->signal |= (1<<(SIGCHLD-1));//找到父亲发送SIGCHLD信号
            return;
        }
/* if we don't find any fathers, we just release ourselves */
/* This is not really OK. Must change it to make father 1 */
    printk("BAD BAD - no father found\n\r");
    release(current);//释放子进程
}
总结:这里的tell_father、kill_session都是通过发送signal实现的;发送signal的方式也很简单:直接找到对方的task结构体,通过“或”逻辑运算增加信号量!
(5)还有一个“挂羊头、卖狗肉”的方法:sys_kill如下:名字叫sys_kill,实际上是在给目标task结构体发信号!linux的shell中kill命令就是用这个函数实现的!
// 系统调用 向任何进程 发送任何信号(类比shell中的kill命令也是发送信号的意思)
int sys_kill(int pid,int sig)
{
    struct task_struct **p = NR_TASKS + task;//指向最后
    int err, retval = 0;

    if (!pid) while (--p > &FIRST_TASK) {
        if (*p && (*p)->pgrp == current->pid) //如果pid=0,就给当前进程所在的进程组发信号
            if (err=send_sig(sig,*p,1))
                retval = err;
    } else if (pid>0) while (--p > &FIRST_TASK) {//pid>0给对应进程发送信号
        if (*p && (*p)->pid == pid)
            if (err=send_sig(sig,*p,0))
                retval = err;
    } else if (pid == -1) while (--p > &FIRST_TASK)//pid=-1给任何进程发送
        if (err = send_sig(sig,*p,0))
            retval = err;
    else while (--p > &FIRST_TASK)//pid<-1 给进程组号为-pid的进程组发送信息
        if (*p && (*p)->pgrp == -pid)
            if (err = send_sig(sig,*p,0))
                retval = err;
    return retval;
}
5、父进程创建子进程时,有时候需要等待子进程执行完毕,需要调用sys_waitpid函数阻塞父进程自己,如下:如果子进程是僵死状态,就把子进程运行的时间叠加到父进程,然后释放子进程的task结构体!如果子进程还在运行,父进程通过schedule让出cpu,把自己阻塞;下次被唤醒后再次检查子进程是否给自己发送了SIGCHLD信号;如果没收到,重复检查的过程,直到子进程庄涛变为僵死后返回继续执行后续的代码!
int sys_waitpid(pid_t pid,unsigned long * stat_addr, int options)
{
    int flag, code;
    struct task_struct ** p;

    verify_area(stat_addr,4);//验证区域是否可以用
repeat:
    flag=0;
    for(p = &LAST_TASK ; p > &FIRST_TASK ; --p) {
        if (!*p || *p == current)
            continue;
        if ((*p)->father != current->pid)
            continue;
        if (pid>0) {
            if ((*p)->pid != pid)
                continue;
        } else if (!pid) {
            if ((*p)->pgrp != current->pgrp)
                continue;
        } else if (pid != -1) {
            if ((*p)->pgrp != -pid)
                continue;
        }
        switch ((*p)->state) {
            case TASK_STOPPED://子进程是stop状态
                if (!(options & WUNTRACED))
                    continue;
                put_fs_long(0x7f,stat_addr);
                return (*p)->pid;
            case TASK_ZOMBIE://子进程是僵死状态:把子进程消耗的时间叠加到父进程,并释放子进程的结构体
                current->cutime += (*p)->utime;
                current->cstime += (*p)->stime;
                flag = (*p)->pid;
                code = (*p)->exit_code;
                release(*p);
                put_fs_long(code,stat_addr);
                return flag;
            default:
                flag=1;//子进程还在运行,设置flag为1,好让下面的代码执行
                continue;
        }
    }
    if (flag) {//说明子进程状态不是stop或zombie,父进程需要阻塞等待,最直接的办法就是让出cpu
        if (options & WNOHANG)
            return 0;
        current->state=TASK_INTERRUPTIBLE;//设置程可种段的
        schedule();//父进程阻塞,让出cpu
        //当父进程再次被唤醒后,检查一下是否收到了子进程结束的通知;如果没有,再次从repeate开始执行
        if (!(current->signal &= ~(1<<(SIGCHLD-1))))
            goto repeat;
        else
            return -EINTR;
    }
    return -ECHILD;
}
这么一圈代码解读下来,个人觉得的需要总结的一些要点:
所谓进程,本质上就是task结构体;结构体包含了很多字段属性,用来描述进程的方方面面(借鉴了面向对象的思想);
对于进程的各种操作,本质上就是修改task结构体的属性,通过这些属性的逻辑组合完成各种复杂的功能;这里有点像汽车:汽车本质上也是由螺丝钉、齿轮、轴承等基础零配件构成的,但这些零配件通过一定的逻辑关系结合,就实现了复杂的功能!
找到task数组就等于找到所有进程的task结构体;
为了便于记忆和理解,整理了一些要点:

后续解读linux源码的时候,会发现大量的struct,每个struct又有很多字段构成,了解清楚每个字段的含义才能真正理解操作系统的各个细节,这里简单总结一下struct内部各个变量的类型:
指针:也就是地址
计数/计量的,比如size、length、index、count、height、amount、sequenceNo等
有应用业务意义的值:id、name等
标记位/控制位:flags等
参考:
1、源码下载:https://mirrors.edge.kernel.org/pub/linux/kernel/
https://github.com/karottc/linux-0.11
2、https://www.bilibili.com/video/BV1tQ4y1d7mo?p=1 操作系统体系结构
3、https://www.bilibili.com/video/BV1VJ41157wq?spm_id_from=333.999.0.0 linux操作系统-构建自己的内核
4、https://blog.csdn.net/heiworld/article/details/25397155 对linux 0.11版本中switch_to()的理解
5、https://www.rutk1t0r.org/2016/12/23/Linux%E5%86%85%E6%A0%B80-11%E5%AE%8C%E5%85%A8%E6%B3%A8%E9%87%8A-%E5%85%B3%E4%BA%8E%E4%BB%BB%E5%8A%A1%E7%9D%A1%E7%9C%A0%E5%92%8C%E5%94%A4%E9%86%92%E7%9A%84%E7%90%86%E8%A7%A3/ Linux内核0.11完全注释 关于任务睡眠和唤醒的理解
6、https://blog.csdn.net/u012351051/article/details/79646843 linux-0.11/init/main.c流程分析